As it's Saturday I'll be off out shortly to attend a workshop with Pauline Butcher and will be playing with Visible Image and Lavinia stamps Whooo Hooo ! So looking forward to it and I'll share my makes on here in a later post.
Here's today's project
I used another scrap of the fabric I decorated using ProMarkers and Alcohol Blending Solution. I still have a small amount of fabric left over from the journal cover I made with the decorated fabric so there will be a few more cards made.
For this card I attached the fabric over a piece of blue cardstock, applied some turquoise Stickles - mirroring the fabric design and embellishing with a little bling.
The sentiment is from the 'Sassy Salutations' stamp set from SU! Those of you who have been visiting regularly will no doubt note that these SS sentiments have been appearing rather a lot lately, I just love these sentiments and make no apologies for using them on many of my projects !
Thanks for dropping by to check today's project, hope you like it.
The musings of a totally obsessed Craftaholic! Stamps, papercrafts, quilting, knitting..... I just love to craft.
Saturday, 19 September 2015
Thursday, 17 September 2015
Christmas is Coming....
It's that time of year when I start to get a bit concerned that I've left it too late to get enough Christmas cards made. So I thought I'd better get on and make a few and today's project is one of them.
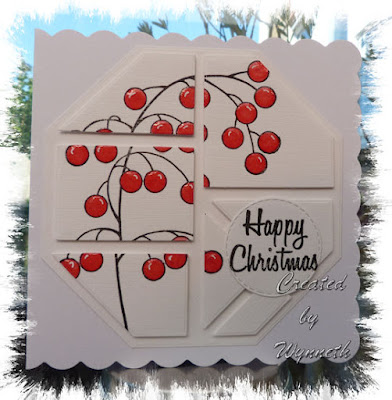
I've used a couple of fairly new stash items for my card, Crealies No 3 Modern Patchwork die set and the lovely Bubble Bloom Snow Flower stamp set by Woodware. I really like this stamp and I thought it would work well used with the Crealies dies.
The image was stamped onto linen finish cardstock using Archival Black ink then coloured using Brusho Ost. Red pigment - a few crystals dropped onto a pallet and a little water added to create liquid paint. Once dry I added small touches of white pen to create highlights and then Glossy Accents over the top.
The sentiment is from the Woodware stamp set, which I stamped onto a circle of white linen finish card cut out using the Crealies Stitched Circle die set.
Thanks for dropping by to check out my project, I hope you liked it.Monday, 14 September 2015
Happy 18th Harry !
Happy September 14th dear friends. It's a super exciting day for my family as my eldest grandson is celebrating his 18th Birthday today. I really can't believe that it's been eighteen years since the moment I was there when he took his first breath. So just wanted to say "Happy Birthday Harry".
Here's the card I made for him
and a close up pic of the detail
Here's the card I made for him
and a close up pic of the detail
I used an 8x8 scalloped edge base card and sprayed Dylusions Post Box Red and London Blue inks lightly over the centre of a slightly smaller square of white card. I then over-stamped the largest image from the Stampers Anonymous Tim Holtz 'Ledger Script' stamp set over the ink splats, using Memento Paris Dusk Ink.
Using Crealies bits and pieces stamp No 29 and Versamark I stamped a couple of times over the background and heat embossed with Detail Black embossing powder. I sprinkled Shabby White Frantage embossing powder randomly over the design and heated from underneath. I layered the background over a slightly larger piece of red cardstock.
Using a TCW jenni bowlin mini number stencil I applied Versamark ink through the '1' and '8' and heat embossed using the detail black embossing powder onto a scrap of white card. I then layered it over a scrap of red card.
Finally I stamped the Happy Birthday sentiment from the SU! Sassy Salutations stamp set onto another scrap of white card, again heat embossing with the detail black EP. I then mounted this onto a scrap of red cardstock and attached to the background using foam pads.
Thank you so much for dropping by to check my project today, I hope you enjoyed your visit.
Thursday, 10 September 2015
Christmas Batch
Hi there and welcome to Crafting Grandma's little creative space.
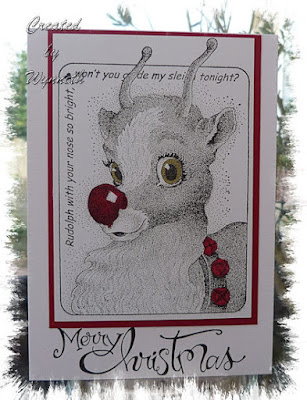
I'm sharing a Christmas card batch make as today's project. I've fallen way behind my plan to get all this year's festive cards made before the end of September, so thought I'd better get on and do a batch make. I used two different colours of cardstock for layering, half of the batch with black and the other half red.
I'm not sure if I prefer the black ones or the red, which do you prefer ?
Tools and materials used :-
- Hampton Art Rudolph stamp - he's such a cutie
- Versafine black ink
- Spectrum Noir Aqua Pens - to colour nose, jinglebells and eyes
- SU! Sassy Salutations stamp set - Merry Christmas sentiment
Tuesday, 8 September 2015
Owl hold the door open for you !
Happy Tuesday dear blog friends, we are enjoying some lovely late summer sun here in my part of Cornwall, I do hope you are also enjoying some nice weather wherever you are.
Today's post is just a short one, I thought I'd share a sewing project I finished recently. Isn't this Owl Doorstop is such a fun chap ? I love him.
I visited our local Dunelm Store recently looking for new bedding and whilst there spotted a Great British Sewing Bee kit to make an Owl Doorstop which was marked down to half price. I needed to make a tall door stop to hold our conservatory door open and I thought this would be perfect.
The kit contained all the fabrics needed, iron on stabiliser and a calico bag to hold rice or sand and provide a weight inside the owl. I used rice to fill the bag, packed the toy stuffing from the kit into the head and ears then inserted the weighted bag.
I used an applique stitch on my sewing machine to stitch around all the pieces of the owl, sewing with black thread as a contrast to the many colours in the fabrics.
He works perfectly to hold the door open and I'm so pleased with how it turned out.
Thanks for dropping by today to check out my latest projects.
Thursday, 3 September 2015
Another 'Crazy' School Day
Hi there friends, as you can tell from the title of this post, I have a second 'New School' card to share with you, again using my Tim Holtz Bird Crazy stamp set and matching dies and the set of Crazy Things stamps.
This card is for my younger Grandson who starts 'Big' school next week. As on the card I shared on here yesterday I've used the same stamp and die sets.
Dylusion Ink Sprays used on this card were Lemon Zest and Vibrant Turquoise. Crazy images stamped with Tuxedo Black Memento ink and coloured with ProMarkers with a little Glossy Accents used on spec lenses, hatband and pencil. I created the sentiment on my computer and cut out using a die from the Crealies Stitched Circle die set.
I'm also using this card as my second entry for this week's Simply Less is More challenge.
Thanks for dropping by today.
Wednesday, 2 September 2015
Happy First Day at College
Hi friends, I'm a little late posting up today's project but better late than never !
I've had the Bird Crazy by Tim Holtz stamp set from Stampers Anonymous for a while and just love them. Then recently I acquired the matching dies and Crazy Things stamp set to go with them.
I couldn't wait to use all my new stash and thought they would be perfect for cards to send to my Grandsons as they are both heading off to college and a new school this year - exciting times ahead for them.
This week's challenge on the Simply Less is More blog asks us to use Sprays/Mists on our cards and I thought this would be a perfect combination with the 'Crazies' for the cards I needed to make.
I dug out my Dylusions sprays and for this card used Fresh Lime, Cut Grass and White to create the background.
I stamped the crazy bird image using Tuxedo Black Memento ink and then cut it out using the matching dies, cutting two beaks and eyes so I could layer them up. The mortar board hat, pencil and tie were stamped then cut out with scissors. I coloured all the image parts using ProMarkers then assembled all the parts before attaching to the background. I dragged a PM pen around the edges of the background to lift it a little against the 5x7 basecard rather than adding another layer of coloured cardstock underneath. A touch of Glossy Accents on eyes, beak and pencil was the finishing touch.
As I needed a personal specific sentiment to complete the design and didn't have a suitable stamp, I created one on my computer and cut out using a die from my Crealies Stitched Circle die set. I then attached the sentiment to the card using foam pads.
I'm hoping my card will amuse my eldest Grandson and I'm also entering it for this week's LIM challenge.
Thanks for dropping by to check on today's project, I hope you've enjoyed your visit. Are you a Crazy Bird fan like me ?
Tuesday, 1 September 2015
Grey Brusho Merry Christmas
Good morning friends, I hope those of you in the UK have had a lovely Bank Holiday weekend. The weather wasn't too good here in my part of Cornwall, but we managed to stay dry.I'm still in the swing of making Christmas cards and the project I'm sharing with you today is another one I made recently.
I created a background using water colour card and just grey Brusho pigment. I'm always amazed at how many different colours burst out of the colour when a few sprinkles of brusho are spritzed with water.
The main image is an Indigo Blue stamp which I stamped using Versamark then heat embossed using Black Detail embossing powder. Over the top of the panel I used Shabby Blue embossing powder, scattered lightly and heated from underneath. The sentiment is from the SU! Sassy Salutations stamp set, stamped onto the background using Versafine Black ink.
You can just see a hint of blue glitter from the shabby blue embossing powder in this close up shot.
The fir cones, bough and twig were diecut from white card using Marianne's dies, then a touch of Memento London Fog ink added whilst the dies were still in place. Finally touches of Stardust Stickles was added on parts of the diecuts.
I attached the panel over a slightly larger layer of black cardstock and then attached to a 6x6 scalloped edge base card.
Thanks for dropping by to check out my latest project, I hope you enjoyed your visit.
Subscribe to:
Posts (Atom)