Thursday 31 January 2013

A Different Corner

It's thursday again (already) so we have a new challenge starting over on the Cute Card Thursday blog today.  Challenge #254 has the theme of "A Different Corner" and this week's prize sponsor is Alota Rubber Stamps.


Now you can interpret this theme in many ways, I decided to make my 'different corner' by leaving it completely empty and rounding it off, whilst leaving all the other corners with sharp angles.

I needed to create a 60th birthday card for a male friend and opted to use the yummy set of Dylusions stamps - which is my current favourite. 

I stamped the large birdie onto a piece of white card, then used one of the flower/leaf stamps which I think looks like it could be balloons (yeah, maybe it's only ME who can see this eh ? just humour me !). 

The bird was coloured with my Copics and I stamped the fun sentiment from a set of stamps by Hampton Arts, using SU! Cherry Cobbler ink.  I cut out small ovals from SU! So Saffron cardstock using a set of nesties, then added peel off numbers in gold before attaching them using foam pads.

The image layer was then matted over more Lucky Limeade card before attaching to the card.  I used a Spellbinders pennant die to cut two pieces from LL and one from the SS card and attached them to the bottom right corner.  I used a tiny dotty circle stamp from a freebie set of stamps and Cherry Cobbler ink to add a spot of colour on each one.  I lined them up 'by eye' and think I managed to get them in a straight line !

Thanks for dropping by to check out my project today, if you get the chance do pop over and take a look at the rest of the DT's awesome creations on the CCT blog and get full details for this week's challenge.

Wednesday 30 January 2013

From our Home to Yours at Christmas

Happy wednesday dear blogging friends, the sun is shining here in my part of Cornwall today and that makes me happy !  I see I'm lucky enough to have gained a few more lovely Followers, welcome dear friends, I do hope you call back from time to time to see what I'm getting up to in my crafting space. 

Today's project is my entry for a challenge over on the 'Craft Mad and Loving It' group on Craftbubble.  This is a new set of month-long challenges started for 2013 and every 25th of the month throughout the year a new theme is published.  Some members of the group were rushing to get sufficient cards made in time for last Christmas(me being one of them !) and we thought it would be a great idea to make at least one a month throughout the year so we would have a minimum of  12 cards finished. 

 
My pal Kathy set this first challenge and she gave us a sketch and a recipe to work with and we can use all elements or choose anything from the list. 
 
The recipe included lots of glitter, a button, stamped image and patterned paper.  I followed the sketch and the recipe, with the exception of the button as this card will most likely need to go through the post and adding buttons can often make the card too thick to be within the lowest price band for postage.
 
The stamped image of the room is by Magnolia and the lovely gift boxes are from a set of stamps by Recollections sold by Michaels Stores in the USA.  I coloured the images using Copics and added Glossy Accents on the door to give the glass panels a realistic look, on the lamp beside the door and on the gift box ribbons to give them dimension.  
 
The main image was cut out using a set of nestie dies then attached over a layer cut with a slightly larger die from the same set.  I added a fancy frame over the top cut using another set of Spellbinders dies, which matches the shape of the nesties exactly.
 
The tree was cut using a Marianne's die and the holly spray using a Cheery Lynn's die.  For the snow I used Glamour Dust over Glossy Accents, which is my favourite combination as IRL it is very sparkly.  Finally some Star Dust Stickles added liberally over the design and my card was done.  

That's at least one Christmas card in my stock for this year, so I have made a start.

It's great to have you stop by to check out today's project, thanks so much for taking the time to visit.

Monday 28 January 2013

Create, Inspire, Dream


The project I'm sharing with you today is a card I've created to enter this week's challenge over on the Simply Less is More blog
 
We have this sketch to work with and, of course, it must be in the  CAS style. 
 
 
For my design I've used a couple of stamps from a recently acquired set of  Stampers' Anonymous Tim Holtz stamps.  I stamped the images using SU! Crumb Cake ink then overstamped the words from a set of  stamps from The Artistic Stamper using Memento Paris Dusk ink.
 
Not much more I can tell you about my card really, I am happy with the finished design and love the contrast between the colours of the Crumb Cake and Paris Dusk inks.  .
 
Thanks for dropping by today, have a great day whatever you have planned.


Sunday 27 January 2013

4 Crafty Chicks

Today's project is an entry for a challenge I haven't come across before, but a couple of my crafting pals had links on their blogs to 
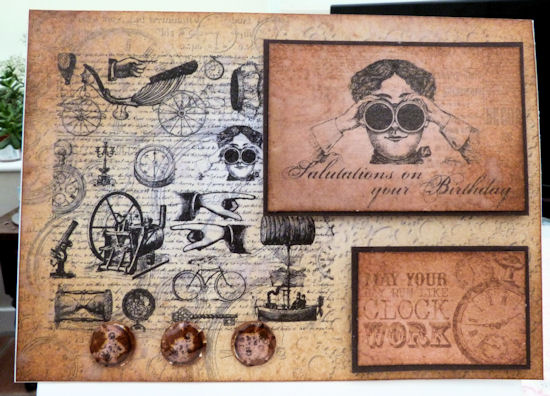
4 Crafty Chicks and I just had to check it out.  This week their challenge #126 has Buttons as the theme and here's the card I'm entering.


When I went to the Crafts4Crafters show at Exeter Westpoint last thursday, there were a number of exhibitors selling materials and tools for Needle Felting.  Now this is one craft I haven't tried (yes there are still some !) and despite being attracted by the gorgeous colours of woolly fleece on offer, I studiously ignored them all as I need to get hooked on another new craft like I need a hole in the head ! 

All was well during the day but when I met up with my pals for a coffee towards the end of our stay, I noticed there was one exhibitor (New Forest Mohair) who was offering free Needle Felting taster sessions.  Again, I was able to resist temptation....... right up to the moment a couple of my pals went over to the stand and sat down to have a 'play'. 

Well, you can guess the rest right ?  Yes, of course I HAD to have a go myself and OF COURSE I wanted to do some more after I'd finished my taster session.  You've guessed it, I ended up buying a starter kit, which was actually quite a reasonable price at just £4.50.   I'm such a 'pushover' for anything new...ha..ha..

Here's a pic of my handiwork from the taster session - can you see the picture I created ?  Well, in my world it is a seascape, sand at the bottom, waves, horizon, sky with clouds and the sun shining brightly as you move to the top.  Can't see it ? - just humour me !

 
Here's the starter kit I purchased, see what a bargain it was ?  After all if I'd booked on any of the workshops running throughout the day it would have cost £6 or more and this taster session was FREE (that's my excuse and I'm sticking to it)
 
 
OK, back to my card and how I created it.  I cut a small square of the pre-felt (the base fabric you needle felt the fleece on to) and added the dyed fleece in stripes diagonally using all the colours from the starter pack.  I sewed a purple button in the centre then glued it to a square of cardstock with two of the corners rounded.  Finally I added a sentiment, using stamps from a Kaiser Craft set of words and definitions which I also bought at Westpoint, using Memento Sweet Plum ink. 
 
WARNING !  it's going to get a bit 'deep' from here on folks. 
 
I selected this particular word and definition for my sentiment as I felt it perfectly describes the creative process of designing my card and I love the shape of the word on the stamp - yeah I have been told I'm weird on more than one occasion.  Do I care ?  I took it as a compliment ! 
 
JOURNEY
travelling from one place to another; 
passage or progress from one stage to another;
the journey to success.
 
In creating the needle felted square the base materials travelled/progressed from one form/stage to another before emerging as the finished item.  Let's hope my challenge entry is on a journey to success !
 
Hope you've enjoyed seeing something a little different today and thanks for taking the time to visit.


Saturday 26 January 2013

The Perfect Blend

Happy Saturday Blogging pals, hope you have a nice weekend in prospect.  I'm hoping to fit in crafting time around the dreaded chores myself as I need to catch up and get some birthday cards made and I have a couple of quilting/sewing projects on the go.  Wish me luck !

Today's project is a CAS style card which I'm entering for the current CAS-ology challenge.  The Cue Card for this week is DRINK and one of my favourite drinks is Coffee.


I used a set of stamps and matching dies from Lil' Inkers to create the coffee cup and wrap, stamping the wrap image onto some SU! Lucky Limeade cardstock before cutting out with the die.  I stamped the lid a second time on a scrap of the LL card then cut out part of the image by hand to add a band of colour on the lid.

There's a touch of Glossy Accents on the heart for dimension.  I rounded the cup and lid slightly with my fingers and attached using Pinflair Glue, putting more down the centre to raise it up and give a 3D effect, rather than adding the flat image.

Using a set of Framelits from SU!  I cut a layer from Early Espresso and a smaller layer from Crumb Cake cardstock and stacked them up under the coffee cup image.

On the basecard I stamped the coffee stain image from Queen Kat Designs using Memento Rich Cocoa ink.  I love this stamp as I think it's so realistic looking.  Finally I stamped the lovely sentiment from the Lil' Inkers set in the bottom righthand corner using the Rich Cocoa ink.

That's it, clean and simples !

Thanks for visiting and checking out today's project.

Friday 25 January 2013

Sugar Block Club - January BoM

Happy Friday folks, hope you're having a great day.

Today I'm sharing a quilting project with you, it's a 12x12 inch block and I'll be making a different one each month throughout the year following the patterns I receive and may stitch them all together to form a quilt when I've finished all twelve.


I enrolled in the Stitchery Dickory Dock's Sugar Block Club BOM (block of the month) for 2013 at the end of last year and finished the block for January a couple of days after receiving the pattern.  I have ordered the fabric bundle suggested from Sam, but so far it hasn't arrived so I used fabrics I already had in my stash.

I did enjoy making this block but after I'd finished I thought it would have looked better if I'd chosen to use more contrasting fabrics which would have revealed the design a little more clearly.  I will make this block again using the Sugar Block Club fabrics when they arrive, although I do love the overall colour scheme of this first block.

My pal Linda, her pal Karen and myself all joined the SB Club and we decided we would share our monthly blocks on our blogs on the last friday of each month, hence my post today.  I'm sure that, despite working with the same pattern, all our blocks will look completely different.

Thanks for dropping by to check out my project today, hope you've enjoyed your visit. 

Thursday 24 January 2013

Out of This World

Happy thursday folks, hope you're coping OK in the wintery weather most of us in the UK seem to be enduring.  Stay warm and safe.

As it's thursday it means we have a new challenge starting over on Cute Card Thursday today.  Our prize sponsor for Challenge #253 is Rick St Dennis who's digi images are well worth checking out if you're looking for something a bit different.  The theme for this week's challenge is 'Out of This World'.


For my DT card I selected 'Euro Payasos' by Rick for my image, as soon as I saw it the design for my card popped into my head.  I wanted to create a Valentine card that wasn't the typical black/red hearts and kisses style and this image was perfect.

Firstly I created a background using white cardstock and Dylusions inks which I spritzed and splashed over the A4 sized card.  Once dry I selected a part of the page I liked best and cut it to fit the front of a 6x6 scalloped square base card, with room to add a layer of bright pink card under it to create a narrow border.  I rounded the corners on the pink layer and inked layer to reflect the shape of the scalloped card.

I overstamped the stars image - which was a freebie stamp with Craft Stamper Magazine recently -across the top of the inked background using black Versafine ink.  Using a fancy heart die from X-cut and my Cuttlebug, I debossed the heart into the centre of the background (although this isn't showing up too well in the pic, it is easily seen IRL. 

The image was coloured with Promarkers and Fleximarkers, then fussy cut out before adding over the inked background.  I added touches of Stardust Stickles over various parts of the design creating sparkly highlights.   I haven't used feathers on my designs for such a long time, I thought I'd dig them out and they look just right set behind the image, don't you think ? 

The sentiment was created on my computer and cut out using a Nellie's Choice heart die then distressed with Picked Raspberry DI.  Their pom-poms were made with a Waco Pearlmaker Pen

Do hop over to the CCT blog to check out all the 'out of this world' creations from the rest of the DT and you'll find full details of the challenge there too. 

Thanks for dropping by today, hope you enjoyed your visit - let me know what you think of my out of this world card. 

Wednesday 23 January 2013

A Long Tall Birdie Told Me......

Good day dear bloggers, are you managing to stay warm and safe during this wintery weather ?  I do hope so.

Today's project is a 'just a note to say' card created in the clean and simple style I love so much.  As I write, this one is winging it's way to a lovely crafting pal, along with a couple of fabric digi camera cases I've made for her.  I'll share a pic of the cases once I know they've arrived safely.


I used the set of stamps by Dylusions which includes this fabulous birdie, the whole set is just so gorgeous and versatile, I love it and it has to be one of my favourites at the moment.  I stamped this fine chap directly on to the base card and added a little colour using my Copics.  Stamped the sentiment bottom right and the design was complete - perfick ! 

I hope my pal likes it when it arrives.  I used the same set of stamps to create a 60th birthday card I needed to make, I'll be sharing that one with you next thursday as I used next week's theme for the Cute Card Thursday challenge for my design which will be my DT card for next week. 

Challenge #86 over on the CAS-ual Fridays blog has the theme 'Long and Short', so as my card has a long side and a short side and has a long image (bird) and a short image (sentiment) I'm entering my card for their challenge - wish me luck !

I'm looking forward to a grand day out tomorrow at the Craft4Crafters show at Exeter Westpoint with three crafting pals, if any of you are planning to be there, let me know, it would be cool to meet any of my Readers/Followers.  So tomorrow there is likely to be just new stash acquisition and very little actual crafting done I think !  Although I don't have much on my shopping/wish list at the moment - some inks, a couple of 12x12 storage boxes and I may be tempted into buying another set of Dylusions stamps perhaps - I'm sure once I get there I'll find all sorts of things I never knew I needed but just HAVE to have !

A short and sweet post from me today, I'm busy finishing off a knitting project for another pal which I'd like to get posted out in the next couple of days.  I've also got a growing list of patchwork/quilting projects and another knitting project I've been asked to make for friends - no rest for the wicked I guess.

Take care and keep on crafting !

Monday 21 January 2013

May Your Day Run Like Clockwork

Good morning Bloggers, how's the weather with you?  If you are in parts of the UK suffering from lots of snowfall and freezing temperatures I do hope you are managing to stay warm and safe.  So far we've avoided all the 'white stuff' here in my part of Cornwall, but today's forecast indicates we might get a little some time today. 

Today's project is a card I've made for a male friend who has a birthday coming up soon. 


I bought the latest Do Crafts magazine last week which had a set of steampunk style stamps as a freebie plus a CD containing matching papers and other elements.  Now I do believe the CD may be an extra gift with the magazine if purchased in Sainsbury's as when I saw the mag elsewhere it had just the free stamps and no CD. 

For the card I created a background layer by combining some of the elements on the CD, printed it off then added Antique Photo DI to distress the whole sheet.  Everything on the card except the brads was added into the design created from the CD, I then printed the two toppers again so I could add them over the base layer for more dimension.  I distressed the toppers with the same DI before matting them over some SU! Early Espresso cardstock.  After printing the matching 'brads' I punched them out and distressed them with the DI before covering with Glossy Accents and adding to the card.

In the pic it looks as if I've been a little too enthusiastic with the DI on the sentiment topper as the text is barely legible !  However IRL it is much clearer and says "May Your Day Run Like Clock Work".   As it's a card for a man I haven't added any 'fripperies' as I believe many of our menfolk prefer not to have ribbons, flowers etc on their cards ! 

I rarely create a card with no stamped elements as stamping and colouring is my favourite method of cardmaking, but the images on this freebie CD are great and I'm pleased with the finished card.  I do hope our friend likes his card when he receives it. 

Thanks for dropping in to check out my project today, let me know what you think of today's card.

Saturday 19 January 2013

Simply For You


The weather here in my part of Cornwall is cold, but luckily we have missed the worst of the snowy weather that many parts of the UK are suffering right now.  Watching the weather forecast earlier this evening I see that we are to have one of the coldest temperatures in the UK overnight, so no doubt we'll have icy and slippy roads here tonight and early tomorrow.  I hope that any of you who are suffering the worst of the weather are managing to stay warm and safe indoors and don't have to venture out into the cold.

Now for today's project I have a little card to share with you.


All of us, I think, need a little stock of those 'just because' cards and in my book the CAS (Clean and Simple) style is perfect for this type of card.  I've made this little square card to send to a friend I used to meet up with regularly for lunch but who moved to another part of the UK just before christmas.   Just want to say "Hi ! thinking of you and hoping you're settled into your new home". 

Last week a lovely friend gave me a set of Stampin Up! stamps she'd somehow managed to 'accidentally' buy twice - how lucky am I ?  It's a set of stamps that has been retired so is no longer available, which is a shame as the images are very sweet and will work for many occasions.

I have a little stock of 4x4 inch cards and envelopes which is a great size for this type of card.  I first stamped the image onto a piece of white cardstock which I cut out using a nestie die then attached this over a layer cut from 'Not Quite Navy' SU! cardstock with the next size up die from the set.  I attached this 'topper' to the base card and stamped the sentiment just underneath.  Simples !

As I used a Stampin' Up! set of stamps which is new to me and a set of nestie dies which I hadn't used before, my card fits the current challenge #62 over on the SUO (Stampin'Up! Only) blog I think as the theme is "New Toys".  SU! don't sell dies the same shape as those I used and the SU! dies I've bought so far aren't the right shape, so I'm hoping the card will still meet their criteria. 

Wish me luck with my entry !

Thursday 17 January 2013

Diamonds are Forever


Thursday has rolled around again so we have a new challenge starting for you this week over on the Cute Card Thursday Blog.   Our theme this week is 'Diamonds are Forever' and  Whimsy Stamps have kindly sponsored our prize. 

As 2013 started I made a resolution for the new year to try and use - as often as possible - stamps which have never been inked or have not seen ink in a long time.  So the first thing I did when I set out to create my DT card for this week was to check out stamps in the back of the cupboard and see if any of them would be appropriate for the theme.  I found this lovely elegant lady stamp in a set from KanBan which I hadn't used before - perfect ! 

I coloured the image using Copics and added some 'diamond' gems to her necklace and earring.  I cut out a diamond shape aperture in the centre of a layer of white card the same size as the front of my basecard.  I don't have a diamond shaped nestie, so used a square die.  I then used the diamond shapes stamp from a set by Stampers Anonymous and stamped using SU! grey on each side top and bottom, overstamped with Memento pink ink to fill in the gaps.

With a piece of silver mirri card and a Cuttlebug embossing folder, I created a layer with de-bossed flowers to sit behind the diamond aperture.   The open roses and rose leaves were cut using Nellie's Choice punch and emboss punches with 'Grapefruit' Stickles in the centres of each bloom.   I used PinFlair glue to raise some of the blooms a little.

A few more 'diamond' gems added around the aperture and a sentiment from Stampers Anonymous stamped using the pink ink and layered over a scrap of the silver card, with Glossy Accents over each letter to give it dimension, finished off the design.  I think there are enough diamonds on this card to fit the challenge, what do you think ?

I hope you enjoyed checking out my project today, you can find all the details for this week's challenge and see the fabulous creations from other members of the DT by visiting the CCT blog. 

Please leave me a comment to let me know you've visited and what you think of today's project, thanks a bunch.

Tuesday 15 January 2013

Little Miss Muffet.......

The project I'm sharing today is one I've been wanting to make for a while to help make sitting at my sewing machine more comfortable.  A nice soft cushion is just what I needed to put on the wooden chair I sit on whilst I sew and when I found the pattern for this pretty design I knew it was just what I wanted.  I had a few fat quarters of fabrics in black and white with sewing related designs on each and I used them to cut out the pattern pieces.

Here's the front of the cushion

 
and the view up close
 
The front of the cushion was constructed from wedge shaped pieces of fabric sewn together to create a circle. I cut a circle from one of the fabrics used on the front to make the cushion backing.

 
Here's a close up shot

As a finishing touch, I covered a couple of buttons using scraps of the leftover fabrics and attached one on front and back.

This 'Little Miss Muffet' is now sitting much more comfortably on her 'Tuffet' ! with a nice softly padded cushion.

Thanks for dropping by to check out today's project, please leave me a comment and let me know if you enjoyed today's post.

Saturday 12 January 2013

Happy Birthday Sweet Sixteen

Yesterday was the sixteenth birthday of the daughter of a friend of mine and my friend asked me to make a special card and a smash-type book for her.  The birthday girl loves Manga style and is a huge fan of pink, so my design brief was to work with these elements.

Here's a pic of the card


These cute 'Painting Bunnies' were created using Queen Kat Design stamps and coloured with Copics.  I used Marianne's dies to cut the large hearts and the smaller woven hearts.  The background papers are from the Nana's Kitchen pack by DCWV and matted over some pretty pink cardstock.  I created the sentiment on my computer and the basecard is a nice large 8x8 size.

Now for the smash-type book.  Again I used stamps from QKD and coloured the images with Copics, here's a pic of the front page.


I used a set of Memory Box alphabet dies to cut out the letters for the sweet sixteen title and the various sentiments were from a set of stamps by QKD.   I added Glossy Accents to the die cut letters to give them dimension and emphasis.

Here's a close up of the image top left


and this is a close up shot of the image bottom right - there's Glossy Accents on the fishbowl and globe, I think you can just see it in the pix.


Here's close up shots of the other two QKD images which I added to inside pages


I bound the book using my 'Bind-it-All' machine and added some pretty pink ribbons on the ring binding.  I hope there was enough pink to keep the birthday girl happy and that she has great fun filling in the pages of her smash-style book over the coming days.

Hope you have a great saturday, I'm out to dinner tonight to celebrate the birthdays of a couple of friends - promises to be a fun evening.

Friday 11 January 2013

'O' s and 'X's....

Morning Peeps !  Hope it's not too cold in your neck of the woods, guess here in the UK most of us are battening down the hatches in readiness for the snow and ice that is forecast to arrive within days :o(

It was the birthday of one of our male friends yesterday and I made this card for him.  I followed the January theme over on the Craftbubble Craft Mad and Loving It Group, which is' Noughts and Crosses'.

 
I used a kraft base card and a selection of stamps from Queen Kat Designs.  I'd forgotten I had the Bingo card stamp in my stash and found it again whilst hunting out some other stamps I wanted to use. 
 
I love the 'coffee stain' and stamped this with Rich Cocoa Memento ink randomly over the the base card before adding the other elements.  The Bingo card and sentiment was stamped with the same Memento ink on to SU! Crumbcake cardstock, then layered over a piece of Early Espresso card.  I cut the X's and O's from the EE card using a set of Memory Box alphabet dies. 
 
The 'Life' tickets were among the bits and pieces I have in my box of SmashBook stuff and was perfect for the card theme.  Finally, I added Glossy Accents on the BINGO lettering to give them dimension, but it isn't showing up well on the pic.
 

I'll be seeing our pal on saturday when we go out for dinner to celebrate both his birthday and another pal's so he'll be getting my card then, hope he likes it !

Thanks for dropping by to check out today's project.  I've got a 'special' birthday card and a handmade smash-type book I made recently to share with you tomorrow, do call by again to check them out.

Thursday 10 January 2013

Beat the Blues

Good morning dear Reader, it's thursday again already so we have a new challenge starting over on Cute Card Thursday.  Our challenge theme this week is 'Beat the Blues' and Whiff of Joy Stamps is our prize sponsor.

At this time of year sometimes 'The Blues' can set in as the bulk of the Winter is still to come and all the excitement of Christmas is over, days are still short and often the weather is cold and miserable.

If I'm feeling down, I try to imagine that Spring is just around the corner and Mother Nature about to bring a fresh new season.  So, for my DT card I decided to work with Spring colours and a really sweet image to create a card that could be perfect as an Easter card or even a birthday card.


I am  sorry but I don't know the manufacturer of the stamp as I used a stamped image I received as a gift, it may be a Penny Black Slapstick image, but I'm not certain.  If anyone can let me know different, please leave me a comment and I'll update the stamp details. (thanks for confirming it is indeed a PB stamp Annie).

All these lovely papers, the rainbow and pretty corners were found in a magazine freebie pack of papers which I discovered during a bit of tidying of my crafting space !  I coloured the image with Copics and didn't add a sentiment to the front of the card to leave it open to use for different occasions.  I popped up the main image and the curly corner elements with some Pinflair Glue to add a little dimension to the design.

Do pop over to the CCT blog to check out the fabulous creations by the rest of the DT, you can also get full details of the challenge in case you wish to enter this week.

Thanks for dropping in to check my project today.

Tuesday 8 January 2013

Thank You - With Flowers

I hope that all those who went back to work for the first time yesterday after the christmas break didn't find it too difficult to settle back in. 

It's the time of year when most of us will be sending out 'Thank You' cards and my project today is a card I made to send out to say thanks for a lovely christmas gift from a pal.  

 
I thought I'd try out a technique I haven't used before, freehand drawing an outline border around the stamped image and incorporating a written sentiment as part of the frame at the bottom.  I think I need to practice this technique a little more and improve my handwriting a fair bit, but I'm quite pleased with the finished card.   I do love the Clean and Simple (CAS) style of design as it can look very stylish and elegant for any occasion.
 
The flower image is from a set of stamps by Dylusions, stamped with black Memento onto the base card and a little colour added using the new limited edition Winter set of Promarkers.  The colours are lovely soft and muted shades and I really like this set.  


Thanks for taking the time to drop by to see my project today, I do appreciate it and I'd love to hear what you think of my creations.

Sunday 6 January 2013

Stitchin' for ma Kitchin' ... Oh and a bit of Knittin' !

The christmas and new year celebrations are well and truly over, life is settling back down to 'normal' and so my sewing machine has come out to 'play' again - Yay !

Whilst doing the extra cooking over the holiday period, I decided I really needed some hot pot pads/trivets on which to set pots and pans down to save the worktops.  So, I dug out some bits of fabric and batting and made myself a couple of fabric pads - as my kitchen colours are cream, black and red I decided to use the red gingham and calico fabrics I had in my stash.

Here's a couple of pix of the results of my 'labours'
I love this method of creating a coaster/mat and I think the red gingham fabric looks great with the calico.

And now for the knittin'


I've been busy over the christmas holiday knitting a cardigan for a friend's LO, the yarn I'm using is  lovely soft and cuddly and pink !  so pretty.   I've almost finished the cardi now and here's a sneaky peek of it under construction.


Thanks for dropping by to check out my latest projects, I've a card to share with you next time, another quilt I've just finished as a gift for a lovely pal and a round cushion - to make the chair I sit in to sew more comfortable - which I'll share with you over the next few days.  Hope you'll be back to check out my new projects soon.

If you are starting back to work/school tomorrow after the holidays, good luck !

Thursday 3 January 2013

Something New

Welcome to my first post of 2013, I hope you had a wonderful New Year's Eve and if you did 'indulge' a little too much that you are fully recovered now and settling in nicely to the new year.  I spent a relatively quiet evening with family, which was lovely and a little 'pink bubbly' was involved  to welcome in the new year.

As it's thursday it means we have a new challenge starting over on the Cute Card Thursday blog.  The theme for this week is 'Something New' and this week's prize is sponsored by Bunny Zoe Crafts.

Now this could be interpretted as a new year's card, new baby or new job but as I needed to make a card for friends who have recently moved into a new home, I decided to make my DT card as a new home card.


For the bp I've used a sheet from the Marianne's 'Warm Winter Wishes' paper pack as it's not particularly christmasey and I love the knitted cable effect and the lace border.  The houses image is from a set of Kan Ban stamps and I used the little brick and gate stamps, stamped in a line, to create a wall, the trees were both cut using Marianne's dies and SU! garden green cardstock.  I used a set of SU! Framelits to cut layers from crumbcake and early espresso cardstock and added these over rectangles cut from real red and garden green cardstock.  The scrap of lace at the top was from my stash, sentiment comes from the same set of Kan Ban stamps and stamped using SU! cherry cobbler ink on a scrap of crumbcake cardstock. 
 
The image was coloured using Copics and as a finishing touch I added Glossy Accents to the windows to give the illusion of glass windowpanes.
 
I hope you've enjoyed your visit today, do check out the creations from other members of the DT on the CCT blog for further inspiration.