Wednesday 25 November 2015

It's Been a While !

I just realised how long it's been since my last post on here, apologies and thank you for continuing to visit my Blog. 

Life has been very hectic over the past few weeks, some good and some bad stuff going on. We returned from a lovely vacation only to find that our central heating boiler wouldn't work, no heating or hot water was a bit of a shock to the system after experiencing the lovely warm Florida weather, especially when the temperatures plummeted last weekend.  Happy to report that the boiler is now fixed - although it did take 9 days for the repairs to be carried out.

Well, enough of my woes, I have a new project to share with you at last.  Whilst I have made quite a lot of Christmas cards already for this year, I do still need to make a few more.  Today's project is one of the cards I made since arriving home.


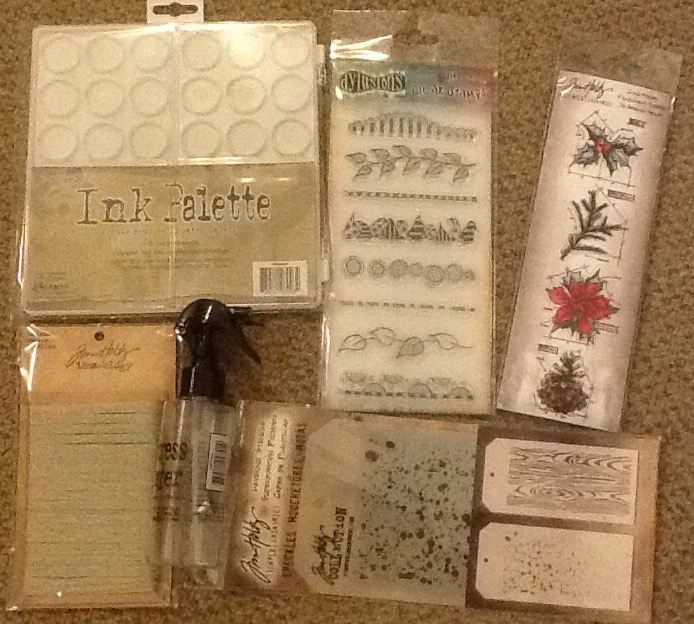
I vowed not to add any more stamps to my vast Christmas stamps collection, but when I spotted the set of Inkadinkado stamps containing this gorgeous wreath, I just had to have it.  In fact I've used all four of the stamps in the set and I love them all, so I'm mighty pleased that I weakened and did buy it.

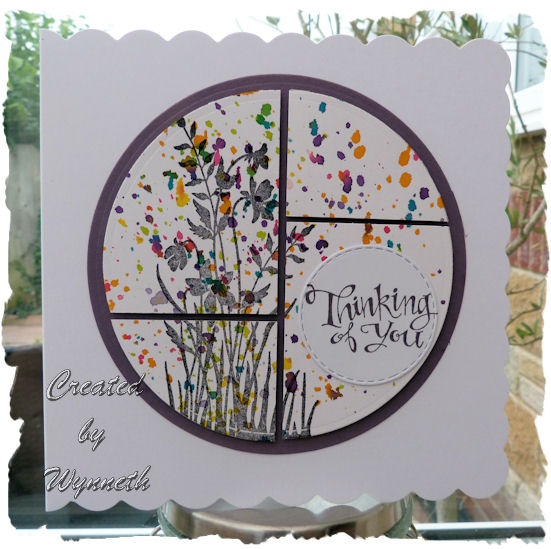
The wreath image was stamped onto a piece of heavy weight watercolour paper using Versafine black ink.  I then used my Ranger Distress Ink pens to colour the image.  After colouring the wreath I used a gold Wink of Stella pen to colour the frame and applied clear WoS to the uncoloured areas.  The whole thing sparkles like mad in bright light, but it's not easy to capture in a photograph.  I am pleased at how 3D it looks after colouring.

Finally I cut out the image taking care to cut around the leaves overlapping the frame, and then attached it to a C6 base card. The sentiment was added using a stamp from the SU! Sassy Salutations set.

I hope you like my latest project, thanks for visiting.

Friday 6 November 2015

Happy Birthday Dad x

Good Morning all.  Today my gorgeous Dad is celebrating his 89th Birthday Whooo Hoooo !  Sadly I won't be seeing him on his Special Day as I'll be travelling, but hope to be with him tomorrow.

Here's the card I made especially for him


I first created a background directly onto a 6x6 basecard using Brusho Acrylic Shimmer Spray, spritzing lightly.  I then cut a rectangle of corrugated Kraft card on which I'd previously stamped randomly using black ink.

After attaching the corrugated panel to the front of the card I attached a smaller rectangle of white card onto which I stamped the Happy Birthday from a SU! Sassy Salutations stamp set using Memento ink.  

This simple design is perfect for a man's card I think.

Thanks for dropping by today to see my latest project.  I'm now looking forward to spending time with my Dad to belatedly celebrate his Birthday over the next few days.

Wednesday 4 November 2015

Snowflakes Christmas

Hi folks, I've got another Christmas card to share with you today, once again crafting with my pal Kathy (the Purple Princess) using her stash.


Materials used:
  • Stampendous large snowflake stamp
  • Dylan Reaveley 'Stocking Fillers' stamp set - smaller snowflake and sentiment
  • Background created using Acrylic paints and Gelli Plate
  • Stardust Stickles to highlight

And now since it is What's On Your Work Desk Wednesday here is the work desk I'm currently sharing with the Purple Princess


Brush Pine Christmas

Hi there Blogger friends, just a quick post from me, sharing a Christmas card I made whilst crafting with my pal kathy (aka Purple Princess)


Using Kathy's stash I created a background using Distress Inks  before overs tamping the Pine Brush image with a slightly darker DI.  I added touches of Stickles to bring a little sparkle to the image.

Materials used :

  • Penny Black Brush Pine stamp
  • Distress Inks - Fired Brick and Barn Door (applied using a blender tool) Crushed Olive
  • Dylan Reaveley  'Stocking Fillers' stamp set (snowflakes used)
  • Crushed Olive DI used to create a slightly larger layer from white card stock
  • Stickles - Platinum and Stardust to add sparkle


I'll be entering this for :-

  1. Creative Inspiration - Challenge 334 - Sparkle
  2. City Crafter - Challenge 286 - Getting Ready for Christmas


I hope you've enjoyed your visit to Stamping Grandma's crafty space and today's project, thanks for dropping by.


Tuesday 3 November 2015

Entering a Rudolph Day Challenge

Happy Tuesday dear Blogger friends, I wonder if you are like some of my crafting pals and have already made more Christmas cards than they need for this year.  Or are you like me and still busy trying to catch up and get enough made during the next couple of weeks before we actually get to December.

That said, I've been a little busy over the last couple of days crafting with my pal Kathy (aka the Purple Princess) and made four festive cards which are also perfect to enter a Rudolph Day Challenge which is to use the same image on all of them.

Here's all four together


.... and for a closer look


Materials used :

  • Inkadinkado 'Evergreen Holiday' stamp set
  • Sentiment - My Sentiments Exactly set
  • Distress Ink pens
  • Derwent Inktense Blocks
  • Stickles - green, platinum and star dust


I'm entering the following challenges with my cards


I hope you've enjoyed seeing today's project, I'm happy as I now have another four cards in my Christmas stock.

Sunday 1 November 2015

Mini Canvas Playtime

Happy first of November dear Blogger friends, my how this year is flying by - very scary !

Today's project is a mini canvas, decorated during a fun crafting session with my pal Kathy (aka The Purple Princess).


I love this Tim Holtz mini robots set and couldn't wait to ink it up after buying it recently at Violettes Scrapbook Store in Lakeland, Florida.

Materials used:
3" square canvas
Stampers Anomymous 'Mini Robots' stamp set
Stampers Anonymous 'Random Thoughts' stamp set
Visible Image 'Flower INKognito' stamp
White Gesso
Platinum Liquid Pearls
Platinum Stickles
Tim Holtz idea-ology Linen Ribbon
Sparkly Button tied on with twine
Distress Inks - Salty Ocean, Weathered Wood, Dusty Concorde and Hickory Smoke

If you would like to see what Kathyk did with hers then pop over to her blog here, any time after 08:15 GMT.

Wednesday 28 October 2015

VW Birthday Wishes


For today's project I used a Craft Stamper Magazine freebie stamp, it's a great VW image and perfect for a male card.

Using the Hero Arts Brush stamp set and SU! inks in Crushed Curry, Cajun Craze and Midnight Muse I created a background directly onto the base card.  I then stamped the VW image over the background using Versafine Black Ink.

The sentiment is a stamp from the SU! Sassy Salutations set, again stamped using Versafine Black ink.

A nice clean and simple design, hope you like it.

Sunday 25 October 2015

Happy Birthday to my Pal Allie

Good Morning dear Blogger friends, I hope you have a lovely day to look forward to.

Today is my pal Allie's Birthday and I'd like to wish her a most wonderful day of celebration.  Unfortunately I won't be around to celebrate with her but I made this card for her.
To create the card I used a Sizzix Stamp and Emboss set.  I firstly stamped the image onto a piece of white cardstock using Mermaid Lagoon Distress Ink.  I then placed the stamped panel into the embossing folder, carefully lining up the design with indentations on the folder. 

After embossing the design I used a clear Wink of Stella Pen to highlight the butterfly and some of the flowers.  Finally sealing the inks using Crafters Companion Spray and Shine and then attaching to the front of a C6 scalloped edge basecard.

That's it from me today, thanks for dropping by to check today's project.

Thursday 22 October 2015

St Petersburg, New Stash and Dolphins

Thought I'd share a couple of pix with you today taken on a day out with my pal Kathy (the purple princess).  We let the boys come along too !

This is me shopping for new stash in Whim-so-Doodle in St Petersburg, far too many tempting goodies in this store, thank goodness it isn't closer !   The cookies baked especially for us were totally delicious mmmmmm....


After St Petersburg it was on to the Johns Pass Boardwalk where we were fortunate to see wild dolphins swimming and playing in the bay


After our travels we headed for dinner at the Longhorn Steakhouse in Lakeland... Slurp !

Back at Kathy and Steve's we sorted our new stash and here's a couple of pix of my haul.


Hope you've enjoyed your virtual trip in Florida and stash shopping.  Have a great day.

Tuesday 20 October 2015

Celebrating a Happy Birthday

Good morning dear friends.  Today I'm sharing a birthday card I made recently trying something new.  I have never actually stamped on acetate and coloured from behind using acrylic paints before making this card and was quite pleased with the finished result.

 
I first created a background using Distress Inks and stamped the 'Celebrate' sentiment at the bottom using Memento Rich Cocoa ink. I then stamped the acorn and leaves image by Studio 112 onto a piece of acetate using Green Stazon ink.  Once the ink was completely dry, I coloured the image from behind using acrylic paints.

The acetate was attached to the background using brads, then mounted onto a piece of orange cardstock before being adhered to the front of a C6 scalloped edge base card.  Finally I stamped the 'Happy Birthday' sentiment using the Rich Cocoa ink and a stamp from the SU! Sassy Salutations stamp set, underneath the image.

Here's a close up shot of the acetate layer


I hope you've enjoyed seeing today's project, thank you so much for taking the time to visit Stamping Grandma.

Have a great day.

Friday 16 October 2015

Bubble Bloom Snow Flower Christmas

For today's card I've used the gorgeous Woodware Bubble Bloom Snow Flower and sentiment set.  I do love this stamp set as it produces a simple but stunning finished card.

The bubble blooms were stamped using Memento Tuxedo Black ink and coloured using ProMarkers, with a White Signo Pen for highlights.  The sentiment was stamped using SU! Raspberry Ripple ink and the image panel attached over a slightly larger panel of red card before adding to a C6 scalloped edge card.

Hope you enjoyed today's project.

Tuesday 13 October 2015

Tuesday and a Halloween make . . . . . .

Happy Tuesday friends, 

Hope you are all doing OK today.  I've been crafting a little with my pal Kathy (aka The Purple Princess) and using her stamps and stash.

I've created a Halloween card to share with you.


I used a set of stamps by Hampton Arts, Copic and Promarkers were used to colour the image.  To create the background I used Adirondack spray inks in Purple Twilight and Butterscotch, Pam Carricker sequin waste stamp and Inkadinkado drips stamps all used with Dusty Concorde Distress Ink.  Finally a quick spray with Luminarte Radiant Rain Shimmer Spray.

I fussy cut the images and attached then added small amounts of  Platinum and Stardust Stickles for added bling.

This will be winging its way to my Grandsons very soon.

Hope you've enjoyed your visit.

Monday 12 October 2015

Happy Monday


Today's project is an ATC I created a while ago.  For the background I used Bleeding Art Tissue (BAT) then overstamped a design using the Dina Wakley Grunge Tree D1018 stamp, a Craft Stamper freebie stamp and Faux Stitching stamp from a set by Eline's.

After stamping I used a little bleach to take out the colour in some areas and outlined the grunge tree image using a black Pit Pen.

I don't make many ATCs these days, but this one was a fun little project to do.

Friday 9 October 2015

Fragmented Circle

Good Morning dear Bloggers.

Today I have another card using the fragmented circle design to share with you.

 
For this card I diecut a circle using a die from Crealies Stitched Circle die set and white cardstock.  I then lightly sprayed a few Dylusions Inks colours and stamped the SU! flower stamp over the top using Memento Tuxedo Black ink.

I cut the circle into pieces and re-assembled it, attached to a slightly larger circle of purple card then added it to the front of a 6x6 scalloped square base card. 

The sentiment is from the SU! Sassy Salutations stamp set which I stamped onto a small circle of white card cut using another size of Crealies Stitched circle dies and black ink.  It was then attached to the front lower right section of the background.

Another simple technique for creating a pretty finished design.  Hope you like it.

Wednesday 7 October 2015

Purple Happy Birthday


Today's project is a card made using a panel I created recently.  I used Distress Inks to create a background, flicking drops of water over to lift off patches of colour a little.  I then used a Stampers Anonymous stamp and Versafine ink to stamp along the bottom. 

Using Crealies stamps No9 and No 29 I randomly stamped over the background.  Then sprayed Goosebumps over to seal the DIs.

Finally I attached the panel over a slightly larger piece of black card and adhered to a C6 scalloped edge card then stamped the sentiment using the Happy Birthday from the SU! Sassy Salutations set to the side.

I know my pal Kathy will approve of the colour as she loves anything and everything Purple, I'm looking forward to meeting up with her very soon and enjoying time crafting together.

Have a great day.

Monday 5 October 2015

Snowy Christmas Scene

 
Here's another Christmas card I created using just one colour of Brusho pigment powders.  I chose to use the Grey for my card as I just love to see how many different colours pop once the powder is spritzed with water.
 
After creating the brusho background and once it was completely dry, I stamped the Indigo Blu Trees stamp using Versamark ink.  I then sprinkled white embossing powder over and heated.  After this I sprinkled a little Shabby White Frantage powder and heated from underneath.
 
The image was layered over a slightly larger piece of white card, after attaching a length of organza ribbon tied into a bow.  Then a piece of black card added to the right of the basecard and the image layer added to overlap.
 
Using the Happy Christmas stamp from the SU! Sassy Salutations set, I stamped with Versamark ink and heat embossed using white Embossing Powder onto a scrap of black card.  This was then attached over a slightly larger scrap of white card then attached to overlap the image layer.
 
I hope you've enjoyed seeing today's project, that's one more card for my stock so I'm happy !

Saturday 3 October 2015

Quilting with Blues

Today I thought I'd share a few pix of the latest quilt I made.  I used a number of fat quarters of different fabrics all in shades of blue.

Here's the whole finished quilt

 
I decided on a completely random design, first cutting all the fabrics into 5inch squares and putting all the squares into a bag, shaking them up to mix thoroughly.  Pulling out two squares at a time and stitching them together until all the squares were used.
 

This pic was taken during the construction process


Here's a close up shot of the quilting stitches.


I backed the quilt with snuggly fleece fabric in a shade of blue to match the front and bound the edges using more of one of the fabrics used for the squares.

Thanks for dropping by to check out today's project.

Saturday 19 September 2015

Using another scrap of my hand decorated fabric

As it's Saturday I'll be off out shortly to attend a workshop with Pauline Butcher and will be playing with Visible Image and Lavinia stamps Whooo Hooo !  So looking forward to it and I'll share my makes on here in a later post.

Here's today's project


I used another scrap of the fabric I decorated using ProMarkers and Alcohol Blending Solution.  I still have a small amount of fabric left over from the journal cover I made with the decorated fabric so there will be a few more cards made.

For this card I attached the fabric over a piece of blue cardstock, applied some turquoise Stickles -   mirroring the fabric design and embellishing with a little bling.

The sentiment is from the 'Sassy Salutations' stamp set from SU!  Those of you who have been visiting regularly will no doubt note that these SS sentiments have been appearing rather a lot lately, I just love these sentiments and make no apologies for using them on many of my projects !

Thanks for dropping by to check today's project, hope you like it.

Thursday 17 September 2015

Christmas is Coming....

It's that time of year when I start to get a bit concerned that I've left it too late to get enough Christmas cards made.  So I thought I'd better get on and make a few and today's project is one of them.

 
I've used a couple of fairly new stash items for my card, Crealies No 3 Modern Patchwork die set and the lovely Bubble Bloom Snow Flower stamp set by Woodware.  I really like this stamp and I thought it would work well used with the Crealies dies.
 
The image was stamped onto linen finish cardstock using Archival Black ink then coloured using Brusho Ost. Red pigment - a few crystals dropped onto a pallet and a little water added to create liquid paint.  Once dry I added small touches of white pen to create highlights and then Glossy Accents over the top. 
 
The sentiment is from the Woodware stamp set, which I stamped onto a circle of white linen finish card cut out using the Crealies Stitched Circle die set.
 

Thanks for dropping by to check out my project, I hope you liked it.

Monday 14 September 2015

Happy 18th Harry !

Happy September 14th dear friends.  It's a super exciting day for my family as my eldest grandson is celebrating his 18th Birthday today.  I really can't believe that it's been eighteen years since the moment I was there when he took his first breath.  So just wanted to say "Happy Birthday Harry".

Here's the card I made for him


and a close up pic of the detail


I used an 8x8 scalloped edge base card and sprayed Dylusions Post Box Red and London Blue inks lightly over the centre of a slightly smaller square of white card.  I then over-stamped the largest image from the Stampers Anonymous Tim Holtz 'Ledger Script' stamp set over the ink splats, using Memento Paris Dusk Ink.
 
Using Crealies bits and pieces stamp No 29 and Versamark I stamped a couple of times over the background and heat embossed with Detail Black embossing powder.  I sprinkled Shabby White Frantage embossing powder randomly over the design and heated from underneath.  I layered the background over a slightly larger piece of red cardstock.
 
Using a TCW jenni bowlin mini number stencil I applied Versamark ink through the '1' and '8' and heat embossed using the detail black embossing powder onto a scrap of white card.  I then layered it over a scrap of red card.
 
Finally I stamped the Happy Birthday sentiment from the SU! Sassy Salutations stamp set onto another scrap of white card, again heat embossing with the detail black EP.  I then mounted this onto a scrap of red cardstock and attached to the background using foam pads.
 
Thank you so much for dropping by to check my project today, I hope you enjoyed your visit.