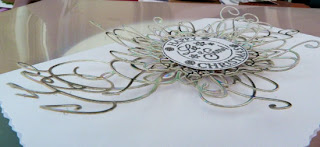
'It's just a number' is our theme for the challenge this week over on Cute Card Thursday and our prize is sponsored by The Stamp Shoppe.
I selected a couple of cute snowpeople digis from Robyn's Fetish for my DT card. Coloured the images using my Copics before cutting them out and adding Glossy Accents dusted with Glamour Dust on the bobbles on hats, scarves and mittens.
The background paper is a magazine freebie and I stamped a Magnolia snowflake circle stamp on white card before cutting out with a scallop circle nestie. I added the snowpeople over this circular layer and Star Dust Stickles around the edge of the scallops.
The Holly Spray was cut with a Cheery Lynn die and I added berries using a Waco Pearlmaker Pen. The sentiment is from Magnolia and blinged up a bit with some Stickles. It has the number 25 on it to fit the theme for this week's challenge.
Thanks for dropping by to check my project, do take a look at the fabulous creations from the rest of the DT, it's well worth a visit to their blogs. You'll find direct links from the CCT blog here, just click on their name or their card for the link.
The musings of a totally obsessed Craftaholic! Stamps, papercrafts, quilting, knitting..... I just love to craft.
Wednesday, 30 November 2011
Snowmen & Snowflakes
Today it's back to a Christmas card I'm afraid ! This week's challenge #94 theme over on I Love Promarkers is 'Snowmen and Snowflakes' and our prize is sponsored by Robyn's Fetish. I chose this cute snowie from RF for my card.
It's sort of White on White style, with minimal colours added. I've used one of my lovely Memory Box dies on the left edge and the snowflakes which were cut out, I've added in the bottom right hand corner with some Stickles in the centres and a clear gem over the top.
The flowflake was created using a Martha Stewart punch and a Crealies flower die. Again I added one of the tiny snowflakes from the border, Stickles and a clear gem in the centre.
The image was coloured with Promarkers and Glamour Dust over Glossy Accents added on the scarf and hat, before cutting the whole image out. I created the frame behind using a Labels 17 nestie and the largest stamp from the Fancy Labels set from Our Daily Bread. I stamped the frame using Versamark and heat embossed using WOW! Plantinum embossing powder. The sentiment is from Lili of the Valley and again embossed with plantinum.
One more card added to my stock, so I'm happy - hope you enjoy your visit here today, thanks for taking the time to check out my project.
Sunday, 27 November 2011
A new skill ?
Something a little different to share with you today peeps - did I hear a loud sigh of relief as it's not a Christmas card today? hee....hee...!!
A while back I bought some metal mesh ribbon from Ribbon Box at a craft show in Westpoint Exeter. I also got some pearl brads and brooch pins so thought I'd make up a few brooches to give as small gifts, don't they look pretty? I think I shall be buying a little more mesh as I really enjoyed working with it.
Thanks for stopping by, enjoy your day, whatever you have planned.
Saturday, 26 November 2011
Hot Chocolate Mouse
Happy Sunday morning folks, hope you are enjoying your weekend although I guess at this time of year we are all really busy preparing for Christmas and some of us having just celebrated Thanksgiving.
Today's project is another design using the pretty 'Hot Chocolate Mouse' from Queen Kat Designs This cutie is designed by Che Gilson for her 'Gothic Dollies' range.
Here's a list of tools and supplies I used on this project:
Copic markers
Stickles
Glossy Accents
Papers from my stash
SU! cardstock
Lace
EK Success border punch
Memory Box dies
Flower punch
Waco Pearlmaker Pen
Scalloped oval nestie
Cuttlebug embossing folder
Pin Flair Glue
Thanks for stopping by today, hope to see you again real soon.
Thursday, 24 November 2011
Still playing with my Memory Box Dies !
I've got more projects using my new Memory Box dies to share with you today.
I had a great session making a batch of Christmas cards using mirror board and some of my new dies. For these three I also used the Fancy Labels stamps by Our Daily Bread, which are compatible with nestie labels 17 dies. I cut the shapes first, then stamped and embossed using WOW! Platinum and Silver Sparkle embossing powders, before attaching to the base card.
For these two cards, I added the diecuts over plain white base card.
Here's a close up of one of the cards showing the diecuts a little more clearly.
The sentiments are from Lili of the Valley, stamped and embossed in silver.
I hope you've enjoyed today's projects, thanks for dropping by.
Merry Christmas Silhouette
I've managed to squeeze in a second entry for this week's Simply Less is More 'Silhouette' challenge - and it's yet another Christmas card !
I used two lovely stamps from an Inkadinkado set, stamped with Versamark then used WOW! Black Twinkle embossing glitter - hard to photograph, but the effect is great IRL really twinkly.
Simple white C6 basecard with the fold on the short edge and rounded corners, job done !
Thanks for dropping by to see my last project. If you've dropped by to see my Cute Card Thursday DT card, scroll down to the previous post and you'll find it there.
Wednesday, 23 November 2011
I want a puppy for Christmas
It's Sketch Time on the Cute Card Thursday's Challenge Blog and we've a great sketch designed by Fiona. I've chosen to use the sketch to create another Christmas card as my DT project. Our sponsor this week is Kraftin' Kimmie Stamps.
I haven't used this sweet Sugar Nellie stamp in ages and as I was looking for an image for the Craftbubble Craft Mad & Loving It theme, 'Christmas Carol or Song' I thought this one was just perfect for "I want a puppy for Christmas". I do like it when I can enter my DT projects in other challenges.
I coloured the image with Copics and used some magazine freebie background papers. I'm so in love with my new Memory Box dies, I just had to use a couple of them to create embelishments for my card. The image was cut out using an oval nestie then matted over a layer of red card cut with a scalloped oval nestie. The large snowflake was cut with a Martha Stewart punch and the gem in the centre was from my stash.
Glamour Dust over Glossy Accents gives the puppy's hat trims some sparkly dimension, Stickles around the edge of the image layer, on the stars on her dress her wand and wings and GA on her ribbon sash were the finishing touches.
Hope you like today's project and that you'll enter the CCT challenge, I do love checking out all the fabulous creations entered each week.
Tuesday, 22 November 2011
Have an Elfy Christmas !
We've got an 'Anything Goes' theme for this week's challenge over on I Love Promarkers and our prize sponsor is Digi Doodle Shop.
I chose this cute 'Elf with Gifts' image from DDS for my card - yes another christmas card I'm afraid ! The image was coloured with Promarkers before cutting out using a nestie die. I used a piece of magazine freebie paper to cut a larger layer for under the image.
The mistletoe sprigs were cut using a Marianne's die and I used a regular office punch and a scrap of white card to create the white berries. Then I added Glossy Accents to the berries to give them some dimension.
The sentiment is from Magnolia and there's Stardust Stickles around the edge and also around the image layer to give the card a little sparkle.
A simple design, but I think this cute little chap deserves centre stage without too many embellies drawing the eye away from him.
Hope you're own Christmas card production is going well and thanks for taking the time to drop by to see my project today.
Monday, 21 November 2011
Clean and Simple Season's Greetings
I've struggled to get an entry done for the Less is More Challenge over the past few weeks, so was determined to get one finished in time for this week's theme 'Silhouettes'.
I'm still busy making Christmas cards, so no surprise that my entry is yet another one !!
For my card I used two of my stamp bargains picked up at the Sincerely Yours Craft Show in Taunton a few days ago. The tree stamp was just £1.50 and the sentiment £1 - how good is that?
I inked up the tree stamp with Versafine black ink, stamped it directly onto the basecard, then stamped again to the left and very slightly higher than the first image without re-inking the stamp. This gave me a much paler second image and created some dimension without having to mask the first image. I added touches of subtle glitter to the trees with a Quickie Glue Pen and some Glamour Dust. The sentiment was stamped with Versamark and heat embossed using WOW sparkling embossing powder for added twinkle.
I don't normally like black and white Christmas cards, but I'm quite pleased with how this one has turned out. I might try the same design using different coloured inks.
Sunday, 20 November 2011
Three Wreaths Closer to Christmas
As I still need to get lots of Christmas cards made in time, I've been doing some batch making using a CAS style and some beautiful stamps. The three cards I'm sharing today feature this gorgeous whispy wreath stamp from Penny Black.
I've used the Tim Holtz special edition Winter Set of Distress Inks to stamp the image and the Inkadinkado sentiment, then added touches of Stickles just to give a few subtle highlights. Left to right the colours are Festive Berries; Evergreen Bough and Iced Spruce. They are really gorgeous colours and I'm so pleased that I decided to get them after all.
A very simple design, but I like the classic elegance.
Thanks for stopping by today, I'm afraid there'll be more Christmas cards in the coming days, I do need to get a wiggle on if I'm going to finish before the last posting date!
Saturday, 19 November 2011
Sparkly Unicorn
I've got a project to share with you today using the Christmas Unicorn stamp set from Queen Kat Designs. This little Unicorn is so cute !
I decided to add lots of glitter and bling to the image rather than colour it in for this card, using two colours of Glamour Dust and Spica Glitter Pens.
Recently I bought some gorgeous dies by Memory Box and used two of them to cut lacey layers to add under the sentiment. Aren't they pretty? I just love them.
The basecard is a small 4 x 3 inch black card and as it's so small, I've kept the design simple.
Thanks for checking out my project today.
Wednesday, 16 November 2011
Green & Grey Christmas (better photo now added !)
Yet another Christmas card to share with you today folks ! Well, it is that time of year again and I'm busy trying to get all my cards made in time to send out, so here's another one.
Our challenge theme over on Cute Card Thursday this week is to use the colour combo Green and Grey and the prize sponsor is Alota Rubber Stamps.
The image is coloured with Copics, with Glamour Dust over Glossy Accents on the hat trims and as snow. I used a snowflake flurry stamp from a set by Inkadinkado and Memento Cottage Ivy ink to stamp on the basecard creating a background, and a Cuddly Buddly sentiment which I embossed with a metallic green embossing powder. The image is layered over some mat silver (grey) card and I used the same card to punch out the tiny snowflakes. I used one of my new Memory Box dies to cut out the lacy medallions from green cardstock. I'm just loving these dies right now, they produce such pretty and delicate diecuts.
I hope you've enjoyed today's card, check out the challenge details on the CCT blog if you'd like to enter a project yourself.
Tuesday, 15 November 2011
Oh Christmas Tree, Oh Christmas Tree......
Christmas Trees are our theme for this week's challenge on I Love Promarkers and our prize sponsor is Stampeezee.
I created my card using these stamps
They are by Judith and when I saw them I thought they were a brilliant idea. You start by stamping the bare tree, then choose the leaves you want, or any of the peg stamps with which to dress the branches. I selected the pine needles, candy cane, candle, bow and light bulb stamps, although I do have quite a few others.
After stamping the bare tree using Memento Rich Cocoa ink, I used the pine needles stamp and Cottage Ivy ink to add foliage to the branches. I then stamped a number of candy canes, candles, bows and light bulbs on white card, coloured with Promarkers and cut them all out before attaching randomly over the tree. The bowl the tree stands in was stamped with Tuxedo Black ink and coloured with Promarkers.
The sentiment stamp was from a £1 box at the Sincerely Yours Craft Show in Taunton last sunday. I stamped and embossed in white on to the red layer and cut a silver star for the top of the tree using a nestie die. Finally I added Glossy Accents on the lightbulbs, candles and candy canes.
It was quite time-consuming, but I am pleased with the final result.
Thanks so much for dropping by today, I hope you've enjoyed your visit.
Saturday, 12 November 2011
Christmas Unicorn
Good morning and welcome to my little piece of blogland. Sunday is now my day for posting projects using Queen Kat Designs products on Facebook, but I like to share them on here too with my lovely Followers.
Today's project features more new stamps released by QKD for November. I got to play with the 'Christmas Unicorn Set' from Artemiss designed by Danika Lindsell and I've used the main image and one of the sentiments included in the set for my design.
This sure is a cute lil' Unicorn, don't you think? I coloured her with Copics and added touches of clear Spica Glitter pen on her hooves and horn with Glossy Accents on top. The background paper is again from a previous QKD kit, as was the lace and ribbon. The snowflakes were punched with a Martha Stewart punch and I added the red sparkly brad from the kit in the centre. The image was added over a layer of SU! Baja Breeze then a layer of red cardstock, I edged around it with some red Stickles. The Stickles has dried flatter since I took the photograph, but I wanted to catch the last bit of daylight so couldn't wait for it to dry first !
Hope you like today's project. it's also posted up on the QKD Facebook page.
I'm off to the Sincerely Yours craft show in Taunton with a crafting pal today, I prescheduled this post so I hope I publishes OK !
Wednesday, 9 November 2011
Red for Remembrance
With Remembrance Day occurring next Sunday, our theme for this week's challenge on Cute Card Thursday is really appropriate - 'Red for Remembrance'. Our prize sponsor this week is Simon Says Stamp.
We'd like you to interpret this theme however you wish, I chose to create a Christmas card with Red as the predominant colour.
The background paper is a magazine freebie from Hot Off The Press. I used a set of nesties to cut out the image and a layer of red metallic card (which I also embossed with a snowflake design using a Cuttlebug embossing folder.
The tree was cut using a Marianne's die and I created the baubles by using a regular office punch and a scrap of the red metallic card. After punching the tiny circles from the card I used a ball tool to curve them slightly before attaching with PinFlair glue, then I added Platinum Stickles to create a tinsel garland around the tree. The image is from Magnolia and I coloured Tilda with Copics. Sentiment is from Lili of the Valley, stamped then heat embossed using sparkly red embossing powder. The red gingham ribbon was from my stash.
I hope you've enjoyed today's project, check out the full details of this week's challenge over on the Cute Card Thursday blog.
Tuesday, 8 November 2011
Festive Fairy
This week on the I Love Promarkers Challenge we have a great sketch to work with and our prize is a pack of Promarkers. The sketch is posted on the ILPM blog for you to check out, along with the creations from the DT.
I just had to have some of the sweet Lili of the Valley stamps from their new release recently and I selected one of them to use on my DT card for this week. This is Festive Fairy and I think she's just adorable.
The background papers are some scraps I had in my stash and came from Graphicus some time ago. I coloured the image with Promarkers, used plain circle and scalloped circle nestie dies to cut the layers. The flowers were created using a set of Spellbinders poinsettia dies. The sentiment is from LOTV and there's Stardust Stickles added as finishing touches.
Hope you've enjoyed today's project, let me know what you think of it. Thanks for stopping by today.
Saturday, 5 November 2011
Merry Hot Chocolate ChrissyMouse
There are new release stamps for November in the Queen Kat Designs Store and I got some of these new stamps to play with for today's project.
I'm still working on getting my stock of Christmas cards finished and when I saw the cute 'Hot Chocolate Mouse' stamp designed by Che Gilson, I thought she would work really well on a Christmas design.
She's coloured with Copics then cut out and added over a layer of SU! Garden Green cardstock cut using a scalloped oval nestie. The background papers are from a previous kit by QKD, the poinsettias were cut using a set of Spellbinders dies and the holly leaves punched with a Martha Stewart punch. I added finishing touches using Glossy Accents on the mug and Stickles on her hair ornament and around the scalloped layer. The ribbon was from my stash.
My card is posted up on the Queen Kat Designs Facebook page today too, as myself and the rest of the DT share our new projects on Facebook now rather than on the QKD Blogs.
Wednesday, 2 November 2011
Baby You're a Firework !
This week the challenge over on Cute Card Thursday has the theme 'Baby You're a Firework (use glittery, sparkly firework colours). Our prize Sponsor for this week is The Stamp Shoppe.
You can interpret the theme however you wish, I decided to create the effect of fireworks bursting in the night sky for my design.
I started with the sentiment, stamped using a Kaleidoscope inkpad, it's by TPC Studio, huge thanks to my pal Kathy who kindly allowed me to stamp up some of her images when I visited last weekend and for reminding me of the manufacturer. I then cut it out using a nestie die before attaching over a layer of metallic black card.
When I first saw this set of Marianne's dies, this flower shape reminded me of starburst fireworks, so I used it with various colours of metallic card to create the effect I wanted. With the stem trimmed off, I do think they work, what do you think?
Purple Stickles around the edges of the layers just adds a touch of sparkle to the design. Let us see your Firework cards, leave a link to your project on the CCT blog to be in with a chance of winning this week's prize.
Tuesday, 1 November 2011
You Can't Beat a Bit of Glitter and Glitz for Christmas !
Happy Wednesday, hope it's a good one for you. Today I'm sharing my DT card for this week's challenge #90 over on I Love Promarkers. Our prize Sponsor this week is Joanna Sheen and the theme is Glitter and Glitz - how smashing is that ?
I expect that like me, you are busy making Christmas cards, and I don't think you can ever have too much glitter and glitz on these cards.
I've used the gorgeous 'Three Little Angels' stamp from Lili of the Valley and coloured the image with Promarkers of course. I then matted it over a layer of Almost Amethyst cardstock from Stamping Up! - slightly off-set. To intensify the glitter and glitz effect I added Glossy Accents on the clouds, angels' wings and the stars in their hair, then sprinkled Glamour Dust glitter over the top. The large snowflakes were punched with a Martha Stewart punch and the smaller ones were cut using a Marianne's die.
The sentiment is also from LOTV and cut out with a small circle nestie. I added extra glitz with Stardust Stickles around the edge of the image layer, on the snowflakes and around the sentiment.
I hope you'll enter our challenge this week, it's a nice easy one I think ! Thanks for dropping by today, let me know what you think of today's card, I love receiving comments.
Time to P.A.R.T.Y !
Whoo.... Hoooo... ! it's celebration time over in the Queen Kat Designs castle, QKD is 5 years old and we are holding a Blog Hop to commemorate the event. You should have arrived here after checking out Chris' fabulous creation, if not just start at the beginning here and follow the links. The Royal Court are all in Partay mood and have been busy working on some awesome projects to share with you for the Hop, go check 'em out and join in the celebrations !
I thought I'd show you one of the older QKD images for my birthday tribute, I just love Tilly by Maigan Lynn and I know that our Queen Kitty Kat just loves the colour purple, and she's a Star, so this design is just perfect.
Right, I'm sending you off now to see what Janie has in store for you - Enjoy !
Are the Stars Out Tonight.................
I'm trying to crack on with making my Christmas cards right now, so when I saw this week's theme for the challenge over on Less is More is 'Stars' I was really happy as I can enter today's card.
I used a Kraft basecard, cut the lovely filigree star using a Marianne's Die from blue holographic card and attached it with silver thread. I then stamped the sentiment from an Inkadinkado set using Memento Bahama Blue ink. As a finishing touch, I used a Spica Glitter pen to colour over the sentiment to give it a subtle sparkle.
Here in Cornwall it is promising to be a much brighter and drier day as the sun is already shining, unlike yesterday which was dull and damp all day. Sadly, I have to go to work today, so won't see much of the sun. I hope you have a wonderful day, wherever you are and whatever you have planned.
Subscribe to:
Posts (Atom)