Recently I joined a Mail Art Swap with some lovely online crafting pals. I thought I'd share the ones I made with you today as I'm pretty sure all of them will have been delivered by now.
I decided on a different colour for each of the envelopes, selecting the colour I thought each of my pals would like.
Here's a pic of the fronts of the envelopes
I used Distress Inks to colour white envelopes, selecting a light, medium and dark from each colour family. Using a number of different stamps from Kaisercraft, Visible Image and Inkyliscious and the darkest DI in each colour family, I overstamped randomly on front and back of the envelopes. The feather image and sentiment were stamped using black Archival Ink.
Here's a view of the backs
All of the designs were similar, but not exactly the same on each envelope.
I masked an area on the front whilst adding the DI's to ensure the address would be easy to read.
Finally, I sprayed two coats of Crafters' Companion Spray and Shine over both front and back to seal the inks and give the envelopes a little more 'body'. DI's are water-based and if not sealed the colour lifts off with water so, bearing in mind our recent weather, I didn't want my Mail Art to arrive at it's destination as plain white envelopes with all the colour washed off !
I hope my pals liked their Mail Art and that I selected the right colour for each of them.
Thanks for dropping by to check out today's project, hope you enjoyed your visit.
The musings of a totally obsessed Craftaholic! Stamps, papercrafts, quilting, knitting..... I just love to craft.
Wednesday, 26 February 2014
Tuesday, 25 February 2014
Lovely Friends, Crafting and Homemade Soup - Perfect !
Good morning dear readers, how are you doing today ? Good I hope.
A few days ago a couple of my crafting pals and I spent a lovely morning at our pal Linda's house. There was chatting, lots of tea and coffee and, of course, great crafting. At lunch time our Hostess Linda treated us to a bowl of lovely, warm and tasty homemade potato and red pepper soup - helped down by delish homemade cheese scones - slurp !
We had a nice time playing with lots of Stampin' Up! goodies - stamps, inks, papers, ribbons, lace and gems.
Here are a few pix of my creation
I love these papers and the lovely colour combo - perfect for Spring. The Stamp set is called 'Everything Elenor' and I used Wisteria Wonder ink to distress all the edges of paper and card.
Thanks for a fun time Linda, I had a great time and I'm looking forward to doing it again sometime soon.
Sunday, 23 February 2014
Trying Something Different
Welcome to Stamping Grandma's little crafting corner, I hope you're having a great day.
Today I have a project to share with you which I've been working on in spare moments over the past couple of weeks or so. It's now finally finished, so I thought I'd post some pix here on my Blog.
A couple of years ago I received a gift hamper with everything contained inside a wooden box which was made from rough wood and painted with mat black paint. It was too good to throw away, so I have been using it to store various craft tools and materials, although it didn't look very pretty.
Whilst clearing out my stash, I found a couple of very pretty paper napkins which inspired me to try decoupage.
I decided to alter the box into something pretty which I will be happy to have on display and useful in my craft room. Firstly I applied a couple of coats of cream acrylic paint to cover up the black paint already on the box.
Today I have a project to share with you which I've been working on in spare moments over the past couple of weeks or so. It's now finally finished, so I thought I'd post some pix here on my Blog.
A couple of years ago I received a gift hamper with everything contained inside a wooden box which was made from rough wood and painted with mat black paint. It was too good to throw away, so I have been using it to store various craft tools and materials, although it didn't look very pretty.
Whilst clearing out my stash, I found a couple of very pretty paper napkins which inspired me to try decoupage.
After the cream paint was dry, I used fine sandpaper to distress the top edges and corners, rubbing off the cream paint to reveal the black a little on edges where natural wear and tear would be typical. I glued on a piece of green baise (which I'd also found in my stash clearout) to the base, this will prevent the box scratching any surface I place it on.
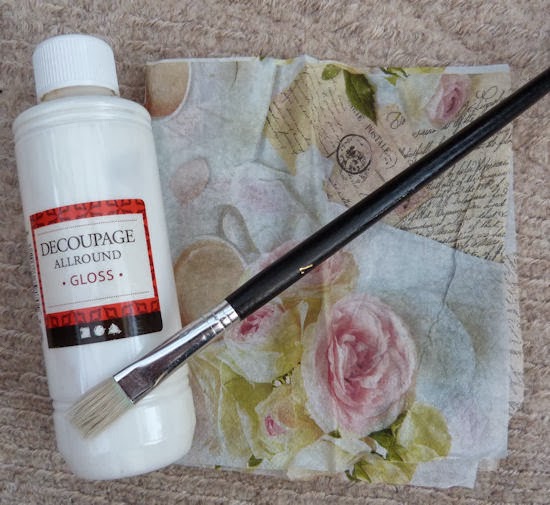
I applied pieces of the paper napkin, using decopage glue/glaze applied with a brush to cover the outside of box.
On the inside I added a small amount of decoration, firstly using a stencil and Treasure Gold paste to create a design in the centre. I also brushed more of the Treasure Gold randomly over parts of the inside.
Once the stencilled design was dry, I used Walnut Stain Distress Ink applied by brush to add further aging/distressing to the inside - particularly in the corners and around the top edges of the box where I'd previously distressed using sand paper, and across the grain to emphasise it.
The final stage was to spray the box all over with Crafters' Companion Spray and Shine - a light varnish. Using two coats to seal and protect all the decoration, but still allow natural distressing to take place through usage.
I can't wait to finish the reorganisation of my craft room and put my newly upcycled pretty box on display.
Hope you've enjoyed your visit today, a different type of craft for me, and one I really enjoyed - you may see other decopaged projects from me in the future, now I've got the bug ! My eye is wandering over the house to see if there are any other items I can decorate - watch this space.......
Thanks for taking the time to drop by here today, I hope you find time for some crafting !
Thursday, 20 February 2014
Buttons and Bows
Good Morning Folks, how are you doing today ? Good I hope.
As it's Thursday I'm sharing with you my DT creation for this latest challenge starting today over on the Cute Card Thursday Blog. This week's theme is 'Buttons and Bows' and our prize is sponsored by Whimsy Stamps.
I decided on a simple layout with minimum embellishments, just a tiny ribbon bow and pretty little flower shaped buttons which, along with the background paper, are from a Papermania Capsule Collection - which I've had in my stash for a very long time !
The image was stamped using a lovely Lilli of the Valley stamp and Memento Rich Cocoa ink - I like the effect I get using this colour ink rather than stamping in black, the image edges are less defined and softer.
I coloured the image using Copics, added touches of Glossy Accents and Stardust Stickles. The sentiment is from a set of stamps by Stampin' Up!, stamped using SU! Island Indigo ink.
For the background I used a set of Marianne's Design oval Passe Partout dies. I took a square of white card the same size as the base card and cut the pretty lace edged aperture in the centre. I then used the largest die of the set to cut an aperture in the centre of the background paper. With the paper layered over the white square of card, only the lacy edge shows through. Finally I added the cut out oval of paper under the white card layer, thus 'sandwiching' the lacy edged cut out layer (not explained very well, but I hope you understand what I mean !!).
I cut the coloured image layer using the smallest plain oval die in the set and attached this in the centre using PinFlair Glue, to give it dimension.
Finally I added a tiny amount of Stickles around the edge of the oval image layer just to give a little discrete twinkle.
I hope you've enjoyed today's project, do pop over to the CCT Blog to check out the amazing creations from the rest of the DT and to get full details of this week's challenge.
Thanks for dropping by today, hope to see you again real soon.
Sunday, 16 February 2014
Monochrome Lavinia
Welcome to my little bit of Blogland thanks for taking the time to visit.
As you will have noticed if you've visited here over the past few days, stamping grandma has been very busy ! Today I'm sharing another card created using one of my lovely Lavinia stamps - I had forgotten just how much I love these images until I dug out my box of stamps a few days ago whilst looking for something else !
Thanks for popping in, hope you enjoyed today's project. Happy Crafting !
As you will have noticed if you've visited here over the past few days, stamping grandma has been very busy ! Today I'm sharing another card created using one of my lovely Lavinia stamps - I had forgotten just how much I love these images until I dug out my box of stamps a few days ago whilst looking for something else !
Firstly I created a background using Distress Inks - Weathered Wood and Black Soot. I then stamped the Lavinia Chinese Lantern image using black Archival ink and the sentiment from a set by Chapel Arts stamps.
I highlighted parts of the Chinese Lantern image using a white Wink of Stella pen and dabbed Distress Stain in Pewter randomly over the background. I then sprayed pearl Smooch Spritz all over the layer to add a hint of subtle sheen.
Adding a red ribbon across the corner and matting the stamped layer over a piece of red card brings the whole thing to life I think. I found the grey pearls in my box of gems and they were just perfect as a finishing touch.
Thanks for popping in, hope you enjoyed today's project. Happy Crafting !
Saturday, 15 February 2014
Splatting, Brayering and Building a Scene
Well, the weekend is here and, despite being battered by the dreadful storms hitting the UK, I'm safe and dry !
Today I'm sharing projects I created at the South West Arty Crafters workshop run by Bernie Simmons in Plymouth last Thursday. This month we had fun playing with our brayers, splatting with Distress Stains and building a scene using inks, masks and silhouette stamps. Actually, today's post is a bit of a 'buy one, get two free' deal as I'm sharing three projects today.
I just love how this card turned out, what a great layout design with the stamped layer circle asymmetrically cut then reassembled. I will use this technique again without doubt.
I used three stamps from a Paper Artsy JOFY stamp set for my design and selected bold colours of Distress Stains for the splatting technique.
The image was first stamped closer to the left hand edge of the circle rather than in the centre. Then taking each of the colours of Distress Stain in turn, 'smashing' the sponge top of the bottle onto the paper - with just enough force to cause the splatter effect, rather than just dabbing which would have produced a circle of colour.
Once dry, the stamped circle was cut into four pieces then reassembled on top of a slightly larger red layer. This was then, using foam pads, attached over a slightly larger white layer and then a larger red layer, before attaching to a square white layer and finally a larger red layer. This was then attached to the base card.
I'm entering my card for this week' CASology challenge which has the theme 'Bold'.
At the workshop we also did a brayered project using masks and Adirondack inks on glossy card.
The stamped image is by Hobby Art and I used a fine black pen to add a hand drawn border around the completed design.
Our final project was building a scene with masks and inks - applied with brushes - over glossy card. The children with tree and swing image is (I believe) by Clarity Stamps and the birds are from a set of Inkyliscious stamps, these were all stamped using black Archival ink.
That's it from me today, hope you enjoyed these new projects, thanks for taking the time to drop in.
Friday, 14 February 2014
Happy Velentine's Day
Happy Valentine's Day to all my visitors and followers, I hope you are having a lovely day.
Once again here in Cornwall we are being battered by severe storms, very high winds and heavy rain but so far no hail today although it is quite cold. Once again, I'm so grateful that we live a little inland and not on the coast and not in a flood prone area. I hope everyone manages to stay safe (if not dry) through this dreadful weather.
Today's project is a Valentine's card - what else !
This is a one layer card with just one tiny embellishment.
I used the fabby large Impression Obsession 'Cover a Page' script stamp, but first I used a couple of Craft Stamper freebie stamps - the dotty heart and the heart with bird. I stamped them onto masking paper (it's a little more expensive than post-it notes but I get a better result with my masking using it as it's lightly tacky all over) the dotty heart twice and heart with bird once. I cut them out and attached them to the front of the card where I wanted the final images to be.
I then used the large script stamp with Memento Tuxedo Black ink to stamp once onto the front of the card (including over the masked areas). Once the ink was dry I removed the masks, exposing unstamped areas just the right size for stamping into with the heart shaped stamps.
Using Stampin' Up! Raspberry Ripple ink I stamped into the blank spaces - I love how the red really 'pops' against the black text. I stamped the tiny sentiment using an SU! stamp and matching tiny scallop punch, before attaching it over the bottom heart, using Pin Flair glue to add dimension.
Finally, I added Glossy Accents on the sentiment and on the bird, branch, flower and swirls in the centre heart image, just to give it a little more interest and texture.
Clean and Simple and just right for this week's challenge over on the Less is More Blog I think as the theme is 'Anything Goes'.
Thanks for calling in to see what's been going on in Stamping Grandma's crafty space today, stay warm, dry and safe if you are experiencing bad weather. Hope you'll be back here real soon.
Thursday, 13 February 2014
Clever Cutting
Happy Thursday Crafters, hope you are having a great day.
As it's Thursday, we have a new challenge starting over on the Cute Card Thursday Blog today, our theme is 'Clever Cutting' and out prize this week is sponsored by Whiff of Joy Stamps.
Here's my Design Team creation for the challenge
My take on the theme was to use a lovely Tattered Lace die to cut out this very nice wintery scene from white cardstock.
I wanted to keep the design clean and crisp so used just white and dark blue - I used Stampin' Up! Midnight Muse cardstock for the blue.
The flowers were created using the Memory Box Fabulous Phlox dies, cut from white cardstock and shaped using a large ball tool before layering up. The pretty fronds are part of the same die set.
As a finishing touch I added clear Wink of Stella over the edges of flower petals and on snowflakes, although it just doesn't show up in the pic, IRL it has added a very subtle twinkle.
I didn't add a sentiment to the front of the card as I wanted to maintain the clean design and made two identical cards, thus adding to my slowly growing stock of cards for Christmas 2014.
Thanks for dropping by to check out today's project, do go check out the fabulous work from the rest of the DT over on the CCT blog, you won't fail to be inspired ! Happy Crafting x
Tuesday, 11 February 2014
Welcome Sweet Baby Girl
Good morning Dear Bloggers, I'd like to wish our pal Steve K a Very Happy Birthday today, it's a 'Special' one this year - have a fun filled day and a great celebration Steve.
The project I'm sharing with you today is a new baby congratulations card, made for friends who have just become parents for the first time. Their sweet baby girl was born a few days ago.
I decided on a CAS style card keeping to white with a touch of pink. It's a 5 x 5 base card and I embossed the smaller white layer with an embossing folder.
The cute image is a stamp by Little Claires, lovely quick and easy to colour and works well for a boy or girl. I coloured the image using Copics before cutting out with an oval nestie. I then added this over a slightly larger pink layer cut using a scalloped oval nestie die.
The two sentiments are by Stampin' Up! and were stamped onto a scrap of the pink card using SU! Cherry Cobbler ink. I don't have the dies to match these sentiments, but was able to cut them out using scissors quite easily. I added another of the congratulations banner to the inside of the card.
I hope our friends like the card, I'm also making a cosy quilt for the baby using soft and snuggly flannel fabric. It's not quite finished yet, but as soon as it's completed I'll share pix.
Thanks for dropping by to check today's project, before you go I have one more thing to share with you. You may be aware that I'm undertaking a major reorganisation of my craft room, trying to ruthlessly sort out all the stash items which I've either outgrown - due to change of style - or will never ever use. Some of these I plan to sell - particularly stamps and punches that I won't use again - and the rest will go to a local church crafting group.
As part of my stash reorganisation, I've found a great new way to store and manage my Distress Inks (with thanks to the ladies at the recent workshop I attended at Scrapbook Magic in Mullion who shared their storage idea with me)
I purchased these 'Really Useful Box Company' boxes at our local 'The Range' store and they fit the DI pads perfectly. I printed off all the ink names on my computer and cut them out as labels. Before sticking the labels to the edges of the pads, I coloured the end of each one with the ink so I know at a glance what each colour looks like.
Rather than putting all the ink pads into one large box - which would be heavy to lug around - I decided on these boxes which hold sixteen pads in each one, arranged in piles of four. Much lighter to carry around if I want only a few colours - I've grouped them into colour families for ease of use to.
That's all, have a great day !
Sunday, 9 February 2014
Lavinia by Moonlight
Well, I guess the weekend is just about over, how was yours ? The weather in my part of Cornwall has been 'interesting' to say the least ! Of course we've had rain - can't remember what it's like to have a totally dry day - lots of strong winds and today the temperature dropped a little and the rain to turned to hail, we did have a few sunny spells but they didn't last long.
Whilst looking through some Facebook posts, I came upon one by Lavinia Stamps and a couple of links which took me on to others. Upshot of this was that I visited the Lavinia Stamps Challenge Blog and discovered that their challenge this month is to use 'Blue or Lilac or Both'.
After having fun at the tag workshop last week, using Distress Inks and other techniques, I've realised just how much I love using my DIs - just perfect for creating an entry for the Lavinia challenge so I thought I'd enter this month.
My Lavinia stamps haven't been out to play for far too long and I'd forgotten just how much I love them, such beautiful fantasy images.
Here's the card I created as my entry
I used the following Distress Inks, applied with Inkiliscious brushes
Some of the images were stamped with black Archival ink, the others stamped with Versamark, white embossing powder sprinkled over and heated with a heat gun.
Very simple techniques, but quite a striking result I think. Anyway, wish me luck in the Lavinia challenge !
Thanks for dropping by to check my latest project.
Whilst looking through some Facebook posts, I came upon one by Lavinia Stamps and a couple of links which took me on to others. Upshot of this was that I visited the Lavinia Stamps Challenge Blog and discovered that their challenge this month is to use 'Blue or Lilac or Both'.
After having fun at the tag workshop last week, using Distress Inks and other techniques, I've realised just how much I love using my DIs - just perfect for creating an entry for the Lavinia challenge so I thought I'd enter this month.
My Lavinia stamps haven't been out to play for far too long and I'd forgotten just how much I love them, such beautiful fantasy images.
Here's the card I created as my entry
I used the following Distress Inks, applied with Inkiliscious brushes
- Stormy Sky
- Chipped Sapphire
- Dusty Concorde
- Shaded Lilac
- Seedless Preserves
Some of the images were stamped with black Archival ink, the others stamped with Versamark, white embossing powder sprinkled over and heated with a heat gun.
Very simple techniques, but quite a striking result I think. Anyway, wish me luck in the Lavinia challenge !
Thanks for dropping by to check my latest project.
Saturday, 8 February 2014
Tags, Tags and More Tags
Happy Saturday dear bloggers. I'm sitting here watching the weather unfold outside my windows and we are bracing ourselves for the 'mega storm' to hit us down here in Cornwall. There has been so much structural damage to properties and businesses on the coast and it's forecast for even worse weather to hit today - stay safe everyone.
I consider myself incredibly fortunate and Blessed that I don't live in one of the areas suffering horrendous flooding and my heart goes out to the poor people whose homes and lands are flooded. It must be heartbreaking to watch the water levels continuing to rise.
Today I'm sharing pix of the tags I created during a workshop I attended last Wednesday at Scrapbook Magic in Mullion, Cornwall.
During the workshop we used different techniques and materials to create six tags. This is a shot of all six of the tags.
Tag 1. Blended, Spritz and Flick using Distress Inks (DIs applied and tag dried with heatgun, water spritzed on parts then dried again, water drops flicked on parts and dried)
Tag 2. Brushless Watercolour (stamp coloured using water based pens, spritzed with water and stamped onto watercolour paper)
Tag 3. Wrinkle-Free Distress (DIs applied to craft mat, spritzed with water, tag dabbed into ink, dried, then repeated until happy with colour and inks used up, then dried with heat gun)
Crumb cake cardstock, Baked Brown Sugar and Cherry Cobbler inks, Petite Petals stamp set, white chalk marker pen (used to outline the larger stamped flowers) dotty embossing folder and Itty Bitty Banners stamp set.
Have a great weekend, thanks for dropping by to see my projects today.
I consider myself incredibly fortunate and Blessed that I don't live in one of the areas suffering horrendous flooding and my heart goes out to the poor people whose homes and lands are flooded. It must be heartbreaking to watch the water levels continuing to rise.
Today I'm sharing pix of the tags I created during a workshop I attended last Wednesday at Scrapbook Magic in Mullion, Cornwall.
During the workshop we used different techniques and materials to create six tags. This is a shot of all six of the tags.
Tag 1. Blended, Spritz and Flick using Distress Inks (DIs applied and tag dried with heatgun, water spritzed on parts then dried again, water drops flicked on parts and dried)
Tag 2. Brushless Watercolour (stamp coloured using water based pens, spritzed with water and stamped onto watercolour paper)
Tag 3. Wrinkle-Free Distress (DIs applied to craft mat, spritzed with water, tag dabbed into ink, dried, then repeated until happy with colour and inks used up, then dried with heat gun)
Tag 4. Alcohol Agates (Alcohol inks and glossy paper to create background, image overstamped using Archival Ink)
Tag 5. Archival Resist (glossy card, various images stamped over background using coloured Archival Inks, DIs applied and then buffed off with soft rag to reveal the vibrant colours, image overstamped using black Archival Ink)
Tag 6. Reflections Stamping (using Archival ink, stamp onto inside of embossing folder, emboss tag to transfer the image. Tag then coloured using DIs.
It was a fun workshop and I met some lovely ladies. Margaret, owner of Scrapbook Magic, is so friendly and there's lots of space to work in the workshop area - far too many yummy 'must haves' in the shop too !!
Finally, here's another small tag made yesterday evening during a Stampin' Up! demonstration at my pal Jacqueline's home.Crumb cake cardstock, Baked Brown Sugar and Cherry Cobbler inks, Petite Petals stamp set, white chalk marker pen (used to outline the larger stamped flowers) dotty embossing folder and Itty Bitty Banners stamp set.
Have a great weekend, thanks for dropping by to see my projects today.
Thursday, 6 February 2014
Lots of Love
There's certainly a great deal of Love in the air at this time of year and our theme for this week's Challenge over on the Cute Card Thursday Blog - 'Lots of Love' is just perfect. Our prize sponsor for this challenge is Bunny Zoe Crafts.
Here's my DT card
I started with a 6x6 base card and attached a layer of SU! Cherry Cobbler cardstock. Using a Script Impression Obsession Cover-a-Page stamp I stamped a background layer - these large stamps are amazing, I have a couple and I love them. I cut the stamped layer to be just a little smaller than the red layer.
Using a Marianne's Design Passe Partout oval die set I cut the pretty red frame and using the same set, cut a plain oval from white cardstock for behind the lacy frame. I then used a Nellies Choice set of heart dies to first cut a fancy heart shape from the red card and the next size larger from white card.
The central embellishment I created using air dry clay and a pretty heart shaped ornate silicon mould - bought from Ali Crafts at Westpoint last week. It takes around 24 hours for the clay to dry and once dry I used Festive Berries Distress Ink and one of my Inkyliscious brushes to add colour to the heart. I left the DI to try for a while, then using my finger I rubbed Treasure Gold Paste lightly over the top to add a light touch of gold. Finally I sprayed the heart with a couple of coats of Crafters' Companion Spray and Shine to give it just a light sheen and strengthen it. Embellishments made using the air dry clay are extremely lightweight, so they don't add a lot to the final weight of a card for posting. They do, however, add depth to the finished card, so would need a Large Letter stamp to mail.
The L O V E letters were stamped using a set of freebie stamps and SU! Raspberry Ripple ink, cut out and attached using Pin Flair Glue, then covered with Glossy Accents to give them extra dimension.
I added a touch of Stardust Stickles around the edge of the oval and white heart layer to give the design a little sparkle and, as a finishing touch, added a bow made from a length of red organza ribbon.
Do pop over to the CCT Blog to check out the awesome creations from the rest of the DT.
Thanks for calling in here today, hope you enjoyed today's project.
Tuesday, 4 February 2014
Cute Snowman or Stan Laurel ?
As I'm sitting writing this post, the rain is lashing down (just for a change) and it's blowing a gale outside. I'm so sick of the rain I tell you, can't wait for some nice Spring weather.
With it being so cold and wintry outdoors I thought I'd share another Christmas card with you. I made this one whilst with my pals at our regular weekly crafting get together. We all used the same stamp set but each of our cards turned out really differently.
This is one more to add to my stock for this year, I am slowly building up my stock but not meeting my personal goal of making at least two cards each week.
The stamps are clear acrylic and I do find that very detailed images on acrylic are best stamped using Archival ink. I stamped him onto white card, added a little clear Wink of Stella to parts of the image - which adds a subtle twinkly sheen - pretty IRL but difficult to capture in a pic.
After cutting the image out I mounted it on a scrap of SU! Baja Breeze cardstock and used a small strip of the same cardstock to layer over the pretty blue checked paper strip across the middle.
I confess that I added the sentiment once I was back at home, I thought it needed a little something more to complete the design. The sentiment is from a set by Little Claire's and I stamped it using SU! Baja Breeze ink, punched it out with a circle punch and added a little of the Wink of Stella pen on bits of the image. I then attached it to the card with Pin Flair glue to give it dimension.
I do so hope that you are experiencing better weather than we are here in the South West of the UK and to all those in flood warning areas, I hope you manage to stay safe through these storms. Tomorrow I'm due to travel to Mullion for a workshop at Scrapbook Magic, the weather forecast isn't good so we could be in for an uncomfortable journey. My pal Linda is driving so I'll be able to save my energy for the workshop. Wish us Luck !
Thank you so much for visiting to check out my latest project, hope you enjoyed your visit and do drop by again any time, it's great to 'see' you - I do check my blog's background statistics and I know that I receive lots of visitors, thank you all.
Monday, 3 February 2014
Needle Felted Brooch
Welcome to Stamping Grandma's crafting space, how's your day going so far ? Just for a change it's pouring with rain in my part of Cornwall and it's very windy. I'm so very grateful that I don't live right on the coast as there is some pretty nasty weather forecast for today. Here's hoping that all those in the danger areas manage to stay safe during this stormy weather. I do feel so sorry for people living in areas where flooding is a major problem. I do hope the rain stops soon !
Today I've a needle felted project to share with you. Recently I attended a workshop in a local village, which was great fun, here's what I made:
We started by cutting a piece of pre-felt into the shape we wanted, I chose to make mine heart-shaped. Then it was on to choosing a colour theme, selecting wool tops in our chosen colours and laying down the base colour onto the pre-felt shape by stabbing it with the (very sharp) barbed felting needle.
As you can see, my chosen colours were shades of purple and I added in various bits and pieces of thread and yarn as I developed my design.
Finally I created the central element by cutting out a scrap of lacy fabric, felted a round button shape and stitched on a pretty bead to finish off the design. I stitched a brooch pin on the back and called it done.
I had dabbled a little with needle felting previously but learned a few tricks and techniques at the workshop so it was well worth attending.
I hope you've enjoyed today's project, thanks so much for stopping by today.
Sunday, 2 February 2014
Westpoint Craft Stash Haul
As I promised yesterday, here are a few pix of my new stash items bought at the Craft4Crafters show at Exeter Westpoint last Thursday.
There are some items wrapped in the carrier bag which are for a project to take to the Craftathon at the end of February (a group of online crafters who have become friends over the past few years and meet up once a year for a weekend of crafting and fun was named Craftathon by my pal Kathy - our very own Purple Princess !). I've kept these items wrapped so as not to spoil the surprise. The Spray and Shine will also be useful for the Craftathon project and I have a few more ideas in mind to use it on.
I've used a template from The House of Zandra before and as impressed, so thought this one for a display cabinet would be a great project to have a go at as I want to make more 3D projects.
I have a few silicon moulds from Martha Stewart and have enjoyed using air dry clay to make flowers and other embellishments and loved the look of these moulds so bought a few more. On the Ali Crafts stand they were demonstrating using the white Mod Podge sticks (for use in hot glue guns) and moulds to create some very pretty flowers etc. After cooling and pressing out of the mould they were coloured with Inks then burnished with Treasure Gold paste. I'm looking forward to having a play with the MP glue and my new TG colour.
Finally, I just couldn't resist these gorgeous curly merino wool tops to use with my needle felting, plus the very pretty and soft merino wool pre-felt. The colours in the wool and silk mix thread is so much more vibrant IRL, the larger piece at the bottom was created by needle felting scraps of silk and wool together. I have a few ideas in mind for these.
I didn't bother to take pix of the 'essentials' I picked up - DS tape, Pinflair Glue, fine tipped glue bottles etc as they're much more boring than the things I've shown you here !
All I need to do now is great creative with all this lovely new stash, I promise to share the results with you once they're completed.
Have a great day, wherever you are and whatever you have planned.
I had considered buying the We R Memory Keepers Thumb Notch Punch online from Oyster Stamps so when I saw it on their stand, I thought I'd get it. I'm hoping that it will prove more robust and punch through thicker card/layers than using a circle punch.
I've had the Graphic 45 Steampunk Spells papers for a while but hadn't invested in any of the matching stamp sets, Ali Crafts had the stamps reduced by £1 per set so I thought it was time to get this set as I love the clock with wings especially.
I do love the Kaisercraft background stamps and my pal Kathy uses this number stamp often and I really like it, so it also fell into my basket on the Ali Craft stand, as did the set of stencil brushes and pot of Treasure Gold. The metal embellies were in their bargain bucket at £1 per pack so I picked up the keys with wings and the scissors.
I love these two sentiment stamps from Inkyliscious and they were a bargain at £3 each. I can't recall which stand I bought the Wink of Stella Pens from but got a pink and a purple one to add to the colours I already have.
There are some items wrapped in the carrier bag which are for a project to take to the Craftathon at the end of February (a group of online crafters who have become friends over the past few years and meet up once a year for a weekend of crafting and fun was named Craftathon by my pal Kathy - our very own Purple Princess !). I've kept these items wrapped so as not to spoil the surprise. The Spray and Shine will also be useful for the Craftathon project and I have a few more ideas in mind to use it on.
I've used a template from The House of Zandra before and as impressed, so thought this one for a display cabinet would be a great project to have a go at as I want to make more 3D projects.
I have a few silicon moulds from Martha Stewart and have enjoyed using air dry clay to make flowers and other embellishments and loved the look of these moulds so bought a few more. On the Ali Crafts stand they were demonstrating using the white Mod Podge sticks (for use in hot glue guns) and moulds to create some very pretty flowers etc. After cooling and pressing out of the mould they were coloured with Inks then burnished with Treasure Gold paste. I'm looking forward to having a play with the MP glue and my new TG colour.
Finally, I just couldn't resist these gorgeous curly merino wool tops to use with my needle felting, plus the very pretty and soft merino wool pre-felt. The colours in the wool and silk mix thread is so much more vibrant IRL, the larger piece at the bottom was created by needle felting scraps of silk and wool together. I have a few ideas in mind for these.
I didn't bother to take pix of the 'essentials' I picked up - DS tape, Pinflair Glue, fine tipped glue bottles etc as they're much more boring than the things I've shown you here !
All I need to do now is great creative with all this lovely new stash, I promise to share the results with you once they're completed.
Have a great day, wherever you are and whatever you have planned.
Saturday, 1 February 2014
Something New
Hi Bloggers - I've a huge apology to make to you all, I just plain forgot to schedule in the post sharing my Cute Card Thursday DT project for this week. It should have posted up on here on Thursday morning, but just didn't happen and I've had a busy couple of days.
This week's CCT theme is 'Something New' and our prize is sponsored by All Dressed Up this week.
You can check out the great digi's available by clicking on the link above.
I've used this really sweet image from All Dressed Up for my DT card. It's such a pretty image and perfect for creating another Christmas card to add to my stock ready for the end of this year. I'm trying get at least one card made each week throughout the year so as to avoid the last minute rush in November.
I coloured the image using Copics, added touches of Wink of Stella pen and some Glossy Accents on the tree baubles to give them dimension. The card is an easel card with the holly berries and red gems acting as the easel stops on the base.
The holly leaves were cut using a Spellbinders die, the scrap of Christmas ribbon was from my stash and all the coloured card and paper used is from Stampin' Up! I added the festive red button, tied with twine as a small embellishment.
The design is clean and unfussy, not quite CAS though.
I visited the Crafts4Crafters show at Exeter Westpoint on Thursday with a couple of crafting buddies. It was a great day, lots of exhibitors and I managed to find a few new things which needed to come home to live in my stash ! Totally exhausting though and yesterday I was aching all over and very tired ! I'll share some pix of my new stash as soon as I've edited them.
Thanks for visiting to check out my project, hope you enjoyed your visit.
Subscribe to:
Posts (Atom)