Thursday, 7 November 2013

Animal Magic

Happy Thursday Folks, hope you're having a great day.  The new challenge starting today over on the Cute Card Thursday Blog has the theme 'Animal Magic' and our prize this week is sponsored by Bunny Zoe Crafts.


For my DT card this week I decided to use these two adorable House Mouse images that have been sitting in my stamped image box waiting to be coloured and used. 

I created a background to 'suggest' the sky by taking a piece of SU! patterned paper and adding Distress Inks with a piece of cut and dry around the edges and across to look a little like clouds.   Using a craft knife I cut a piece of SU! Crumbcake cardstock to look like uneven ground, again I used DI to add shading.

I coloured the images using ProMarkers, adding Glossy Accents on the balloons and the cute little noses of the mousie and baby bunny.

The sentiment is from a set by Lilli of the Valley which I stamped and cut out using a Sizzix banner die.  The flowers were cut using a Penny Black die (the stem is much longer but I trimmed it to fit my design) cutting the flower head from a scrap of SU! patterned paper.  Gems were all from my stash.

I hope you've enjoyed today's project, do pop over to the CCT Blog to check the fabulous creations from the rest of the DT.

Wednesday, 6 November 2013

Happy 87th Birthday Dad !

As my title says, today my amazing Dad is 87 years young.  This year I am Blessed to have him here staying with me so I can celebrate with him.  Have an awesome day Dad x

I made this card especially for him - it says just how I feel about him.


I used some digi images from Rebecca B's blog and fussy cut out each word before attaching using foam pads.  The letters were in a bag of alphabet chipboard cut outs, I've used quite a lot of them in my Smash Books, but found the appropriate letters to spell DAD still in the bag.

That's it, simple but I like it - hope Dad does too !  We are heading out to his favourite restaurant this evening for a birthday celebration meal.

Monday, 4 November 2013

Waste Not, Want Not !

I'm guessing my post title caught your attention then !  Thanks for dropping by today to check my latest project.

I do so like it when I can use up even the tiniest scrap of my stash and today's card does just that.  Whilst creating yesterday's card using the Dees Distinctively Die sentiment die it left me with the outline on the scrap of cardstock I'd used, perfect to use on another card and much better than having it end up in the bin.  I like how the 'Merry' is set at a jaunty angle - not done deliberately as when I cut it I was only concerned with creating the diecut words, just one of those creative 'happy accidents' I guess !

 
I used a different Cuttlebug embossing folder than on yesterday's card to create the background for this one. then attached the sentiment panel with Pin Flair glue to lift it up a little.  I then tied some festive red and white striped twine around the top and finished with a bow.  I've also entered this card in the current Rudolph Challenge on Craftbubble II.
 
A really quick and simple design, but I think it looks classic and neat and meets my requirement for flat cards to mail out.  I may well make a few more in this design to help swell my Christmas card stock and (hopefully) be well prepared a little earlier this year !
 
Thanks for visiting today, have a great week.

Sunday, 3 November 2013

Merry Christmas

Happy Sunday Bloggers, hope you're having a great day.  Today I shall be heading along the M6 and M5 bringing my Dad home to spend a couple of weeks with me - which makes me very happy !  He'll be celebrating his 87th Birthday while he's with me too, which is even better.

My project today is a card I created to enter for the Rudolph Day challenge on Craftbubble II which has the theme of 'embossing' this month.


I used a Christmas themed embossing folder to emboss the base card, adding Stardust Stickles on all the snowflakes.  I used a Dees Distinctively Dies sentiment die to cut out the Merry Christmas from a scrap of SU! Cherry Cobbler cardstock.  The holly sprigs were cut using a Marianne's die and the berries were created with a red Waco Pearlmaker pen.

That's another Christmas card in my stock, although I still have loads to make in the next couple of weeks.  I'm trying to keep the bulk of my cards fairly flat in order to keep postage costs down a little for those I have to mail to friends and family in far away places. 

Have a happy and creative day, whatever your plans are.

Saturday, 2 November 2013

JOY

Morning Folks, just a quick drive-by posting from me today, again I'm away from home - this time spending a few days visting my Dad, Brother and family.

I made this ATC whilst crafting with my pal Kathy at her home in Florida during our vacation and thought I'd share it with you.

 
I applied Distress Inks to the base white ATC sized card, then dragged the same DI around the edges to give a tiny border.  I then used this, lovely corner image from a set of stamps by Hampton Art, coloured it with Copics and Promarkers added Glossy Accents and Platinum Stickles to give a bit of shine and sparkle to the design.
 
That's it from me for  - well I did say it was a quick drive-by post today !
 
Thanks for visiting to check out today's project, I hope you'll stop by again real soon.

Thursday, 31 October 2013

Sparkles

Welcome to Thursday here on my little bit of Blogland.  It's time for a new challenge over on the Cute Card Thursday Blog and this week our challenge theme is 'Sparkles' with our prize sponsored by Heather's Hobby Heaven.

For my DT card I decided to use one of my newly acquired stamps to create a Christmas card - well, there's not many weeks left until the 'Big' day, and my stock of cards is woefully inadequate !


Sadly you will have to take my word for it that my card has lots of sparkle on it, as usual it is soooo difficult to capture the sparkle in a photograph.

The stamp is from Stampendous and was on my shopping list for the vacation after I'd seen it in a magazine - I just love this image.

I stamped the image first on to a piece of kraft coloured cardstock, then stamped again on white card.  After cutting out the central oval element stamped in white I used my Promarkers to colour the picture.  Whilst cutting out the central oval I carefully fussy cut around the holly sprig in top left.

Using dark brown cardstock and a piece of paper from a Graphic 45 paperstack I layered the whole thing up, finishing with the coloured oval stamped on white.  I then added Stickles all over the snowy areas and dusted over the wet Stickles with Glamour Dust for added sparkle.  Finally I added more Stickles around the edge of central oval, used a red Waco Pearlmaker Pen over the holly berries and Glossy Accents on the leaves.

I hope you've enjoyed today's project, do pop over to the CCT blog to check out all the amazing creations from the rest of the DT. 

Wednesday, 30 October 2013

Candy Cane Wishes

Happy Wednesday everyone, hope you're having a great day.  At least it's dry in my little bit of Cornwall at the moment, although quite breezy and a tad chilly.  This morning I ordered some Christmas gifts online and it's got me into the festive mood, just as well really as I have to 'get a wiggle on' if I'm not going to end up in a made frenzy of cardmaking in order to get all my Christmas cards made in time.

Today the project I'm sharing with you is the last of the ATCs I created whilst crafting with my pal Kathy and using her stash.  Given my mood today and as it's a Christmas themed ATC, I thought I'd post it up today.


I first created a background using Distress Inks - I used Barn Door and Festive Berries, applied with a brush.  I then overstamped with the same DIs using a couple of Kathy's stamps (not sure of the manufacturer of the 'sequin waste' stamp but I'm sure Kathy will enlighten me when she reads this !). 

Finally adding the fab Candy Cane image from a set of Christmas stamps from Inkadinkado - which both Kathy and I bought a couple of years ago - stamped using Memento Tuxedo Black ink.  The sentiment is from another set of stamps in Kathy's stash. 

I then stamped a sweet little banner in the same DI using a stamp from a great set by Penny Black, in the top left corner.  I stamped this again on another scrap of card, cut it out and attached over the first impression using foam pads. 

As a finishing touch I added Plantinum Stickles on the stripes on the candy cane and on the small banner, with a little Glossy Accents over the bauble on the banner.  Unfortunately in the pic the pattern on the bauble is lost under the GA but can be seen IRL.

A while ago I used to make quite a few ATCs but in recent times haven't made any.  I have been busy making a set of five to send off for a swap and I thoroughly enjoyed working on this smaller area so may get back into making a few more.  I'm sure there must be lots of ATC challenges in Blogland that I could enter, a little online research is called for I think - unless any of my lovely readers can point me in the right direction !

That's it from me today, hope you enjoyed your visit.  I'll be sharing my DT card for the new Cute Card Thursday Challenge with you tomorrow, but for now......Keep on Crafting....
Tuesday, 29 October 2013

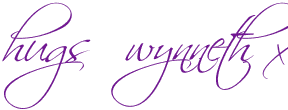
I 'Mustache' you to have a Fabulous Birthday

Yesterday was the 60th birthday of a friend and the project I'm sharing with you today is the birthday card I made for him.


I first created a background using Distress Inks, I then stamped a number of different images using the same DI's to make a subtly patterned background.  Finally  stamping the telephone image from a set of stamps by Recollections (brand name of stamps from Michaels Craft Stores in the USA) using Memento Tuxedo Black ink. 
 
The free stamps with the latest Craft Stamper Magazine are these fabby spectacles and mustache which were perfect for my design stamped using the Tuxedo Black ink.  I cut the numbers from a scrap of black cardstock using a set of Memory Box dies.
 
I matted the image layer over some pieces of SU! cardstock in Crumbcake and Black.
 
Here's a pic of the inside of the card, I carried the design through from the front and created a sentiment using the mustache image and letters cut from black card using Memory Box alphabet dies.  The cute little froggy cocktail image is a stamp from Sparkle and Sprinkle, I also stamped him on the outside of the envelope.


I hope our pal liked his card, he's on vacation in Florida as part of his birthday celebrations so I'm sure he's had a great day.

Monday, 28 October 2013

More Spooky Stuff - Halloween Star book

Hi there Bloggers, I've not posted on here very much lately, for which I apologise to those of you who swing by here regularly and have been disappointed not to see some new projects.

The main reason for my absence in Blogland is that I've been away in Florida on a wonderful vacation.  My pal Kathy and her hubby arrived at their Florida home during the second half of our time over there and we managed to fit in a fair bit of craft shopping and (probably a little too many) delicious meals out with them.  Their home is just about 20 minutes drive from where we were staying, so nice and handy.  I did manage a little crafting whilst I was away, some of which was done on Kathy's 'table of craftiness'.  We also managed to take in a 'Halloween Star Book' workshop at Violette's in Lakeland.  It was fun - fast and furious some of the time too !

Thanks to Kathy, here are a few pix of us all working hard


Pages under construction


Individual finished pages


... and the finished book as a star


front and back covers, seen when the book is closed


I'll do my best to have something posted on here for you to check out most days now that I'm home, I've a few creations waiting in the wings which I haven't shared with you so far.  Watch this space.....

Thursday, 24 October 2013

Spooktactular !

Well, with a post heading like that, you just KNOW I have a Halloween themed project to share with you today don't you ?  Ha Ha !

The new challenge starting over on the Cute Card Thursday Blog has 'Spooktacular' as it's theme and our prize sponsor for this challenge is Bugaboo Stamps.


With my DT card I've managed to use up some more magazine freebie papers - I don't tend to buy much stash in the Halloween theme as we don't really celebrate it and generally I make just one card to send to my Grandsons.

I dug out my Reflections (Michaels Stores) set of little monster stamps, stamped and coloured these images using my ProMarkers before fussy cutting them all out.  I stamped the sentiments and cut them out by hand.

The central orange panel was embossed with a pumpkin embossing folder before being distressed using Black Soot DI.  The length of 'hairy' twine was in my ribbon stash and I thought it was a perfect finishing touch.