Friday, 26 June 2015

BAT-ty Crazy Birds

TGiF and the weekend is almost upon us - got plans ?

Today I'm sharing a card with you that has lots going on in the design !  My pal Kathy the Purple Princess suggested I might like the Stampers Anonymous Tim Holtz Crazy Birds stamp set but I wasn't quite sure I'd use them.  I dillied and dallied for a while then decided to get them - only to find they were out of stock..... everywhere humph !

Undeterred I continued to search t'internet until I managed to find the set and I'm so glad I did, thanks Kathy.

Are you ready for this ?


Supplies I used to create my card

* 6 x 6 base card
* Crafters Companion Watercolour card
* BAT background created earlier using Bleeding Art Tissue punched shapes
* Tim Holtz stencils - Dots and Mesh
* Memory Box stencil - Circles
* Adirondack Inks - Wild Plum and Denim
* Dylusions Ink - White
* White chalk paint
* Stampers Anonymous Tim Holtz Crazy Birds stamp set - stamped once on the finished background and once on plain white card then fussy cut out
* Black Archival Ink
* ProMarkers to colour the cut out birds - coloured images attached over the images stamped onto background.
* Brusho Acrylic Shimmer Spray in Silver sprayed over the whole of finished background
* Crafters Companion Spray and Shine sprayed lightly over background to seal inks
* Sentiment from a magazine freebie set of stamps

Thanks for dropping by, have a great day.

Thursday, 25 June 2015

I've Been a Bit of a Sew and Sew !

Hi there friends, I thought I'd share a sewing project with you today for a change from the cards I've been posting lately.

When I visited my local fabric shop recently - Soft Touch Needlecrafts of Tavistock in Devon  - I saw a lovely cushion on display.  I enquired as to whether it was made during a workshop or class and the lovely lady there offered me a free copy of the pattern and pointed me towards packs they'd prepared containing sufficient fabric and notions to complete one cushion.   It would have been rude not to have purchased a pack or two don't you think ? wink, wink !  Like I NEED more fabric !!

So, here's what I did with my first pack
This is the front

and a close up of the front detail, showing the quilting stitches around each
square and around the appliqued heart in the centre, plus the applique
stitches around the heart - all done on my sewing machine


and finally the back view


First job was to cut the fabric into squares and, using the template included in the pattern, cut out five heart shapes.  Then ironing the heart shapes to a piece of Heat-n-Bond and cutting out again.  The heart shapes were then ironed onto five of the squares to stick them into place.  I then used an applique stitch on my sewing machine to sew around the raw edges of the heart shapes to attach them securely to the squares.

Next job was to sew all the squares together into a block of nine squares to produce the front of the cushion.  I then took the square of Calico, laid the batting over and then the front panel right side uppermost on the top to form the quilting 'sandwich'.  After pinning the layers together I quilted through the layers with my sewing machine, sewing parallel lines around the squares and shadowing around the hearts. 

Adding a layer of batting and one of calico under the front panel gives a nice padded front to the cushion cover and the quilting stitches add further interest.  The calico behind helps to protect the batting which could pull apart with use and or washing the cushion cover.

I made an envelope closure on the back, creating pieces of fabric large enough by sewing together all the little bits of the fabrics which were leftover after cutting out the squares and applique heart shapes for the front. 

There was a length of lace and a metal button provided in the pack but, after trying them against the front panel, I decided not use add them as it all just looked too busy.  Instead I used a simple wooden button from my stash to finish off the front, and I have the lace and metal button in my stash for a future project.

The lovely soft shades of blue and beige are so pretty and all the fabrics go so well together, I just love this cushion.

It was a fun project to do and I have another pack in a different colour way to make another one.

Supplies I used:
* Fabric Pack from Soft Touch Needlecrafts
* Free Pattern
* Square of Cotton Batting/Wadding slightly larger than the front
* Square of Calico the same size as the batting
* Feather filled cushion pad
* Heat n Bond
* Wooden Button
* Applique Stitch on my Janome Horizon 8900 sewing machine

I hope you enjoyed today's project, do you sew ?  I'd love to hear what different types of crafting you do.  Have a great day.
Wednesday, 24 June 2015

Thinking of Summer

Hi friends, how are you today ?  Feeling great I hope.

Today's project is another card I created using the BAT (Bleeding Art Tissue) technique.  A while back I punched out a whole pile of shapes from the BAT and made a little stock of backgrounds for later use.  It can get a little messy and often the tissue pieces can be used more than once, although the colour is less vibrant with further use.  Good idea to have a pile of pieces of card or paper handy to make lots of backrounds at the same time.

I used a piece of one of the ready prepared backgrounds for my card and overstamped with black ink for impact.


These are the supplies I used:

* C6 white scalloped base card
* Background made using watercolour card and Bleeding Art Tissue punched shapes
* Marion Emberson Designs stamp set (which incidentally I was 'forced' into buying by my pal   Lauren when we went on a crafting shopping trip - I tried to say no but resistance was futile Ha Ha)
* Black Archival Ink
* SU! cardstock for layering

That's it from me today, hope you enjoyed your visit, see you next time.

Tuesday, 23 June 2015

Time To Say Goodbye !


Hi there, no project from me today so I thought I'd share some pix taken on our last night here in sunny Spain.  I shall miss this beautiful place, the hot days and warm nights and glorious sunsets over the Mediterranean Sea aaahhhh !


Back tomorrow with a project for you, thanks for dropping by today.

Monday, 22 June 2015

Alternative Style Wedding Card

Here we are at the start of a whole new week and I hope I find you all well and happy today. 

Got anything special planned for this week ?  I shall be doing a fair bit of travelling over the next few days but have pre-scheduled a few posts so there will be something new to see on here if you do get chance to visit.

Today's project is a different take on the wedding card I shared with you a couple of days ago.  I made today's card at the same time as the last one but creating a really different look.

 
These are the supplies I used to create my card
 
* C6 kraft base card
* Stampers Anonymous Tim Holtz Runway stamp set
* Black Versafine ink to stamp the image
* Stampin Up! Whisper White ink, applied to the image using a Dove Blender Pen
* Ice Stickles applied to the headdress, bouquet and a couple of spots on the dress to add a little bling
 
I think I slightly prefer this version to the other one, although I like both of them.  If you've dropped by and seen both, which do you like best ?  I'd love to know.

Thanks for visiting, hope to see you again real soon.

Sunday, 21 June 2015

LIM Stencilling Challenge

Happy Sunday dear friends, how's your weekend panning out ?  Well I hope.  Mine will mostly be about packing bags and getting ready to leave sunny Spain and heading back to (fingers crossed) sunny Cornwall in a couple of days.  Might fit in a dip in the pool to cool off though as it does look so inviting !

Before I get to work I'd like to share with you a card I've created to enter this week's Less is More LIM challenge to use stencilling.


For this simple Thank You card I used the following supplies

* C6 base card
* Glitzcraft Bluebell stencil
* Glitzcraft Glitter Paste in blue and green applied through the stencil using a palette knife
* SU! cardstock for layering

Have a great day with some crafting fun if you can.

Saturday, 20 June 2015

A Very Special Day

Good morning all.  Today is a very special day for a young lady we know, a little later she'll walk down the aisle to meet the love of her life.  Wishing the happy couple a beautiful day and a life together filled with love, health and happiness.

Here is a pic of the wedding card I made for them, when I saw this stamp I knew it would be perfect for the card I wanted to make.


Here's a list of the supplies I used :
 
* 6 x 6 scalloped base card
* Image is from the Runway CM5214 set of stamps by Stampers Anonymous Tim Holtz Collection
* Versafine black ink
* Spectrum Aqua Pens and water brush to colour the image direct on base card
* Ice Stickles applied to the headdress and bouquet for a little sparkle
* Clear Wink of Stella Pen - light layer added over dress and veil to give a subtle twinkle
 
Have a wonderful day wherever you are and whatever you have planned for the day.


Friday, 19 June 2015

TGIF !

Hello dear friends, everyone who visits here regularly, occasionally or have just washed up on the shores of Stamping Grandma for the first time, thanks so much for taking the time to come see what I've been getting up to.

Today I'm sharing a birthday card I created a little while ago for a crafting pal.  I'm falling in love all over again with Kraft, Sepia and all things Vintage at the moment - what's your current crafting passion ? 

I have a box full of ready coloured images in my stash and when I rummaged through it recently I found this delightful vintage lady image and thought it was perfect to turn into a card.

Here's the finished card

These are the supplies I used:

* Image is by Hampton Art I believe (anyone who can correct me if I have this wrong, please do so)
* Stamped using Vintage Photo Distress Ink onto cream cardstock
* Water brush used to drag in some of the ink whilst still wet to colour the image
* Red heart shaped gem from my stash
* Scraps of SU! cardstock
* Scrap of lace and natural twine tied around image layer
* Double heart charm (recycled from packing of goods from Art From The Heart)
* Sentiment (again, not sure of the manufacturer of this one)
* Glossy Accents added to roses on the vintage lady's hat
* C6 kraft card blank and envelope

Hope you've enjoyed today's project and that you'll drop by again to see more of my creations in the future.

Tuesday, 16 June 2015

Definitely getting into the swing of this Mediterranean Lifestyle !


Hiya blogging friends, I don't have a crafting project to share with you today, but thought I'd share a few pix taken today.

Can't beat a nice coffee sitting outside in the shade 


As another beautiful day draws to a close, the view from the balcony - gonna miss this view I can tell Ya !


Hope to have some more craft-y projects to share with you soon

Hugs
Wynneth
X


Saturday, 13 June 2015

A JOFY Kinda Birthday

Good morning lovely Blog friends, followers, visitors and those who washed up here by accident !  It's a lovely sunny day for me today and I hope the weather where you are isn't too bad, especially those in the UK.

Today I thought I'd share a card created using another image coloured with my Spectrum Aqua Pens, this one very different to the last one I shared.


Supplies I used :

* Paper Artsy JOFY 11 stamp set used to create a collage effect and the sentiment
* Crafters' Companion Watercolour Card
* Spectrum Aqua Pens
* Waterbrush
* SU! cardstock for matting
* Black Pitt Pen
* 7 x 5 base card

After matting the coloured image onto a piece of SU! cardstock and attaching to the base card, I used the Pitt Pen to doodle a line incorporating 'to you' to complete the design.

I hope you've enjoyed your visit and today's project.  Have a great day yourself, whatever you have planned.  I shall be spending time with friends who are visiting this week.

Wednesday, 10 June 2015

Getting All Cute and Girly

Welcome to Wednesday here in my little piece of Blogland, I appreciate each and every one of you lovely visitors, followers and anyone who happens to drop in for the first time, either accidentally or following a link from somewhere !  I hope you find something to delight or inspire you.

I haven't made a lot of cutesy cards for some time, but today I thought I'd share one of the few with you.  The image was the first one I coloured with my recently acquired Spectrum Aqua pens.  I'm still learning how to get the most from them and the best way - for me - to produce colouring I'm totally happy with ( I know I'm my own harshest critic !)

Anyway, here's how I used the coloured image to create a card

List of supplies I used:

* 6 x 6 base card
* Penny Black stamp
* Spellbinders Nestabilities dies
* SU! cardstock - for layering - and sentiment
* Spectrum Aqua Watercolour Pens
* Glossy Accents (on flowers and dress ribbon)
*  Ribbon

I hope you've enjoyed seeing today's project, leave me a comment if you have the time, I love to hear everyone's thoughts on my work.

As it's Wednesday, I thought I'd also share a What's on Your Work Desk Wednesday (WOYWDW) pic


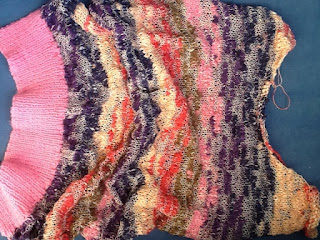
the easy vacation knitting project is all that's in my crafty workspace today.

Have a great day whatever you have planned.

Monday, 8 June 2015

Oriental Quilting

Happy Monday dear followers and visitors, got any exciting plans for this new week ?  I hope to fit in some crafting but apart from that it's pretty much unplanned the rest of the time.

Today I thought I'd share a sewing project with you.  The idea for my Oriental style quilt came about when I had a piece of left over black fleece after completing the quilt for my Grandson which I shared with you recently.  The fleece was large enough to make a lap size quilt and, whilst rummaging about in my fabric stash (looking for something completely different I might add) I came across a pack of ready cut 4 inch square pieces of fabric in a lovely black and white Willow Pattern design - Perfect !


You may well be thinking that the squares look larger than 4 x 4 inches and you are absolutely right.  I took one whole piece for the centre, cut two more pieces in half to create 4 rectangles and another square cut into quarters creating four small squares.  Then..... I stitched them all together again, mixing the different designs on the fabric to create the larger squares.

I added the red sashing (strips) vertically between rows of squares to create the design and I think the red makes the design really pop.

Here's a close up shot of the squares so you can see more clearly the smaller pieces sewn together.


I attached the fleece to the back (no need to add extra wadding or batting).  Finally I added the finishing quilting stitching using a lovely curved line pattern - which is a stitch built into my Janome Horizon 8900 sewing machine - following the seams and using black thread.  If you look closely at the close up shot you can just see the curved quilting stitch.  The quilting stitch also made a nice design on the fleece back. 

The last step was to use more strips of the red fabric to add a binding around the edges.

I hope you've enjoyed seeing today's project, thanks for dropping by.


Saturday, 6 June 2015

Feathers for a Male Pal's Birthday Card

Happy Saturday dear Bloggers, have you got plans for the weekend ?  We have friends coming to visit tomorrow but nothing so far planned for today.

The project I'm sharing with you is the card I created for a male pal's birthday recently.  I received the lovely feather die as a magazine freebie earlier and thought it was just perfect for a man's card.


Supplies used:

*Magazine freebie feather die
* SU! cardstock
* SU! sentiment stamp and matching die
* Washi Tape
* Stencil (manufacturer unknown)
* Distress Inks applied with cut-n-dry to create background
* Wooden Button
* String

Thanks for visiting, have a great weekend.

Friday, 5 June 2015

Going BAT- ty again !

Good morning Bloggers, I can't believe that Friday has come around again, this week has flown by for me - how about you ?

Today's project is another card I created using the Bleeding Art Tissue (BAT) technique and inspired by the gorgeous work of Eileen Godwin.


Supplies I used for this project :

* Bleeding Art Tissue cut into circles and flower shapes using punches
* Water Spritzer
* Paintbrush and water - to apply the BAT shapes
* Crafters' Companion Watercolour Card
* Poppy Stamps Stencil
* Black cardstock
* Black Archival Ink
* Dylusions inks in Black and White - splattered over the finished design
* Black gems
* C6 base card

I find the black archival ink gives a good impression used through the metal stencil. 

Layering over a piece of black cardstock makes the colours of the BAT background really 'pop'

Thanks for dropping by to see today's project, hope you liked it.

Wednesday, 3 June 2015

Lavinia in 'Any Colours You Like'

Welcome to Wednesday friends.  I had planned to share a pic of my work desk for WOYWDW today but unfortunately my work desk has disappeared under a pile of tool boxes and electric drills etc - the Hubbs is attempting some DiY !  Best get my hard hat and earplugs ready methinks LOL

Maybe next week I'll be sharing a pic or two of my work space, providing the DiY is all finished of course.

So, for today's project I'm sharing a pic of the card I've created to enter into the June challenge over on the Lavinia Challenge Blog.  This month the theme is 'Any Colours You Like'
but must only contain Lavinia stamps and/or dies. 

Once again I've featured my favourite Zen Butterfly stamp, this time using a delish blue/yellow combo which I love
 
Here's a list of materials used

* 5 x 5 base card
* Stampin'Up! inks - Baked Brown Sugar, Crushed Curry, Island Indigo, Baja Breeze and Coastal  Cabana
* Lavinia Zen Butterfly, sentiment and tiny fairies (magazine freebie) stamps
* Lavinia Glitter
* Clear Wink of Stella pen (fairy wings)
* Crafters' Companion Spray n Shine to make the background inks waterproof
* Crafters' Companion watercolour card

I applied the SU! inks using cut n dry foam and a dry paintbrush to add colour to the butterfly.

I love how the blue 'pops' against the yellow background on this card.

Thanks for dropping by to check today's project, I hope you like it.  Wish me luck in the Lavinia Challenge for June !

Tuesday, 2 June 2015

Birdsong - A Celebration of Simple Things

Happy Tuesday dear readers, I hope the weather isn't too bad wherever you are today, just when will Summer arrive in the UK ? 

I'm bringing a little breath of Spring in the project I'm sharing with you today - birds nesting and pretty flowers immediately make me think of bright Spring days, lighter nights and a sign that Summer is on it's way. 

I created this card for my lovely pal Jacqueline's Birthday recently. 

Here's a list of supplies I used:

*C6 300 GSM scalloped base card
*Chocolate Baroque panel stamp coloured with Pan Pastels
*Magazine freebie stamps - bird on branch, eggs in nest, sentiment, musical notes
*Tuxedo Black Memento Ink
*Spectrum Aqua Pens to colour image
*PinFlair Glue


I used the bird on branch and the nest stamp to create a small collage, stamped using Tuxedo Black ink, coloured with the Aqua pens then fussy cut out.  I then used the sentiment and musical notes stamps together on the sentiment panel.

It's been a few days since I last posted a project, I've been on my travels again but am back online and hope to be posting more regularly now.  Thank you so much for taking the time to visit my little corner of Blogland and a huge thank you to all you wonderful people who've continued to visit regularly whilst I've been 'off air' for a few days - I really appreciate every single one of you.

Have a great day whatever you have planned and I hope to see you back here again very soon.