Monday 28 February 2011

Aries the Fire Eater !

It's March 1st and that means a new month and brand new release stamps by Queen Kat Designs.

My new girl for this week is the fabulous Aries by Che Gilson, she's so gorgeous and very fiery. As soon as I saw her I knew I wanted to use lots of yellow, orange and red - all the colours of fire.

I coloured her with Copics and added touches of clear Spica Glitter Pen before cutting her out using a plain oval nestie. I sponged round the edge with Distress Inks then added her over a layer cut from So Saffron cardstock by SU!.

I've had this totally scrummy background paper in my stash for ages, just waiting for the perfect project - and this was it. I added a length of dark brown ribbon with sparkly dots and punched out three flowers from two sizes of Nellie Snellen punches, layered them up and added the tiny yellow buttons.

The gorgeous Aries is now availble in the Queen Kat Designs Store if you'd like her for yourself.
Thanks for dropping by today, I hope you've enjoyed your visit.

Take Three Squares......


The latest challenge over on the Less is More Challenge blog is to use three squares on your project.

I selected this stamp from a set by Stamping Up! and stamped it first in Chipped Sapphire Distress Ink on whate cardstock and twice more with white chalk ink on SU! Not Quite Navy cardstock.  I then cut each image out using a plain square nestie and added all three images to the front of my C6 size white base card.

The design is completed by the addition of some slightly sparkling dome stickers in graduating sizes.

That's it, nothing more, I consider my card finished !  and so is my entry for the challenge this week!

Thanks for dropping by today.

Friday 25 February 2011

Craftathon 2011

Last weekend I headed up north to Lancashire with a group of crafty pals from the Craftbubble forum for Craftathon 2011 and boy did we have a ball !  We were all booked on a workshop with Rachel Grieg, the owner of Dark Room Door Stamps on the saturday afternoon at Topaz Crafts in Accrington and stayed in the lovely Maple Lodge Hotel.  They very generously allowed us to use the dining room as our crafting space and each of us took along different crafty goodies to share and play with.  The first hour after arrival was spent in 'oooing' and 'ahhhing' over what the others had brought but we did eventually settle down to some crafting. 

At the saturday workshop we created an Art Journal from scratch, using Viva Decor Ferro Paste/paint, DRD background stamps and metallic paints to achieve some stunning Grungeboard outer  covers.  Here are all the lovely books made by the attendees at the workshop, everyone's cover turned out differently which was fantastic.

Here's a piccie of the insides of the books.   The images used are also DRD and we used a variety of stamps to decorate the pages before adding the images.  We had used Distress Inks to colour the plain cream concertina pages before starting the decoration. 

On the left is  my own book and another project pack which I won when my name was pulled out of the 'hat' - such a pity that mine was the second name as the first one won a set of DRD stamps !! but hey, I was pleased to have another kit to work with at home and see what I can come up with, and of course I just HAD to order both sets of stamps once I got home ! 

I also made good use of one of my pal Kathy's sets of Crafty Individuals stamps which she'd brought along to share and created an ATC during one of our crafting sessions at Maple Lodge. I'm just going to have to get this set myself, it's just fabby ! 


On the left is a pic of Rachel during the workshop and you can just see me hard at work in the background !  I'm afraid I'm a standing up crafter, can't seem to stamp or get the placement of elements just right unless I stand up.


We were lucky enough to have Dawn Bibby around during the afternoon workshop, she was busy preparing for this week's QVC show with Tim Holts TSV so I took the opportunity to get a photo taken with her.  Thanks Dawn - this one's for you Dad !

We all had such a great weekend that we are already planning to do another one, we just need to decide on a venue and a date.  I would also recommend Maple Lodge to anyone who is looking for hotel accommodation in the Accrington area, they made us so welcome, their rates are very reasonable and the rooms are excellent.

That's it from me today folks, hope you've enjoyed hearing all about my craftathon experience, thanks for dropping by.

Thursday 24 February 2011

Like a Spring Day....

I'm enjoying the Clean and Simple (CAS) style of card so much at the moment and this card fits into a couple of challenges too, so I'm a happy crafter ! 

The design for this card was inspired by an embossing folder I saw recently.  I used a ball tool and an embossing board to create the debossed lines (which aren't really showing up too well in the piccie sadly).  The snowdrops image is a digi from Papergardenprojects.com and is coloured with Copics before cutting out with a plain circle nestie.  The sentiment is also from the Spring Flowers digi set and I cut it into a simple rectangle and dragged the same green Copic pen around the edges to tie in to the image.  The image was added over a layer cut from SU! Garden Green cardstock with a small scallop circle nestie. 

The sunday challenge on the Craft Mad & Loving It group on Craftbubble has the theme of Snowdrops, so this is perfect to fit the challenge and the Simply Less is More challenge asks for a Spring themed project so it will be a second entry from me for that challenge too.

I hope you've enjoyed seeing my latest project, thanks for visiting today.

Wednesday 23 February 2011

I ♥ Promarkers Challenge #54 - Stitching

The new challenge for this week launched yesterday over on the I ♥ Promarkers Blog and we ask that you use Stitching on your project - this can be real or faux.  Our prize Sponsor for this week is Digi Doodle Shop.

For my DT project I chose the really fun 'Sea Life' set of digi images from DDS - they just made me smile as soon as I saw them!

The background paper is from the Pocketful of Posies stack by DCWV, I created a 'porthole' frame from some SU! Not Quite Navy cardstock using a set of circle nesties.  Coloured the images with Promarkers, of course and added Glossy Accents on their eyes to make them pop out like googley eyes.  The 'bubbles' are clear flat backed gems (I've had this huge bag of them for a couple of years, I think they may be meant to be used as table confettie for parties or weddings).  

I doodled some faux stitching with a white pen and pricked holes around the porthole and a black pen to add stitching around the outside edge of the card.  The sentiment was created by me on my computer and cut out with a small circle nestie.  A simple layout but I just had to use this fabulous blowfish as the focal point of my card, he just makes me smile and I love the expression on the face of the Big Mouth Bass bottom right!

Now it's over to you, create your project, make sure you use Promarkers on it and add some stitching (real or faux).  Finally add a direct link to your project on the I ♥ Promarkers challenge blog for a chance to win this week's prize.

Tuesday 22 February 2011

Princess of the Sea

Today Queen Kat Designs are launching fabulous new stamps designed by the artist Sue Miller.  Those of us in the Royal Court of Queen Kat are just bursting with excitement at the fabulous new images are are getting to work with during 2011. 

You should have hopped here after seeing what the lovely Valerie has created for you, if you came straight here do go back to the start of the Hop on the QKD blog, trust me you really won't want to miss any of the gorgeous projects using these fabulous new stamps that the DT have created for you.

The image I'm working with is "Princess of the Sea" don't you think she's totally faberooney?  I've got two cards to share with you today, I wanted to demonstrate how the same image can look completely different dependent upon colour, layout and embelishments added.

For the first card I've coloured the image with Copics and added some Spica Glitter pen on the beads, which matches the larger beads I've added on top of the ribbon at the bottom of the card.  I used a set of Marianne's Designs dies to cut the frame under the image and created the pleated half-circle element at the top using a nestie large scallop circle die set.  The seaweed/fronds behind the ribbon were punched with a Martha Stewart punch.  The background card is SU! Not Quite Navy and the frame and some fronds cut from Sage Shadow.  I created the sentiment on my computer.

My second card is in complete contrast to the first.  I created a 'Clean and Simple' (CAS) design for this one, leaving the image uncoloured.  I used all the same materials as for the first card, except for Copic pens and beads.  Same colour cardstock, same ribbon but a different shape card and the sentiment is a stamp from the January kit by Myka Jelina. 

The lovely Princess of the Sea is available from today in the QKD Store if you'd like to have her for yourself.

I'm now sending you hopping along to the QKD Store so you can pop this gorgeous girl into your cart !

Thanks for joining us today, I hope you've enjoyed yourself.

Monday 21 February 2011

Triple Tiara Tuesday Challenge

Today it's my turn to host the Queen Kat Designs 'Triple Tiara Tuesday Challenge' along with my fellow DT members Sarah and Loretta.  If you enter the challenge every week each month, you increase your chances of winning the $25 prize to spend in the QKD Store. Full details are on the QKD Blog, just add a link to your project with the linky tool over there once you've completed it, simple as that !  Do check out the fabulous projects that Sarah and Loretta have created to inspire you this week, links to their blogs are also on the QKD blog.

The picture inspiration for this week's challenge is this pretty painted planter on the right here. 

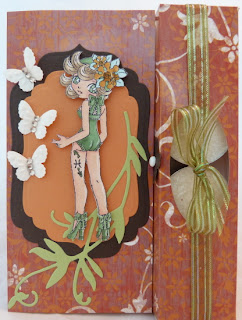
For my project I took the colours and a floral theme from the inspirational picture and decided to use the lovely Pisces image to create a tealight holder card.  I've seen a few of these pretty tealight holder cards as I've been hopping around blogland,

They are a great
gift idea so I thought I'd have a go at making one myself. I based my design on the tutorial here but actually used only the basic measurements from the tutorial to develop my own tealight holder card design.

I do love this Pisces stamp which was newly released for February by QKD. The image was coloured with Copics before cutting out. The patterned base card was from my stash and I used a Marianne Designs die to cut out the leafy swirl.

The layers under Pisces were cut using a set of Labels 4 nestabilities from SU! Early Espresso and Peach Parfait cardstock and the butterflies punched with a Nellie Snellen Punch and Emboss set from cream. I created a closure 'button' from a punched flower and a brad to hold the card closed and tied a ribbon round to hold the tealights safely inside the box. 

I do hope you'll enter our challenge this week, I'll hop over to check out your creations after you enter your link on the QKD Blog, I can't wait to see how this week's picture inspires you - good luck !

Less is More for Spring


The theme for this week's Less is More challenge is 'Spring'.  For my entry I decided to use my newly acquired 'Flutterby' embossing folder from Craft Concepts as the butterflies, flowers and leaves make me think of Spring time.

I embossed a C6 size white base card with the folder and added a simple Thank You sentiment, stamped in black, at the bottom right.  I layered up the stamped sentiment on to a scrap of the white card, cut using one of the smaller dies from the nestie beaded circles set. 

I'm a great fan of the 'white on white' technique and may go on to make a few more cards in this design to keep in stock as you can never have too many thank you cards to hand.

Thanks for dropping by today, I hope you've enjoyed your visit.

Saturday 19 February 2011

Time for Cake !


Cupcakes that is !  Today's card is a sweet and simple design which I created as my entry for the Craftbubble Craft Mad & Loving It group's Sunday Themed Challenge.  This week the theme is 'Sweet Dreams' and what better to dream about than yummy cupcakes !

The image is from the January Myka Jelinka monthly kit from Queen Kat Designs.  I used the accesory stamps that are included in the kit to create a little collage of cupcakes and sentiment. 

As I'm currently staying with my Dad for a few days, I've had to raid his stash in order to do any crafting.  I found this really pretty stripey base card in a draw and some pink cardstock.  I added the image layer over a slightly larger piece of the pink card and cut out a stripe in a sort of bunting style, adding the 'time for cake' sentiment stamped in pink ink.  I don't think Dad minds me using up his stash and it is so fabulous to be able to craft along with him.

The image was coloured with Promarkers and Stardust Stickles added over the icing on the cupcakes. 

Hope you've enjoyed today's creation - til I see you again, Happy Crafting.

Friday 18 February 2011

Today I bring you Joy !


Well, the stamp is Joy from the Sugar Nellie Adorables collection anyway !  I can't think of a better name for these sweet images as they really are adorable, I knew I had to have the full collection as soon as I saw them.

I decided to use the sketch from the Craft Mad and Loving it weekly sketchie challenge over on Craftbubble for my layout, with the added bonus that I can enter my card for the challenge.  The theme is flowers and there are certainly quite a few on my card.

The image was coloured with Lettraset Aqua Markers - I'm getting more used to them now that I've coloured a few images with them, but I do have to say that I still prefer my Promarkers and Copics.  It's good to try out new techniques and styles though, and I shall persevere with the Aquas and try to learn to love them !

The background layer is embossed with flowers and I matted the floral bp on to a scrap of card before attaching.  The image was cut out using a plain oval nestie and added over a scalloped oval layer cut with a just slightly larger die than the plain oval, so that just a tiny bit of the pink scalloped layer shows around the edge of the image.

The tiny butterflies were created with my Nellie Snellen punch and emboss set and I added pink Waco Pearlmaker pen for the bodies.  The pink flower gems I bought recently at a craft fair as well as the pretty sparkly pink ribbon and the sentiment is from Cuddly Buddly.

Tomorrow I'm heading up to Accrington for the weekend to attend a workshop run by Dark Room Door Stamps at Topaz Crafts.  The excitement is rising I can tell you as I am meeting up with a few on-line crafting buddies for the weekend and it promises to be an absolute Hoot !!!   I'm sure there will be piccies to share with you at a later date - and maybe a few that are not for sharing !!!!

Thursday 17 February 2011

Less is More with Flowers


A short and simple post from me today !  Over on the Less is More challenge blog, the challenge this week is to create a Clean and Simple (CAS) card with just one layer.  Following, of course, the less is more principle and using a flower or tree image on your creation, so  I've entered my card for this challenge.

I have a fabulous set of stamps by Stampendous and this beautiful image of an orchid plant was just perfect for the challenge.  The simple and elegant sentiment is also from the set and I have to say that I use these sentiments on lots of my projects.

The image was stamped directly on to a C6 size base card and coloured with Copics - simples !

Nothing more to say on this, so I'll bid you farewell for now.  Tomorrow I'm heading off 'up north' to Accrington to meet up with a bunch of my on line crafting pals (some of whom I've actually met before).  We are all doing a workshop run by Dark Room Door at Dawn Bibby's shop - Topaz Crafts - on saturday afternoon but the rest of the time up there we are hoping to get lots of crafting done.  We're each taking tools and supplies for different techniques and looking forward to trying something new.

Hope you've enjoyed today's project and I that you'll stop by again as I'll be sharing more of my creations.

Tuesday 15 February 2011

I ♥ Promarkers Challenge #53 - Paper Piecing


Howdy folks, are you having a great day?  I do hope so.  A huge thank you to all those who entered the I ♥ Promarkers Birthday Challenge last week and left a comment here on my DT card.

I used Random.org to select a Commenter and the winner of my personal prize is Pamela

       Pamela said... Such a beautiful card and lovely image.
       Pam x


Congratulations Pamela, please contact me using the link in my side bar and let me have your name and postal address and I'll get your prize sent off to you as soon as possible.

As it's wednesday again, there's a new challenge starting today over on the I ♥ Promarkers challenge blog.  This week we ask you to include Paper Piecing on your project.  Don't forget that you also need to use Promarkers too though !  Our prize this week is sponsored by Die Cut Dreams. and  consists of A set of 2 Door hanger kits in Tempting Toffee & Hot Candy Pink with overlaying die cuts for the front and backs" the kit consists of 10 pieces which are ;
     2 Chipboard die cut hangers
     4 Coloured Card die cut hangers
     4 white layering shapes

For my DT card I've used this fun image from Stampavie - "Psst... Dani and Taylor"  by Mo Manning.  I've had this stamp in my stash for a very long time and I'm ashamed to admit that this is the first time it's been inked up ! 

I paper pieced both dresses and the green boots and coloured the rest of the image with Promarkers.  I cut and punched out lots of different flower shapes and sizes from the same papers and some matching cardstock and layered them all up, topping each with an amber coloured gem.  The little dotty bow was in my stash and the sentiment is from a set of Hero Arts Anyone Can Stamp, which I stamped in Rich Cocoa Memento ink and cut out.  The frame is cut from SU! Close to Cocoa cardstock using a Spellbinders frame die. 

Hop on over to the I ♥ Promarkers Challenge Blog for full details and to see the inspirational projects created for you by the DT, then add a direct link to your completed project on the blog - easy peasy !  Good Luck !

Monday 14 February 2011

Purple Piper

Today's card features the delightful Piper from Queen Kat Designs once again, isn't she such a pretty little gal? I decided to use some pretty pastel shades and make her much more 'girly' than on my last card featuring her.  I'm showcasing this card for my regular Tuesday slot on the Dark Ink Sorority blog for QKD.

I cut the image out using a large scallop circle nestie die and coloured her with my Copics. Using the spellbinders Lacey Circles die set I cut out layers from SU! Pixie Pink and Almost Amethyst cardstock and layered them up under the image. Using the same cardstock I edged a strip with a Martha Stewart punch and embossed it with the Cuttlebug Swiss Dots folder. The swirls and fronds were cut using Marianne's Designs dies and a MS punch. The crystal flower was from a pack I bought recently at a Craft Show, where I also bought the tiny dragonfly gems and the sparkly pink ribbon was from my stash.  It's Dark Ink but not as we know it!!!! mwah !

Thanks for dropping by to check my creation today, it's great to see you !

I'd like to wish my new Followers a HUGE welcome - it's great to have you on board and I hope you'll enjoy the ride  :O) 

Saturday 12 February 2011

Love you More !


I wanted to make a Valentine's card for my Hubby and cute just wouldn't cut it with him!!  So I opted to use this fabulous butterfly stamp from the Morphing Bugs set by Inkadinkado.

The image was stamped with Versafine black ink directly on to the base white card.  I added black Spica glitter pen and Black Diamond Stickles on parts of the image, but sadly this just isn't showing up on the piccie as the light here is so bad today.  The sentiment is from a Hot Picks set of stamps by PaperArtsy and I stamped it in Brilliance Opalescent Orchid ink.

I've recently discovered the new 'Less is More' challenge blog and their theme for this week is Clean and Simple using black, white and pink, so my card fits right in with their challenge.

Let's hope that my 'Special Someone' likes his card when he opens it next monday !

Have you entered to win my prize Birthday Candy for the I♥ Promarkers challenge yet?  If not, scroll down to see the post and leave me a comment for a chance to win my prize, you've got until 6pm on 15 February to enter.

Scroll down to the earlier post if you haven't get joined in the I ♥ Promarkers Birthday Challenge, there are prizes to be won from each of the DT in addition to the main challenge prize. Leave a comment on my posting for a chance to win my Prize Candy and hop along each of the DT's blogs for a chance at winning theirs. Don't forget to enter your card on the main I ♥ Promarkers Challenge blog - details and links in my earlier post.

Friday 11 February 2011

Owl Be Seeing You !


Ever since I got my set of stamps from Stamping Up! which contained this little Hooter, I've been dying to get him inked up and on to a card.

The sunday themed challenge over on Crafbubble's Craft Mad and Loving It group has Nature as the theme for this week.  So, this little chappie is just perfect for that challenge.

I stamped him with Rich Cocoa Memento Ink and cut him out with a circle nestie, layering this over a scalloped circle cut from SU!  Espresso cardstock.  I used a Martha Stewart border punch along the bottom of the Close to Cocoa strip and the brown grosgrain ribbon was from my stash.  The sentiment is from a set by Stampendous and the three flower gems were from the pot I bought at Westpoint last month.

This is another card for my stock which would be appropriate for either a man or woman I think.

Thanks for dropping by today, it's lovely to see you !

Scroll down to the earlier post if you haven't get joined in the I ♥ Promarkers Birthday Challenge, there are prizes to be won from each of the DT in addition to the main challenge prize. Leave a comment on my posting for a chance to win my Prize Candy and hop along each of the DT's blogs for a chance at winning theirs. Don't forget to enter your card on the main I ♥ Promarkers Challenge blog - details and links in my earlier post.

Thursday 10 February 2011

Happy Birthday Mr K....


It's a friend's birthday today and I created this card for him using a simple layout and lots of white space which I'm loving right now.

The image is a Stamping Up! stamp which I've coloured using Lettraset Aqua Markers.

Coloured layers were cut from SU! Early Espresso and Sage Shadow, using a set of rectangle nesties. The lovely script style sentiment is by Stampendous and I just felt there was nothing I could add which would enhance the overall look of the card, so I considered it done.

I'm pleased with the simple and elegant finished card, I hope it arrived in time and that Mr K liked it too.  Happy Birthday Mr K! 

Scroll down to the earlier post if you haven't get joined in the I ♥ Promarkers Birthday Challenge, there are prizes to be won from each of the DT in addition to the main challenge prize.  Leave a comment on my posting for a chance to win my Prize Candy and hop along each of the DT's blogs for a chance at winning theirs.  Don't forget to enter your card on the main I ♥ Promarkers Challenge blog - details and links in my earlier post.

Tuesday 8 February 2011

It's our Birthday - come help us celebrate - Happy Birthday !

This week over on I ♥ ProMarkers we’re having a Blog Hop to celebrate our 1st Birthday which will also be our weekly challenge #52.

I hope you will all join us in our first ever Blog Hop by creating a Birthday themed card and posting a link to it on the challenge blog here.

We have prizes from Whiff of Joy and Letraset and some gorgeous beaded pins created by our very own Karen for the lucky winner.  In addition each of the DT members will  have a mini prize to give away to one lucky visitor to their blog who leaves a comment.

The Blog Hop will end at 6 pm on Tuesday 15th February and names of the winners will be placed on the challenge blog, along with our next challenge, on Wednesday 16th February.

I'm giving away a mini Candy to celebrate - here's what you can win :

Papers, assorted ribbons and lace, toppers, stamp and a wee box which I created and decorated to hold some small choccie bars especially for you.

I may add some extras in too, maybe some diecuts, flowers etc - in fact if you tell me in our comment what you would like me to add, I'll see what I can do!  I will add in a stamp from Faerie Art Song Stamps if I get more than 30 comments too.

For a chance to win, just leave me a comment under this post and complete the hop by visiting all the DT blogs.  If you decide to become a Follower on my blog, that would be totally Awesome, but don't feel you have to. 

You should have arrived here after visiting Lorraine's blog but if you just came straight here, start back at the beginning on the I ♥ Promarkers Challenge blog and visit all the DT blogs in order.  Don't forget to enter a link to your project on the challenge blog to be in with a chance of winning the fabulous main birthday prize.  Here’s the order of the DT blog hop:

Karen
Kate
Julie
Lorraine
Wynneth - you are here
Ruth
Tine
Kathleen

Then go back to I ♥ ProMarkers and leave a link to your project on Mr Linky.

Now for the details of my DT card.  The images and sentiment are from the January Myka Jelina monthly kit from Queen Kat Designs.  I coloured them with my ProMarkers, background patterned papers were magazine freebies and layers were cut from SU! So Saffron and Pretty in Pink cardstock.  Martha Stewart heart border punch, Nellie's Choice heart die set and Cuttlebug tiny hearts embossing folder were used for the various elements of the card. 

I'm so looking forward to seeing your entries for this special Birthday Challenge and to visiting your blogs to check out your work.  Now head on over to Ruth's blog and check out her creation and leave her a comment to be in with a chance to win her prize.


Note added:  Welcome to my new Followers - Allison and Donna - it's so great to have you on board girls!

Monday 7 February 2011

All You Need is Love


Happy Tuesday Dear Followers ! Can you believe we are already into the second week of February? How time is flying by - I guess I must be getting old, or maybe it's because I'm having so much fun!

Today's card showcases the fabulous Piper stamp designed by one of Queen Kat Designs' new artists Myka Jelinka, isn't she a Doll?  This is my project for today's Dark Ink Sorority blog, but I also like to post on here for my own Followers to see.

As it's February, I thought I'd use Piper to create a Valentine's card, so coloured her in shades of red and grey using my Copics.

The background black and white hearts paper is from my stash and I recently found the paper heart shaped doillie at a craft show. The black swirl was cut using a Tim Holtz for Sizzix die, red heart cut with a Nellie's Choice die set and the white filligree heart with a Martha Stewart punch. The Love sentiment was cut with a Cuttlebug die and the butterflies created with a Nellie Snellen punch and Emboss set, with tiny red gems added for the bodies. I've had the red heart shaped gems in my stash for ages and they were a perfect finishing touch I think.

I hope you've enjoyed seeing my project today, please leave me a comment and let me know what you think of the lovely new Piper image. If you'd like to have her for yourself, just visit the QKD Store and pop her into your cart - easy, peasy !  Thanks so much for dropping by today, it makes me so happy to see so many visitors and even happier when I have comments to read!

Anyone for Chocolate?


Happy Monday folks !  Hope you had a great weekend, mine consisted of shopping, clearing out cupboards (very therapeutic!) going to a 60th birthday and, of course, crafting !

I've been thinking of making some little boxes to hold a few of these singly wrapped choccie bars and came up with this simple solution. 

Each one was made from patterned card from the DCWV Nanna's Kitchen stack - not that you can actually see much of the background card!! 

The one on the left is decorated with some SU! Early Espresso and Baja Breeze cardstock, cut out with Marianne's Designs and nestie dies.  The edges on both were punched with Martha Stewart border punches and I sponged some Distress Ink around the edges of the lefthand one before assembling.  The image on the righthand one is part of the Buttercup stamp from the Myka Jelinka range of stamps by Queen Kat Designs and coloured with Copics.  The flowers were cut using a nestie die and the tiny gem flowers were from my stash.  The righthand one is going to be part of the Birthday Candy I'm offering to one lucky commenter as part of the birthday celebrations for I ♥ Promarkers this week.  Don't forget to pop back here on wednesday and enter for a chance to win.

Thanks for popping in today - it's lovely to see you :O)

Friday 4 February 2011

Bright Buttons

Firstly, I'd like to welcome Allison and Boni my two latest Followers, thanks so much for joining girls.

Now, over on Craftbubble's group Craft Mad & Loving it this week, there's a themed challenge 'Bright Buttons'.  My postie brought me a lovely package yesterday which contained a set of newly released Marianne's Designs dies which I had pre-ordered.  I just couldn't wait to use them, so thought I'd put together an entry for the challenge using my new toys. 

I've recently discovered the fabulous cardstock by Stamping Up! and I'm just loving all the colours and am fascinated as to how, whichever colour you choose, it works well with any other of their cardstock colours.  I'm busy building my stock of all the colours and I still have a few to go, but one of my favourites is Certainly Celery and I've paired this up with some Peach Parfait for my card.  I used a Martha Stewart border punch along the lower edge of the bottom layer and cut the flowers with two Nellie Snellen punch & emboss sets.  The offset circle is from the new Marianne's die set and I used a scalloped circle nestie to cut the CC layer in the centre.  The stamped image in the centre is from an SU! set which was a free gift for spending a qualifying amount during January and I cut it out by hand as I don't have the matching punch (yet!).  The pearly centres in the flowers were made using my Waco Pearlmaker pen.  I know the design is supposed to include buttons and I have added just one pretty flower shaped button in the centre at the bottom - well, it's so hard to use up any of my precious button stash ! 

A little different to my usual style of card, but it was fun to make.

Thursday 3 February 2011

To have and to hold..........


I've been asked by a friend to help with producing the wedding stationary for their son and fiancee who are marrying in the Autumn. 

I created these two samples with simple layouts as potential designs to show to the happy couple. 

Although the pink isn't the shade the bride wants, she did like the design and layout of the first one, so I'm going to be using this sample as a starting point for the invitations.

It's always good to have a couple of wedding cards in stock, so these will go into my box ready to be used  when needed.

My personal favourite is the second design on the right, but then I am really liking lots of white space at the moment !  Tools used to create both samples were a scalloped oval and a plain oval nestability and the set of hearts dies by Nellie's Choice.  The cardstock is SU! Pretty in Pink and I used a Cuttlebug tiny hearts embossing folder on the white layers.  The gold rings embellishments were from my stash.

Thanks so much for dropping by today, it's really lovely to have visitors.