Tuesday 31 August 2010

I ♥ Promarkers Challenge #30 - Myth and Magic Theme

Hi there, welcome to my regular wednesday spot when I share with you my DT project for the I ♥ Promarkers challenge.  This week the prize is sponsored by Joanna Sheen - who wouldn't love a £10 gift voucher to spend in her fabby online store?

For my DT card I selected this cute Mouserkins image from Faerie Song Art Stamps.  She is such a cutie sitting there on her toadstool with her butterfly pal.  She was coloured with Promarkers and some Startdust Stickles added to her wings and flower.

I covered the front of a 5x5 card blank with paper from my stash, then cut an aperture in the middle with a nestabilities die.  I used the same die and one a little larger to create a frame from some dark gold pearlised cardstock.

The swirls and flowers were cut using a set of Marianne Designs dies and the butterflies cut with two Martha Stewart punches from white pearl card and coloured with Promarkers.  The half pearls on flowers and butterflies were from my stash.

I hope you've enjoyed your visit to the 'magical glade' and meeting up with my lovely Mouserkin!  I'm looking forward to dropping by to see your entries this week.

hugs
wynneth
x

Monday 30 August 2010

Seeing Double

It's tuesday again so that means it's Hop day with Queen Kat, if you'd like to do the whole hop, just click here and follow the links.  Each tuesday I post my project on the Whimsical Ink Sorority blog which is part of the Hop.  I like to also post here on my blog so my visitors get to see them too.
So, my brief was to create two ATC's, going a bit grungey and distressed - all good so far! The exciting part is that I am able to bring you one of the new release stamps for September - yay! I know it's still August, but only for a few more hours and these new girls will be officially launched on 1 September.

I started out with two ATC sized pieces of kraft card, used Tim Holtz distress ink around the edges to give me a grungey effect, one with Brushed Corduroy and the other with Chipped Sapphire.

Using DI again I stamped some QKD images on to the backgrounds before adding the gorgeous mermaids which I'd coloured with Promarkers and Copics. I wanted to demonstrate the versatility of larger stamps, using the whole of the stamp on the brown ATC and just a 'cameo' cut from the full image with a nestabilities die for the blue one. The same image looks so different when you use only part of it don't you think?

I 'aged' the lock and key charms with a black Promarker and attached them with dark blue organza ribbon. The flowers were cut with a Martha Stewart punch and the gems were from my stash. The 'bronze' sentiment on the brown ATC was from my stash and I attached it with a length of twine.

Til next time - Happy Crafting!

hugs
wynneth
x

Sunday 29 August 2010

Teddy's a Christmas Star


Welcome on this Bank Holiday monday dear reader, I hope you are spending a lovely long weekend and having lots of fun.  I always feel that once this holiday is over, we are then coasting down into autumn and winter, with Christmas just round the corner.  I know I need to get a bundle of christmas cards made, so you will be seeing quite a few posted up on on my blog in the days and weeks to come when you visit.

This cute little chap is a Lilli of the Valley stamp and I just love him.  He's coloured with Copics and Promarkers, with Stardust Stickles on his star and Glamour Dust over Glossy Accents on his hat.  I embossed the darker green layer and the white and green strip with a 'Crafts Too' star pattern embossing folder.  The stars were cut using a nestabilities star die set from scraps of the double sided card I used for all the layers.

This week's Just Cute Bears challenge is to include embossing in your project, so I am entering this card for their challenge.  I used the sketch from this week's challenge on 'Stamp Mad and Loving it' on Craftbubble which asks us to use stars on our projects, so my card fits this one too. 

I don't usually try to fit my projects into multiple challenges, but this card fits right in for both of them without too much effort!

Thank you so much for visiting today, I do appreciate your support. 
hugs
wynneth
x

Christmas Dolly


Happy Bank Holiday Sunday dear readers.  I hope you're having a lovely weekend whatever you've been up to or have planned !

The card I'm sharing with you today is my entry for this week's sketchie challenge over on the 'Stamp Mad & Loving It' group on Craftbubble.

Regular readers will know that a couple of weeks ago I spent a fabulous weekend with two of my crafting Buds in Bristol.  This dolly stamp was one of my purchases when we did a little crafty shopping on the saturday.  When I bought her I wasn't sure how I'd use her, but she is quite sweet.

I need to 'get a wiggle on' and start making my Christmas cards or I'll be burning the midnight oil again this year to get them finished on time!  I thought I'd see how dolly would work on a Christmas card, so I coloured her in festive shades and created christmasy embellishments to go with her.  The star circle was cut with a Marianne's Designs die, as was the poinsettia and the holly cut with a spellbinders shapeabilities die.  The Merry Christmas background card has been in my stash for ages and the red layer was embossed in my Cuttlebug with a snowflake embossing folder.  Dolly was coloured with Promarkers with some Stardust Stickles added on her dress to make it sparkle.

I think I've managed to turn dolly into a 'Christmas Star' let me know what you think!

Until I see you next time - Happy Crafting !

hugs
wynneth
x

Friday 27 August 2010

Sweetie Shrimps!

Big bags of pink sweetie shrimps - now I wonder how best to present them as a wee gift?  In a pizza box, of course!! 

Over on Craftbubble's Craft Mad and Loving It forum, the challenge this past week is to use acetate on your project and this is what I created for my entry.

I created the box using a sheet of 12x12 double sided heavyweight paper, cutting a circular aperture in the lid using a nestabilities die.  Using a slightly larger die from the same set I cut a circle of acetate.  I then created two frames from yellow cardstock using a scalloped circle nestie and the plain circle die I used previously to cut the aperture.  One frame for the outside of the box and the other for the inside to give a neat internal finish. 

Here's the box from the top so you can see the design more clearly This gorgeous little girl is a hAnglar & stAnglar stamp and I just love her!  I coloured her with my very limited stash of Copics, but I'm happy with the amount of shading I managed to achieve.  The sentiment ticket is one of the stamps from a set by Hero Arts,  the flower was in my stash and the leaves were punched from white card and coloured with a Promarker.  I added some bronze microbeads to the centre of the flower to give it a little more dimension.  Finally I added a length of light olive green ribbon around the outside and covered the join with another punched flower from my stash.

Now, I wonder who I could give this little sweetie to?

Hope you've enjoyed your visit today - Happy Crafting!

hugs
wynneth
x

Thursday 26 August 2010

White on White

I had a great time creating this card!  White on white with only colour allowed on the image is the challenge I entered with this one.  The challenge is from the Craftbubble Craft Mad and Loving It forum and this is a really great theme which I plan to use again when I get down to making more christmas cards for this year.

I just love this new snowie image from the Lili of the Valley Christmas stamps - he has such a cheeky expression.  I coloured the image with Copics although I have only a very few colours.  I generally use Promarkers, but I was able to get all the shades I wanted from the Copics I have, so was very pleased!  I added a little Glossy Accents to his carrot nose and the baubles hanging from his arms. 

A little Stardust Stickles gives the image layer a nice sparkle and also around the edge of the scalloped frame.  The image and the frame were created using nestabilties dies and I added Pearl Drops dots around the scalloped frame.  Here's a side view which shows the layers a little better.

The base layer is a combination of two different christmas themed Cuttlebug embossing folders and the snowflake ribbons were cut with a Martha Stewart border punch which my pal Jacqueline brought around and let me play with - thanks Jacqueline!  I cut out two double layer poinsettias from white card using my Marianne Designs dies, tucked them under the edges of the image layer and added a little more of the Stardust Stickles around the edges of the petals.  The sketch calls for a sentiment to be added at the bottom, but I left this off as I thought it would spoil the balance of the layout.

Hope you've enjoyed my White on White creation - thanks for stopping by today.
hugs
wynneth
x

Another Award - Yay!


The lovely Lauren aka Blue Bertie has kindly nominated me for this lovely Award.

To qualify for the award I need to nominate 7 more people to give it to and tell you 7 facts about me. So here we go :-

1.  I'm totally besotted with my gorgeous Shih Tzu Tilly - I feed her from a fork and carry her up to bed every night !
2.  I am very proud Grandma to two lovely boys
3.  I love to travel
4.  I'm addicted to crafting, rubber stamping in particular
5.  I've always wanted to be taller, have nice long legs and straight hair!
6.  I was the Angel Gabriel (in my school's Nativity Play many, many years ago!!)
7.  I am a Reiki Master/Teacher

I'm nominating these 7 people to receive this award, I'm sure their 7 facts will be much more interesting than mine!

Kathy
Annie
Junie
Jona
Jayne
Meredith
Alex

hugs
wynneth
x

Wednesday 25 August 2010

Butterfly Queen

The challenge over on Magical Monday this week is to include flowers in your design.  Well, I think I might just have enough flowers on this card to fulfill the brief !

This lovely Butterfly Queen stamp is from Faerie Song Art Stamps and she's a perfect image for the Magical Monday challenge.

I coloured her with Copics and added a little clear Spica Glitter Pen and touches of Glossy Accents.  The background layer is from the Pocketful of Posies pack of papers by DCWV, I just love all of them.

The frame was created with a spellbinders Shapabilities die and I punched out loads of flowers from some different coloured scraps from the papers using the Martha Stewart Hydrangea punch.  The beauty of these papers is that they all match up with each other, regardless of which ones you put together.  I attached all the flowers around the edges of the frame and added Stardust Stickles in the centres of each. The leaves were also cut with Martha Stewart punch.

I coloured a white flower from my stash using Copics and applied Stardust Stickles for added bling.  The lovely pale lilac sparkly ribbon was one of the bargains from my weekend in Bristol, only 97p a roll from What!.  Finally I added some aqua gems in the top corners and three more on top of the ribbon.

I'm entering this card in the Magical Mondays challenge, so wish me luck!

hugs
wynneth
x

Tuesday 24 August 2010

I ♥ Promarkers Challenge #29 - include a charm

Happy wednesday folks!  It's time for a new challenge over on the I ♥ Promarkers challenge blog.  This week we are asking you to include a charm somewhere on your project - no sketch this week just let your creativity run wild!  Our sponsor for this challenge is Digi Doodle Shops Best so I hope you'll enter and play along with us.

I decided to use this yummy Digi Doodle image for my DT card this week, I have just harvested my own Blueberry crop - which consisted of just one berry!  There must be a lot of very fat birds in my garden as they have snaffled all the others!  Did a bit better with my apple crop though.

I coloured these luscious berries with Promarkers then added Glossy Accents over the top to give them some dimension.  I found this gorgeous little metal bee charm in my stash which was just perfect for my card.  Making an easel card, I cut out the image with a nestabilities scalloped oval die set and a slightly larger layer in dark blue card using another die from the same set.  I created the sentiments on my computer and cut them out with smaller dies from the set, using the larger one as the 'stop' for the easel.  Dragging a matching dark blue PM around the edges of these smaller layers gives the impression that there is a slightly larger blue layer underneath.   It isn't easy to see, but I added some pale blue cloud effect paper to the base card - not sure who it's by as it has been in my stash for a while. 

I do hope to be visiting your blogs and commenting on your entries this week, I love this part of being on the DT!

Keep on Crafting!!
hugs
wynneth
x

Monday 23 August 2010

Vibrant Princess of Callas


Tuesday are Queen Kat blog hop days each week and I spotlight my projects on the Whimsical Ink Sorority blog as part of the Hop.  If you'd like to do the Hop yourself, just start here and follow the links.

We have this fabulous picture to inspire us this week, I do so love turquoise and olive/lime green together, it is one of my favourite colour combinations.  I decided to use these two colours for my project and I love the fluted/scalloped edging to these beautiful ceramics and wanted to create a similar effect on my card. 

In order to do this, I used a set of scalloped circle and one of plain circle nestabilities dies to cut out a number of different sized circles. I layered the image on to a larger scalloped circle cut from the green card used for the background.  I coloured the lovely Princess of Callas image from the August WIS kit with Copics and Promarkers and added touches of Spica Glitter Pen and Glossy Accents.

The 'Thank You' sentiment is also from the WIS Kit and I added three small turquoise half pearls to the bottom of the sentiment layer. I have a big bag of these clear half beads in my stash and they are perfect for adding to projects to create a bubble effect with these gorgeous mermaid images.

That's all from me for today, so til I see you next time - Happy Crafting!

hugs
wynneth
x

So nice to receive an Award!


When I checked my blog this evening, I found that I'd been sent this award by two lovely crafting friends wasn't that nice of them?

These are the conditions that accompany the award :-

1.  Thank the person who gave you the award
2.  Post it with pride on your blog
3.  List THREE things you love about yourself
4.  Post a picture you love
5.  Tag FIVE other people with this award

Here goes!

1. Thank you so much Kathy and Louise, I do appreciate you thinking of me
2.  Done, as you can see.
3.  Oooo... tricky this one!  I'm very tolerant; I have some great friends and I am blessed with a wonderful family
4.  This picture was taken at my Niece's wedding of me and my sister in law - it was such a fabulous day and the whole family were just so happy - every time I look at this photograph it makes me feel happy all over again


5.  My 5 people to tag are :-
Annie
Jayne
Junie
Alex

hugs
wynneth
x

Sunday 22 August 2010

Craftbubble Bubbles


Today I thought I'd share with you the card I made as an entry for last week's sketchie challenge from the 'Craft Mad and Loving It' forum on Craftbubble.  We were asked to make an easel card and the twist was 'Bubbles'. There was a sketch to follow but I realised after finishing my card that I had completely ignored it!!  On second look, my card could almost stretch to match the sketch and after all it does have lots of bubbles on it, so I hope the DT will forgive me!

This cute little House Mouse image had been sitting around in my stamped images box for a while and he just fitted right in to this challenge.  I used nestabilties dies to cut out the shaped layers, added lots of the clear half beads I have in my stash and a strip of white card punched with an EK Success border punch to add yet more bubbles.  The pale blue pearl layer was embossed with a Cuttlebug embossing folder and is actually a snow storm but I think it looks like it could be bubbles.  I created the sentiment on my computer and coloured the image with Promarkers, finally adding clear Spica Glitter pen with Glossy Accents over the top to the bubbles for extra sparkle and dimension.

Thanks for stopping by, I'll have another project to share with you tomorrow and as it's tuesday, there'll be a Queen Kat Designs blog hop going on if you'd like to join in with us.

That's it from me for today - Happy Crafting!
hugs
wynneth
x

Saturday 21 August 2010

A little something different.....

For those of you who don't already know, last weekend was spent in Bristol with the lovely Kathy and Lauren - two of my great crafting pals.  Kathy and her hubby very kindly allowed their dining room to be taken over and turned into a well stocked craft space!  After both Lauren and I arrived at Kathy's on friday afternoon, and unloaded all our stash, we spent a couple of hours ooooing and aaahhing over the stash each other had brought with us. 

When the actual crafting commenced eventually, Kathy opted for an ATC sized canvas and both Lauren and I chose slightly larger canvases to work with.  Lauren had also brought along a lovely stash of Tim Holtz stamps and some yummy mica powders, both of which I found far too attractive to resist!

I didn't quite finish mine over the weekend as I knew I had a few bits and pieces at home that I wanted to include in the design.  So, after a few days at home, I can reveal the finished item......

I primed the canvas with Gesso and used a couple of colours of Distress Ink around the edges and to stamp some of the fabby TH stamps.  I particularly love the 'drippy' butterfly which I stamped with DI then added some really yummy coloured bright orange mica powder over the top to give it a nice sheen.

The flowers were created using three different sizes from an Elusive Images set of stamps, stamped on various muted shades of card and cut out.  The sentiment was stamped on an additional scrap of canvas (thanks Lauren!) and the edges distressed with DI before attaching with Glossy Accents to the main canvas.

The lovely sparkly brad in the centre of the largest flower was part of Kathy's stash, but she selflessly donated it towards the project!  I painted some Rock Candy crackle glaze paint over the sentiment stamped scrap of canvas, but discovered that it doesn't crackle on this medium.  Oh well, we learn by experimentation!  I also added the crackle glaze to all the flowers, followed by a little Distress Stickles in Brushed Corduroy.

The gold half beads were from my stash and I added a piece of stripey ribbon which Kathy had kindly given to me, along with a piece of gold ric rac braid.  Finally, I used some gold UTEE on a couple of the corners, melted with a heat gun til just liquid.

My first stretched canvas project and I have to say I am pleased with it and will try another soon I think.

Thanks for dropping by my blog today, hope you've enjoyed your visit.

hugs
wynneth
x

Friday 20 August 2010

Gift Boxes

Last weekend myself and a couple of my crafting pals had a fabulous get together in Bristol.  The whole weekend was spent admiring each others' stash, craft shopping and even a little crafting!  My pal Kathy generously allowed us to use her home as our crafting venue and her amazing hubby kept us well fed with his amazing culinary skills!

I decided I wanted to give both my pals a small gift as a little memento of the weekend and decided to make bracelets for each of them, using beads in their favourite colours - purple and pink for Kathy and blue and pink for Lauren.  To package the bracelets I made a couple of pizza boxes and added these cute Penny Black hedgehog images, coloured with Promarkers, to the fronts of the boxes, layering them up on red card cut using a scalloped square nestabilities die.

Both the girls loved their gifts, so I guess it was a good idea of mine.

We had such a great time, it has taken me almost the whole of this week to come back down to earth and cope with the demands of 'real' life!  We are hoping to do it all again some time soon, I can't wait.  Tomorrow I'll show you the canvas I started at Kathy's and finished at home.  It was fun to create something a little different for a change.

hugs
wynneth
x

Thursday 19 August 2010

Chinese Tilda


When this gorgeous new magnolia stamp arrived in the post, I just couldn't wait to get my Chinese Tilda inked up, she's just so adorable.  Last week on the Craft Mad and Loving It group on Craftbubble the sketchie challenge included creating your own background papers.  I've had this fibre material in my stash for absolutely ages - I think it was made from banana leaves, but can't be completely certain after such a long time!  Suffice it to say that it is very interesting material to work with! 

I spritzed the fibre with glimmer mists and cut out a piece to fit my base card but maintaining the natural shaped edge at the bottom.  I added the fibre layer to a plain white 5x5 card as I wanted to keep the design as 'clean' as possible so that the hand made background and the image were more prominent.  I coloured the image with Copics, although I only have a very few colours to work with as I mostly use Promarkers.  The sentiment is from a set of clear stamps by Kanban and I thought it worked well with this image and layout.  I added  a piece of scrappers' floss which matched the colour palette I've used and attached it with staples.  I then punched out a large retro flower and a smaller one from white card and coloured to match the image with Copics.  The small mauve/beige half pearl just finishes off the flower perfectly I think. 

Thanks for dropping by my blog, I hope you've enjoyed today's project.  That's all from me, so until I see you again - Happy Crafting!
hugs
wynneth
x

Tuesday 17 August 2010

I ♥ Promarkers Challenge #28 - beside the seaside, beside the sea....

Happy wednesday, hope you're having a great day.  Every wednesday there's a new challenge starting over on I ♥ Promarkers.  For each challenge, myself and the rest of the DT do our best to create inspirational projects to share with you, this week we have a seaside theme which, as you will see from the DT cards, can be interpretted in a multitude of ways!  Our prize sponsor for this week's challenge is Simon Says Stamp and the winner gets $15 to spend in the store - how fantastic is that?!

I decided not to go with 'cute' for my card this week, choosing this mermaid stamp from Queen Kat Designs for the background image and the lovely shell frame from I Brake for Stamps for the top layer.  I created an aperture by cutting out the centre of the shell image, although it isn't easy to see the two layers in the photograph, but is was the best shot I could get - sorry!  I used Distress Inks to colour plain white card in sea and sand colours on the top layer and Promarkers to colour all the images.  There are touches of Spica Glitter pen and Glossy Accents on parts of the images, but again these don't show up too well in the piccie.

I do hope you'll enter the challenge this week, we do love to visit all your blogs to see your entries and leave you a little 'lurve' !!

Thanks for stopping by my blog today.
hugs
wynneth
x


Monday 16 August 2010

Lovely Lani

Every Tuesday, Queen Kat Designs run a Blog Hop and I showcase my DT project on the Whimsical Ink Sorority Blog as part of the Hop - if you'd like to join in, just start here and follow the links.  I also like to share my projects on here with my regular visitors. 

This week we are working with a beautiful colour combo, I love these luscious colours - Rose, Butter and Melon - mmmm..... my mouth is watering just thinking about them !!! These lovely pastel shades are so gentle and easy on the eye and a true pleasure to work with.

When planning my project I selected the colours and also took inspiration from the pictures on the left, I just love the rose bouquet at the top left so decided to have a posy of roses on my card.

It is nice to bring out some of the stamps which have been around for a while, instead of using new releases and I felt the lovely Lani Mermaid was just perfect for my project.

I coloured Lani with Copics and Promarkers, addubg touches of Spica Glitter Pen here and there. I used a plain oval nestabilities die to cut out the image and added this over a layer of buttery cream coloured card cut with a scalloped oval die. I then added Frosted Lace Stickles around the edge of the plain oval layer.

The pink background paper was from my stash and I embosed a piece of melon coloured card with a Koi Pool Cuttlebug embossing folder - you can just about see the Koi swimming around under the image layer. The sentiment is from the QKD August WIS kit and I again used the Stickles around the edge of the sentiment layer.

The leaf fronds were cut with a Martha Stewart punch and the tiny pink and white roses were from my stash. The wired gems are by Magnolia and the pink ribbon is from my stash.

I hope you enjoyed today's project and that you'll drop by again soon, til then - Happy Crafting!
hugs
wynneth
x

Sunday 15 August 2010

Birthday Boy

Today's card is the last in the set I made as part of my friend's birthday gift.  I thought I should include one card which is appropriate as a man's or a boy's card and this little hAnglar & stAnglar chap is ideal.  I coloured him with Promarkers and cut him out using a nestabilities die and mounted the image layer on another one, cut from the background paper, using a slightly larger die from the same set.  The background papers are from the DCWV Nanna's Kitchen pad, the button was in my stash and I coloured some white crochet cotton with a Promarker to match the colour theme and threaded it through the button before tying in a knot.  I used the same Promarker to edge around all the layers to give them just a little more definition and tie the whole thing together.  The Happy Birthday sentiment is from a Papermania set of clear sentiment stamps and I added a line of Stardust Stickles down the join between the two bottom layer of background paper, although most of it is covered by the image and sentiment.

I do hope you've enjoyed seeing all the cards in this set over the past few days, they were fun to make and it was very refreshing to create a few more simple layouts without adding lots of embelishments and bling!  My friend was delighted with her gift and I know she will use all the cards in no time, at least I can top up her stock when she needs more!

That's me done chatting for now, so til your next visit - Happy Crafting!
hugs
wynneth
x

Saturday 14 August 2010

Sending a little TLC

Happy sunday to you, nice of you to take the time to visit my little blog today :o)  Today's card is another of the set I made as part of my friend's birthday gift.  This cute image is from The Greetings Farm (thanks Kathy and Lauren!)
I coloured her with Promarkers and added Rock Candy Stickles on the bubbles in her bath to give them some texture.  I added Distress Ink around the edges of the image layer and the background papers are from the 6x6 Sweet Nothings pad by Papermania.  The flower was cut with a Martha Stewart punch and I added some pearly doodles in the centre after adding it with Pinflair glue.  The sentiment is from a Kanban set of clear stamps and I thought this card could be used to send get well wishes, birthday wishes or any other occasion when a little TLC is wished for the recipient.

I'll be sharing another one of this set of cards with you tomorrow, I do hope you'll drop by again then.  Sadly my crafty weekend away with the girls in Bristol ends today and I shall be heading back to the southwest later on.
hugs
wynneth
x

Friday 13 August 2010

Just a Note.....

Here's the third of the set of cards I made as part of my friend's birthday gift. I love this elegant Sugar Nellie stamp, especially the wiggly bits (technical term!) at bottom left and top right of the image border.

I coloured her with Promarkers and added little touches of Spica Glitter Pen. The background paper is from my stash and I added a length of the lovely sparkly green ribbon I got recently at Just Tracy's Crafts. The sentiment is from a set of clear stamps sentiments from Papermania. I thought this would leave the card open to be used for many different occasions as I left the inside blank. That's it, a very simple layout with only two layers and not too much bling!

Thanks for visiting today, I'll be sharing another from this set of cards with you tomorrow. I've autoposted the cards for yesterday, today and tomorrow as I will be having a ball with my crafting pals Kathy and Lauren in Bristol - a whole weekend of girly fun, chat and shopping, total bliss!! Kathy's hubby is spoiling us tonight with a lovely meal he is preparing himself - what a treasure!

I hope these postings appear on time, but I will be checking to make sure.  I do hope you're having a fun weekend too, til I see you again - Happy Crafting!
hugs
wynneth
x

Thursday 12 August 2010

Keep in Touch!

Hi there and welcome to my blog today, I hope you are having a good one.  I am working today, but would much rather be at home crafting!  Yesterday I shared a little card with you that I created as part of the birthday gift for a dear friend.  It is actually her birthday today and so I will have delivered her pressie and card by the time this is live on here.

This little cutie and the sentiment are from a set of clear stamps by Kanban which my pal Annie got from Funky Kits and kindly allowed me to stamp up when we had our crafty session last monday - thanks again Annie!  I did enjoy colouring her with my Promarkers and will be ordering the set for myself as it has some lovely sentiments as well as cute images on the sheet.  The background papers are from the 6x6 pad by My Minds Eye that was a free gift with a magazine this month, I love the pretty floral paper especially.  The gems are from my stash and I added clear Rock Candy Stickles around the edges of the image and sentiment layers for a little extra bling.  The little flower had been sitting on my desk for a while after I cut it out with a Marianne's Designs die and I added a tiny matching gem in the centre before attaching it with Pinflair glue. 

That's it for today folks, tomorrow I'm heading up to Bristol to spend a fabulous crafty and chatty weekend with two of my best crafting pals - I just know we'll have a ball and will most likely spend much of the time giggling and chatting rather than crafting.  I promise to share piccies of any crafty creations when I get home.

hugs
wynneth
x

Wednesday 11 August 2010

Make a Special Birthday Wish


It's so nice that you've taken the time to visit my blog today, I really appreciate my visitors and Followers.

Today's project is a little card which I've made to go into the birthday gift I've made for a dear friend.  I made this stationery box (on the right) a couple of weeks ago and wanted to put a few cards into it so she has a little stock of cards for different occasions in hand.

Here's a view of the inside (on left), I've put the cards I've made into the space at the back where there are plain white cards in the picture.  I've also popped a book of postage stamps into the little pocket on bottom left, so she'll be all set to send out the cards.

Today's card has just a simple layout and I used this lovely little image that I received in a RAK recently, no fancy shaped layers, just cut out with my trimmer.  I don't know the manufacturer of the stamp and would love it if any of you could tell me who it's by!  I coloured her with Promarkers and added a little Spica Glitter Pen and Glossy Accents.  The background papers were hanging around in my stash, as were the pale blue half pearls.  The sentiment is from a set of clear stamps by Kanban which are available through Funky Kits and which my pal Annie allowed me to stamp up when we had our crafty afternoon last monday - thanks Annie!

I hope you've enjoyed seeing my card today, I'll be showing you the others in the coming days so I hope to see you again soon.
hugs
wynneth
x

Just had to tell you about this Fabulous Candy!

Amy is a crafter who makes LOTS of cards and she keeps track of how many too!  Impressed?  Bet you'll be even more impressed by the fact that this week she cut into her 1000 th piece of patterned paper since she started making cards - now that's impressive!   To celebrate this milestone, she's put together some awesome Candy and there'll be lots of winners.  For those of you wondering what 1000 sheets of paper looks like.....

I'm sure lots of us have piles at least as big as this tucked away - I know I do!  However, I am always wanting to add to my paper stash.  In addition to 200 sheets of paper, Amy is also including stamps and other goodies in each set of Candy.

How can you be in with a chance to win?  Just post about this Candy on your own blog and then leave a message for Amy on her blog - Simples!

Good Luck everyone.
hugs
wynneth
x

Tuesday 10 August 2010

I ♥ Promarkers Challenge #27 - use acetate on your projects

This week's challenge on I ♥ Promarkers is to use acetate on your project and our prize this week is sponsored by Digital Delights.

For my project I selected the adorable 'Penny & Bear' digi image from Digital Delights and decided to make a Christmas Card.  This year is running away so fast and it will be Christmas before we know it, so I thought I'd better start getting a few christmas cards made !! 

I used a circle of acetate edged with a border to create a 'spotlight' effect on the image, colouring only the part of the image which shows through the acetate 'window'.  The acetate and border were cut using a set of plain circle nestabilities dies. The image was coloured with Promarkers and I added Stardust Stickles around the edge of the frame and the sentiment layer.  The tartan paper has been in my stash forever and the green striped paper was from the 10p bargain box at my local Art Shop.  The lovely green glittery organza ribbon I bought from Just Tracy's Crafts while I was there for the demo last saturday - at just 20p per metre I think it was quite a bargain.  I decided to use a simple layout so that the spotlighted area is emphasised more.

I do hope you'll enter the challenge this week, myself and the other members of the DT love to visit your blogs to check out your work and leave comments - this is just one of the fun duties of being on a DT!

That's all from me today, until next time - Happy Crafting!
hugs
wynneth
x

Monday 9 August 2010

Princess of Callas

Here we are, the second tuesday in August already - where did last week run to?   My regular visitors will know that I post a project every tuesday on the Queen Kat Designs Whimsical Ink Sorority blog as part of the weekly Blog Hop by the DT.  The card I'm sharing with you today is the one I created for this week's Hop, if you'd like to join in with the Hop just start here and follow the links.


We are working with another great sketch and I am again using the fabulous August WIS Kit stamps.

This gorgeous girl is called 'Princess of Callas' and she sits so regally in her watery domain, holding her trident wrapped in gems and wearing her crown.

I recently acquired some of the amazing Microbeadz and thought they would be just fabulous used on my project this week - what do you think?

I coloured the image with Promarkers and Copics and then added two different colours of Microbeadz with Glossy Accents to her tail and top. I also added clear Microbeadz on her crown and the bubbles around her. The Microbeadz certainly give you a completely different finish and look to a project. I don't think the full effect can be seen in a photograph but I did the best I could!

I added a small punched shell, embellished with a half pearl bead and used the 'Heart of Gold' sentiment from the kit . I punched out the lefthand strip with a border punch and added half pearls to tie in with the sketch layout. The sparkly green/blue ric rac ribbon was from my stash and the background paper is part of a 12x12 sheet I recently picked up for 10p at my local Art Shop.

Thanks for visiting today and until next time - Happy Crafting!
hugs
wynneth
x

Sunday 8 August 2010

Demo Day at Just Tracy's Crafts

There was a treat in store for all the customers at Just Tracy's Crafts in Plympton on saturday 7 August.  Dulcie Jackson the owner of Wild Rose Studios and designer of Milton & Co was demonstrating her colouring techniques using Promarkers and her stamps.

The picture shows Dulcie in the centre, with me behind on her right, then Tracy and Karen from the Store next to me, with another customer on the far right.

There were certainly lots of people there so I think it was a very successful event for Tracy and Karen and their new shop.  I am so pleased that they are doing well and it is nice to have such a well stocked local craft store in the area.

The picture on the right shows the shop from a different angle and some of the lovely items they have in stock.  They also have an on-line store and the website gives details of all the forthcoming workshops and events they have planned.


Thanks for dropping by today, hope to see you again soon.
hugs
wynneth
x

Friday 6 August 2010

Bloom where you're planted


Today's project is my entry for this last week's sketchie challenge over on the Craft Mad and Loving It group on Craftbubble.  We had a sketch to work with and the theme of 'Bloom where you're planted'. 

I decided to use these adorable hAnglar & stAnglar stamps and coloured them with Promarkers.  The background papers are from the Papermania Sunshine Paper Pack by Tina Higgins.  The three buttons are from the same range and so match perfectly with the papers.  The narrow ribbon was from my stash.

There'll be a new challenge in the morning, I wonder what the theme will be for next week.

Thanks for dropping by, I hope you enjoyed your visit. 

hugs
wynneth
x

Tuesday 3 August 2010

I ♥ Promarkers Challenge #26 - sketch

This week's challenge on I ♥ Promarkers includes a sketch created by 'yours truly' and I added the twist of allowing no more than 3 colours in your project.  It is the first time I have set a challenge since joining the DT a few months ago, so I am nervously awaiting your reaction!  This week's prize is sponsored by Joanna Sheen, a great reason for entering this week as she has so many goodies in her on-line store!

I decided to use this delightful image from hAnglar & stAnglar for my DT card this week.  I think she is such a cutie and I coloured her in shades of green and pink to match the background papers I used.  The papers are from My Mind's Eye and the 6x6 pad was a free gift with a craft magazine recently.  For the corner elements I used small flowers punched from a scrap of the pink dotty paper, with a pink gem added to the centre of each.  Although it isn't showing up in the photo, I added hand doodled swirls extending from the two outside flowers with a Spica Glitter Pen in green, then added Stickles over the top for extra bling.  The dotty doodles around the edges of all layers were done with Spica pens and more Stickles added around the edge of the oval image layer - sadly, none of this seems to be visible in the photo.

I do hope you'll enter the challenge this week, myself and the rest of the DT love visiting your blogs to view your work and with a great prize on offer, it's well worth entering.  Happy Crafting!
hugs
wynneth
x

Monday 2 August 2010

Queen of the Sea

It is always great to go on holiday, but do you - like me - find that it's also lovely to be home again?  I know that I really miss my crafting when I go away and I didn't even have internet access on my recent break in Spain and I had to hope that all the pre-scheduled posts I had put up here came on line at the correct times.  I think it all worked quite well and I do thank those of you who visited (and especially those who left me comments!) while I was away.  I really appreciate all my Followers and visitors who haven't yet become followers, thank you all so much.

So, for my first card since getting home, I had to get straight back into my DT work for Queen Kat Designs to be ready for today's blog hop with my post on the Whimsical Ink Sorority blog.  As this is the first week in the month of August, it means there are some newly released stamps to show you and I am lucky this month to have the August WIS Kit stamps to work with, and boy is this a fabulous kit. I honestly do think that Maigan Lynn has excelled herself with her designs for the kit this month, it is just so awesome!!!  If you'd like to see the other new stamps for August, why not do the blog hop yourself, just start here and follow the links.

The first week of each month also means we have a sketch to inspire us. I really enjoyed working with today's sketch as it is very 'clean' and neat.

Why not have a go at creating your own project using this sketch as inspiration for the layout. I think it would work well for cards, scrap book layouts, ATCs etc, etc. Just leave me a comment under this post, including a link to your project, and I'll hop over and take a look. I really love seeing what everyone is busy creating!

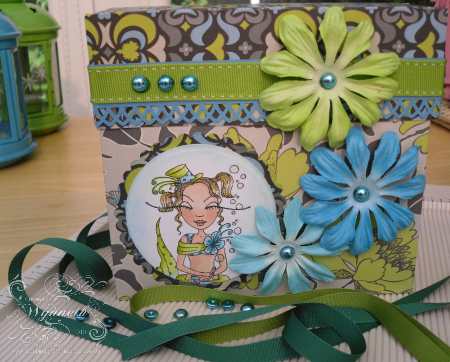
My project for this week is a card, and I wanted to keep the whole thing very simple so as not to take away anything from the beauty of this fabulous image. I didn't include the bows on the sketch as I felt they would be too 'fussy' for the effect I wanted to create.

I coloured her with Promarkers and added Spica glitter pen and Glossy Accents to highlight and emphasise elements such as her crown and the bubbles in the background. The lovely sparkly ric-rac ribbon was in my stash and the background papers are from the Oriental Spice 6x6 pad from Papermania. I used the lovely swirly lily stamp from the kit, stamped with Bundled Sage Distress Ink, on the layer under the image to create a matching background.

Ok, that's me done, thanks so much for stopping by today, hope to see you again soon.  Leave me a comment to let me know what you think of this amazing new WIS Kit and my project and don't forget to include a link to your own projects following today's sketch, I do promise to come by your blog and check out your creations. Happy Crafting!
hugs
wynneth
x