Friday 29 November 2013

A Stitch in Time....

.....well, in time for Christmas at least ! 

Happy Friday Bloggers, how's your day shaping up so far ?  Yet again, here in my bit of Cornwall the day has dawned dark and dismal, although at least it is dry and not really cold.  As I've said before, I hate these dark days and find them so depressing - the solution ? - do something crafty and preferably with bright colours !

As you have probably guessed from my post title, today's project is a quilted one.  I've finished another table runner, this time in rich lush blues, creams and golds.  Here's a close up shot of the runner folded.

 
... and here's a shot of the whole thing - beautifully modelled by my trusty quilt holder !


I've used my favourite 'disappearing nine-patch' design for this runner, I love how all the tiny pieces fit together to create each unique design. 
 
That's it from me for today, I've more sewing to do and a few more Christmas cards to finish off.  I'm all prepared for tomorrow's Craft Fair so can concentrate on other projects which need attention. 
 
I'll have another sewing project to share with you in my next post on here.  It's a home décor item and I can't wait to have it displayed alongside our other Christmas decorations when we begin making the house more festive in readiness for the Holidays.
 
Have a great day whatever you have planned and thanks so much for taking the time to drop by here to check on what I've been doing today.

Thursday 28 November 2013

Anythings Goes - and it's not a Christmas Card !

Happy Thursday Folks, it's time for a new challenge over on the Cute Card Thursday Blog.  This week there is no particular theme, just 'Anything Goes' so feel free to create whatever you wish for your entry.  Our prize sponsor this week is Rick St Denis - do go checkout his amazing digi-images especially if you're looking for something a bit 'different' it's well worth a visit. 

For my DT card this week I've used one of Rick's fabulous images, this one is called Chin Chin - isn't she a cutie ?


I haven't made an oriental style card in such a long time, but when I saw this image in Rick's shop, it encouraged me to dig out my box of oriental bits and pieces and I found some stickers and papers that, to be honest, I'd forgotten were there. 

Firstly I coloured Chin Chin with my Copics and added a touch of pink Stickles on her shoes and the tassels and pom-pom on her hat, then fussy cut her out.

I created the frame using some of the stickers from my stash and embossed a piece of rich gold cardstock using a bamboo design embossing folder.  I set this embossed panel in the centre of the frame then attached the Chin Chin image.  You can just see a bit of the bamboo in top left corner.

The flowers were from my stash and are, I believe, from Orchid Crafts.  Using some Marianne's dies I cut out various fronds of greenery to attach under the flowers.

That's it, a nice simple card to pull together but I'm pleased with the final result.

Thanks for dropping by to check out my project, you can see the fabulous work by the DT by popping over to the CCT blog.  Happy Crafting !

Wednesday 27 November 2013

Christmas Wreath

Good morning Bloggers, how's your day panning out ?  Here in my bit of Cornwall the day dawned dark and dismal, but it's a tad warmer than of late and at least it's dry - well not actually raining although it is damp.  I don't know about you but I find this type of weather very depressing, makes me want to turn on all the lights and do something nice like crafting or baking to fill the house with warm and delicious aromas !  What do you do on a dark and dismal day to cheer yourself up ? 

I'm still slogging away making Christmas cards and today I'm sharing another one of my designs with you (I am now getting close to having enough finished cards for my needs I think, must do a recount of my stock)


I have made a batch of cards using this design, however it is a small batch as the design has lots of elements and it quite time-consuming !  Made just 6 of this particular design, although I had planned to make 10. 

Firstly I cut out the twiggy circle using a Memory Box die, then cut out both the large and small Ivy corners using a set of Marianne's dies  - you can see these at top and bottom of the wreath.

I then created the poinsettias using a Nellie Snellen punch and emboss set and SU! Cherry Cobbler and Garden Green cardstock.  I built up the flowers with a green layer and two red layers, finishing off by adding a gold centre using a Waco Pearlmaker Pen.  These do require a longish period of drying time or the pearl centre squashes flat when stacked with other cards or mailed out.  This all added to the timescale for completing this particular batch of cards.

The fronds at each side of the flowers were punched from more of the Garden Green card and, sadly, whilst punching these out, my lovely (but very old) Martha Stewart punch broke into pieces Noooooo !  I use this particular punch a lot and just had to set about finding a replacement immediately.  After an online search I discovered one for sale on Ebay - unfortunately it is from the USA but the shipping costs weren't that bad.  Fingers crossed it will wing it's way to me quickly as I feel bereft without it !  Such a pity that I couldn't source one from a UK supplier as I do prefer to buy from British retailers whenever I can. 

Finally, the sentiment in the centre was created using a Little Claire's stamp and SU! Cherry Cobbler ink, then cut out using a nestie which is the perfect fit.  The Merry Christmas at the bottom was stamped using a stamp from the Stampers Anonymous Tim Holtz Alterations Blueprint Snowman stamp and die set. 

Once again, a card with no Stickles on the design, however did that happen !! 

Thanks for dropping by today, hope you've enjoyed your visit and that you'll be back again real soon.


Monday 25 November 2013

Bird on a Wreath

Happy Monday dear Bloggers, I have a sunny and fairly warm day here in my bit of Cornwall, hope you have nice weather wherever you are.

Over the past couple of days I've been batch-making lots of Christmas cards as I'm attending a Christmas Fair at a local Nursing Home next Saturday.  I'll share some pix of my makes over the next couple of days.

Meanwhile, here's today's project


For the design I've used the Memory Box twiggy wreath die to cut some SU! Early Espresso cardstock to make the wreath. 

The poinsettias were created using a set of Nellie Snellen punch and emboss punches and a gold Waco Pearl Pen to make the centres. 

The fronds were cut using a Marianne's die and the bird was first stamped on SU! Cherry Cobbler cardstock with Memento Tuxedo Black ink, then cut out using the matching SU! punch.

I stamped the sentiment using SU! Raspberry Ripple ink and a Little Claire's stamp which I love as Peace, Love, Hope and Joy are what I believe Christmas should be all about.

I hope you've enjoyed your visit today and my project.  As this week's challenge on Simply Less is More is to use a bird, I think I'll submit this as my second entry for this week. 

Sunday 24 November 2013

Finished 12 Days of Christmas Project

Happy Sunday Folks, hope you're enjoying a fabulous weekend. 

If you have been reading my posts over the past few days, you'll know that I spent a wonderful weekend with crafting pals, which included a Workshop at Snazzy's in Swindon.  In the Workshop we were creating a '12 Days of Christmas' house.  I did share pix earlier of the progress on my house by the end of the day - not quite completed.  Since getting home I've finished it off and, as promised, here's some pix of the finished project.

The whole house
 
Top

 
Middle Floor

 
Bottom floor

 
Middle left

 
Middle Right

 
Middle Left Lower

 
Middle Bottom Box

 
Bottom Right Box


I continued using the stickers and card we received in the kit, plus some of the shrink plastic 12 days stamped images I made at Snazzy's.  The lace at the bottom was from my stash and I raided my DH's model train 'bits and bobs' box and snaffled a tree that was just the perfect size to fit into one of the boxes.  To go with the tree I made some tiny 'gifts' from air dry clay, a little gold pen to add 'ribbon' and then attached next to the tree.   The tiny glass bottles are filled with embossing powder and the '8 Maids a Milking' spilled milk bottle was created by dripping a little white acrylic paint inside and allowing it to settle - this was included in the kit.  I created the little poinsettias using a Nellie Snellen punch and emboss set and finished them off with a gold Waco Pearl Pen.

In case you're wondering and/or have inspected all the boxes closely to check, all 12 days are included within the items used, some days more than once ! 

I'm really pleased with my finished house and so glad I did this workshop. Do you enjoy this type of project ?  I had a great time and it's inspired me to attempt more altered art and 3D projects. 

I do hope you've enjoyed your visit to check on today's project.  Have a great day !

Saturday 23 November 2013

Two Turtle Doves... and a Robin in a Pear Tree ? !!

Morning Folks.  Intrigued by my Post title ?  Well then, I'd better explain myself.

I recently bought a lovely set of  stamp and matching dies by Poppy Stamps, which I think is meant to be a Partridge in a Pear Tree.  Now, I'm a little ornithologically challenged and wasn't sure what a partridge looks like, so here's a batch of cards I made.....


I coloured some of the birds as Robins, plus a few as Red Cardinals - these are to send to friends and family in the USA as I believe they don't have robins over there (please feel free to correct me if I'm wrong !).

I coloured the stamped wreath and bird image using ProMarkers before cutting out using the matching dies.  I then cut squares of white card and stamped a large snowflake image in the centre(huge apologies but I can't remember which stamp it was, if I come across it again I'll amend this post with the manufacturer details) and attached the wreath diecut over the top.  I then attached these layers over a very slightly larger mat cut from SU! Cherry Cobbler cardstock, to give a thin red line around the image layer.

Finally, I added the sentiment at the bottom using a Clarity stamp and SU! Cherry Cobbler ink.  I haven't added any glitter or Stickles to this batch of cards - I know that's unusual for me as I do so love a bit of bling - but I just didn't feel the design needed it.  What do you think ?  Should I add some bling or not ?

Thanks for dropping by today, great to 'see' you.  Have a wonderful day !

Friday 22 November 2013

Designer Paper and a Fabby Stamp

Good morning Folks, it's almost the weekend, got any exciting plans ?  I'll bet you are like me and will be fitting in at least a little crafting time.  I'm beavering away at making Christmas cards in every spare moment and today's project is - you've guessed it - a small batch of cards.


... and here's a close up shot of one of the cards


Whilst visiting my pal Kathy for a crafting weekend last week, she allowed me to stamp up some images from her newly-acquired JOFY gift box stamp.  Whilst not specifically a Christmas image, coloured in festive shades, it looks great on a Christmas design.  It was lovely to just sit and colour these images whilst chatting with my pal.

Once home, I decided to use the images after fussy cutting them out, to make a small batch of Christmas cards.  This week's theme on the Simply Less is More Challenge Blog is to 'use Designer Paper in a CAS way' so I'm going to submit this batch of cards as my second entry this week.

The image was coloured with ProMarkers and the Designer Paper is from SU!  I used a corner rounder on the one edge.  The sentiment is from Clarity Stamps and is stamped using SU! Cherry Cobbler ink.

That's it from me today, I'm busy, busy, busy getting my festive preparations underway - cardmaking, sewing, gift buying, food planning etc.  Have a great day whatever you have planned.

Thursday 21 November 2013

Anything But a Card

Whoa !  it's Thursday again and we are hurtling at breakneck speed towards Christmas !  I'm only mildly panicking at the moment, my To Do list is huge, but I am working my way through it, crossing off some of the items.  The gift shopping/making is coming along nicely, but I'm sadly behind with making my cards.  Guess that means you'll be seeing quite a lot of Christmas themed projects on here for a while then ! 

Anyway, back to the main reason for today's post, as it's Thursday we have a new challenge starting over on the Cute Card Thursday Challenge Blog.  This week our theme is 'Anything But a Card' and our prize is sponsored this week by Whimsy Stamps.

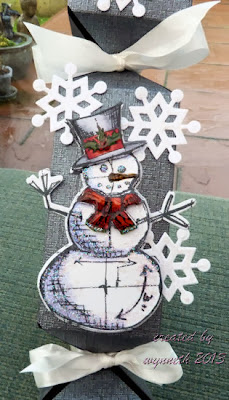
For my DT project I decided to make a festive cracker for on the table on the Big Day (need to get another 3 made to go with this one).  It wasn't easy to photograph so I've included pix from different angles to give you a better chance to see it more as it looks IRL.

The whole thing


Standing on end


Close up shot


I had this very nice pewter coloured 12 x 12 cardstock in my stash and used the measurements and notes I'd jotted down when I came across an online tutorial for making a cracker.  I must apologise but I'm unable to give credit for the tutorial as I've been unable to locate it again and had to work from my scrappy notes.  I'd be more than happy if one of my Readers could give me the link so that I may give due credit for this.

The image is from a set of stamps and matching dies from the Sizzix Tim Holtz Alterations range.  I adore the TH blueprints stamps and have this one in the mini size which I use all the time for tags and smaller cards.  When I discovered that Sizzix had brought out the larger stamp with matching dies I just had to have both this one and the blueprint tree sets - so much for my resolution to absolutely not purchase any more Christmas stamps to add to my huge collection - ah well, I'm guessing that many of you will understand how weak I am when my eye alights on a 'must have' item !  What are we avid stampers like eh ?

I did minimum colouring on the image before cutting it out, stamping and diecutting three times so that I could decoupage different bits. The body has only two layers but hat and scarf have three.  I used Copics to add the touches of colour, lots of Stardust Stickles on his body and the snowflakes and Glossy Accents on hat trim and scarf - but as always, the sparkle of the Stickles just isn't showing up in the pic.  If anyone can give me some tips on how to photograph glittered items, please do so, I'd appreciate it.  The snowflakes were diecut using a Marianne's die.

The lovely white silk ribbon tied around the ends was from my stash and came as a small gift in a birthday card from a lovely pal.

Do go over to check out the fabulous creations from the rest of the Awesome DT over on the CCT Blog, you won't be disappointed, I assure you.

Thanks for dropping by here today, it's lovely to have you visit, leave me a comment if you have the time, I just love reading what everyone thinks of my creations.

Have a great day, whatever you have planned.  I'm off out for lunch with pals today - Yay ! 

Wednesday 20 November 2013

Using Designer Paper in a CAS Way !

We're back to dark, dull and damp weather here in my bit of Cornwall today - hmph !  I do so hate these dark days of November, find them sooo depressing and with such bad light it makes it more difficult to see to colour images well.  I'm generally a 'warm soul' but it seems that the dampness seeps right into me when it's also cold and makes me feel pretty bleugh !  Anyway, enough of my moaning, I'm sure that the sun is shining somewhere and making everyone feel happy.

Today I'm sharing with you a card I made to enter this week's Simply Less is More Challenge.  We are asked this week to use Designer Paper in a CAS way.  Here's my creation


I used one of the dies from the SU! Framelets Holiday Ornaments set and a scrap of SU! Christmas patterned paper.  This is one of those 'happy accidents' that happen as I did cut out the bauble from the other side of this yummy paper which was green and cream.  However, when I turned it over I loved how the lacy pattern was perfectly placed on the shape so decided to use the brown and cream  side as I love the combination with the red ink of the sentiment. 

The sentiment is from Clarity Stamps and I used SU! Cherry Cobbler ink to stamp it direct onto the base card. 

I found a little scrap of tiny ric rac ribbon in my stash, attached a short length to the top of the bauble and a longer length hanging down from the top of the card to look like the bauble is suspended.

The final touch was to add a little Stardust Stickles - I used this rather than another colour as it's translucent and doesn't hide the pattern on the paper but gives a little added sparkle - well it is a Christmas Bauble !

As I've been busy making a couple of batches of cards this morning, one of the designs fits right in with this theme, so I'll be sharing that project with you another day and if I'm in time, will enter a second card for this week's challenge. 

Have a wonderful crafty day !

Tuesday 19 November 2013

A bit of sewing and a great weekend

Happy Tuesday Bloggers, I hope you have a lovely sunny day as I have here in my little bit of Cornwall. 

Warning, today's post is very picture heavy so you might want to get yourself a coffee and make yourself comfortable before you start reading !

Firstly I'm sharing with you pix of a quilted Christmas table runner I made for my pal Kathy, as I was seeing her last weekend, I needed to get sewing last week to finish it in time.  Here's how it turned out


.... apologies for the poor quality of the pictures, I took them in a hurry and foolishly didn't check them before wrapping up the runner and leaving home with it. 
 
I used a 'disappearing nine patch' design, which is one of my favourites as you just never know how it's going to look until all the fabric pieces are sewn together, it's such a great technique.  For the quilting I stitched 'in the ditch'.  Kathy was really pleased with it (phew!) and in a few short weeks it will be resplendent on her festive table on the Big Day !
 
As I said earlier, I left home on friday morning for a crafting weekend with Kathy and a couple of other pals.  Kathy and I had Friday afternoon to craft so we started on decorating a couple of 'printers trays' which I'd had in my stash for quite some time but never got around to doing anything with.  On Friday all we had time for was sticking each of the layers together and applying a few thin coats of gesso to prepare it.  I opted for the house shaped printer tray
 
 
We had the chance for a little more crafting on sunday morning before I headed home again and we managed some progress on our projects. Here's mine with patterned paper and gold leaf paint applied - it's such pretty paper I decided not to cover it up with stamped images but plan to add metal charms, lace and other pretty embellies that I'm sure are languishing in my stash (you can just see that I've added some 'ROXS', which Kathy had in her stash in the bottom right hand section, attached using Glossy Accents.  I'll share pix of the finished item once it's all done.


Kathy opted for the round printer tray, shown here in it's 'naked' form ready for decoration, and as Kathy crafts at the speed of light she, of course, finished hers !  It is rather splendid as you can see and so very different from the style of mine - isn't individual Creativity wonderful ?


On saturday we headed out to Swindon to meet up with our two pals Cherry and Lauren for a workshop at Snazzy's.  It was a great opportunity to craft with pals, have some uninterrupted 'Me' time and create something I may not have done on my own at home.  We created a 'Twelve Days of Christmas' decoration using a wooden house-shaped blank with papers and stickers from the awesome Graphic 45 Twelve Days of Christmas range.
 
Here's the sample created by Val of Snazzy's
 
 
The kit of materials


Having Fun - Yay !  (note the essential crafting tools on the left - yummy biskwits)
 
 
.... here I am working hard on my house deep in creative thought !  I'm a standing up crafter.
 
 
Kathy (who crafts at the speed of light) of course finished her project completely and was off shopping in the store whilst I was still working on mine.  I didn't want to rush it and be disappointed with the final result so brought home the rest of the pack of materials and will complete it at home.
 
Here's my project by the end of the workshop - as you can see there is quite a lot still to be done on it but it's coming along and I have plans for each of the empty 'rooms'.
 
 
Congratulations if you've managed to stay with me this far, hope you've enjoyed your visit today, do call back again, it's great to have you visit.
 
Have a wonderful craft-filled day.


Thursday 14 November 2013

So Angelic

Happy Thursday Bloggers, we've got a new challenge starting over on the Cute Card Thursday Blog today.  Our theme for this week is 'So Angelic' and our prize sponsor is Whiff of Joy Stamps.

Angels are perfect images for Christmas cards and as I'm trying to get as many cards made as I can to add to my still inadequate stock of cards for this Christmas I decided to make one as my DT card for this challenge.

 
here's a closer shot of the card
 
 
I couldn't find the stamp I wanted to use for this card but whilst searching for it I found a box of ready stamped images and this sweet angelic Magnolia Tilda image was on the top of the pile.  I coloured her with ProMarkers before fussy cutting her out.  The background paper was a magazine freebie (from last year I think) and the border across the bottom of the paper design was perfect for her to 'sit' on. 

The little heart pendants were cut using a Memory Box die, the snowflakes were cut using various Marianne's dies and the sentiment from Little Claire was stamped with Memento Tuxedo Black ink and cut out using a nestie die. 

I added lots of Stardust Stickles over all the snowflakes, the hearts and Tilda's wings which is twinkling away beautifully IRL but not showing up at all well on the pic... ah well ! 

The finishing touch to the design was some faux blanket stitch drawn with a white pen around the edges (with thanks to my pal Annie - Ink'n'rubba - who gave me the idea for this by using it on her cards).  I think it gives the whole thing a 'homespun' feel and the red/blue colour combo is quite Scandinavian. 

I hope you've enjoyed your visit today, do pop over to the CCT Blog to see the fabulous creations from the rest of the DT and full details of the challenge.  It would be great if you were inspired by our work to enter the challenge yourself.  

Have a great day, whatever you have planned and thanks for dropping by here today to check out my latest project.

Wednesday 13 November 2013

Anything But a Card

Good morning Bloggers and welcome to Wednesday here in my little bit of Blogland.  Sun is shining here today, although there was a very chilly start to the day.  I'm just so happy that it isn't raining, seemed like it was never going to stop !  Hopefully I'll be taking my Dad for a little outing to Looe - mmmm cream tea springs to mind Ha Ha ! 

The November challenge on the Craftbubble II and a half forum I belong to is 'Anything but a card' so today's project is my creation to enter for this challenge.  I decided to make some gift tags using the fabulous Christmas images from the Stampers Anonymous Tim Holtz Collection Mini Blueprint set of stamps - I just adore these images.


Firstly I used the snowman stamp to create a few tags, cutting out the tags with a Marianne's die and SU! Crumbcake cardstock.  I added touches of white ink, red and green ProMarkers and just a little twinkly black with a 'Wink of Stella' pen.  There were more tags than this but I used a couple which you can see in the next pic.


I then went on to make a few more tags, using the same die and more of the Crumbcake cardstock as well as some scraps of red.   I tried stamping some of the images using SU! white ink, embellished with a few gems and added touches of colour on some using ProMarkers.


I'll be making a few more of these in the coming days but thought I'd share what I've done so far and they are just right for entering the challenge.

Thanks for dropping by today, I'm off out for a breath of fresh sea air in Looe now so might be back to add a couple of pix to this post later.  Have a great day whatever you have planned.

Sunday 10 November 2013

Ho ! Ho ! Ho!

Good morning dear Bloggers, the sun is shining on my bit of Cornwall at the moment, but I don't know how long it will last.  I will be watching the Remembrance Service on TV this morning, but then have to knuckle down and work on a sewing project I need to have completed by next weekend.

Today's project is a Christmas card, I've made a few but still have lots more to do. 

I decided on a nice simple design for this card, used the Santa Hat stamp from a set by Recollections - just love this stamp set as there's a fabby Candy Cane and Holly Leaf image in the set too. 
 
I stamped the images with Memento Tuxedo Black ink onto kraft coloured cardstock (I love the different effect you get with colouring on kraft there seems to be much more depth to the colours) coloured them with Promarkers before cutting out. 
 
A little Stardust Stickles on the cuff and bobble to make them sparkle and then attached using Pin Flair Glue to give them dimension - first giving them a little curve by shaping with my fingers. 
 
I hand wrote the Ho ! Ho! Ho ! sentiment as I couldn't find the stamp I wanted to use !  (note to self :  urgently sort out stamp stash).
 
That's it, simple, quick (apart from waiting for Stickles to dry) and I love the finished result.  I'll be making a few more like this one I think.
 
Thanks for dropping by my little bit of Blogland, I do appreciate your continued support.  Have a great day whatever you have planned. 
 
I'm off to find my sewing machine now.